


Ever since the release of the original Resident Evil 4 in 2005, many Resident Evil games have featured hidden, destructible collectibles for players to find and smash to unlock special rewards.
These included the likes of Blue Medallians in Resident Evil 4 (and Clockwork Castellans in the Resident Evil 4 Remake), Mr. Everywhere bobblehead figurines in the Resident Evil 3 Remake, and today's subject - the Goats of Warding in Resident Evil Village.
Now, these goats can be a royal pain to find because of how darkly lit the game's environments are and how devious their hiding spots are.

So, to make your lives easier than ours were finding them, we have documented every location, all 20 Goats of Warding are hiding in. We'll also tell you the secret reward for collecting the Goats of Warding if you need extra incentive to find them yourself.
Warning: This guide will contain spoilers for some events in the game, so proceed with caution.
All 20 Goats of Warding Locations

Here's a map showing where all 20 Goats of Warding are located in Resident Evil Village. You can also keep reading below to get more details on where to find them.
1. Graveyard


The first Goat of Warding location is hard to miss. You'll find the wooden figure proudly displayed in a small wooden altar in the graveyard of the village.
Listen carefully for the wooden clicking sound the Goats of Warding emit. It will make finding the others much easier.
2. Vineyard


In the vineyard outside of the castle walls is a Goat of Warding hidden in the snow. Look for the human scarecrow in the back-right corner to find this one.
3. Church Roof


Shortly after visiting the graveyard for the first time, you'll make your way to a small church.
Inside, you'll notice that distinctive clicking, but the figure is nowhere to be found. Make your way outside and look for this Goat of Warding on the roof.
4. Fallow Plot


In the left corner of Fallow Plot, opposite the tall grass and horrifying werewolves, you'll find a Goat of Warding resting atop a stone wall with wooden shingles.
Just hug the left edge of this area, and you should be able to find it.
5. Castle Distillery


As you're making your way to the castle distillery, look behind you after climbing down the ladder from the Hall of Ablution to find a Goat of Warding tucked in the corner next to some candles.
6. Castle Attic


Tucked away in one of the back corners of the Castle Attic you'll find a Goat of Warding on top of a small stack of crates next to some books.
7. Lone Road


After leaving the castle, you'll make your way down Lone Road to meet up with Duke.
Off to one side will be a small stone building. Go inside, and you will find a Goat of Warding on the floor, hidden in the darkness.
8. Church Graves


Once you've returned to the village from the castle, take the Iron Insignia Key you obtained and unlock the graves behind the church.
In the snow behind one of the large graves, you'll find a Goat of Warding.
9. West Old Town


While making your way through some of the houses in West Old Town you'll find a Goat of Warding on top of a small shingled roof behind one of the larger homes.
10. House Beneviento


Before entering House Beneviento, take a left on the porch and follow a small path along the side of the cliff near the waterfall.
You'll see a Goat of Warding on the other side of the metal fence.
11. Suspension Bridge


After leaving House Beneviento, you'll again cross a rickety suspension bridge.
If you look to your right, you'll see another mostly broken bridge with a Goat of Warding resting upon it.
12. Windmill


When working to deal with Moreau, you'll come to a watery area with a series of windmills.
At the first of these windmills you encounter, hidden behind some chopped wood, is a Goat of Warding.
13. Moreau Chase


When Moreau is chasing you around the buildings, submerged in water, eventually you'll come across a switch covered in green sludge and worms.
From this switch, look to the left, and you will see a Goat of Warding atop a wooden pole.
14. Drained Reservoir


After you've drained the water from the reservoir, you'll find an optional path from the exit of this area that will lead you down to some fish and a Goat of Warding on top of some watery trash.
15. Otto's Mill

Before encountering Heisenberg, you'll notice an optional path from the village to the left that will lead you to Otto's Mill.
Inside is a terrifying enemy, but below this structure, in a wooden altar, is a Goat of Warding.
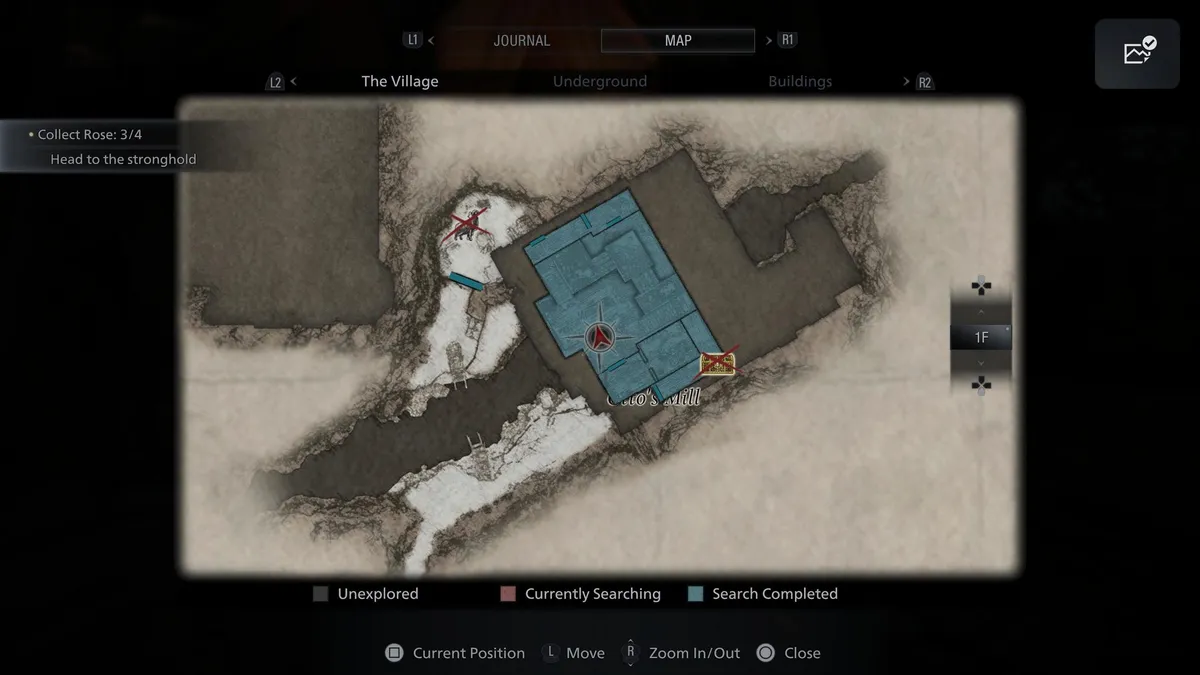
16. Stronghold


In the Stronghold filled with werewolves you'll find a Goat of Warding next to a few metal buckets as you are climbing the central spiral staircase.
17. Grinder Shaft


As you are making your way to the higher levels of the Factory you'll eventually come to Grinder Shaft.
Hidden above you in the clutches of a metal scoop is a Goat of Warding. You'll likely want the sniper rifle for this one.
18. Cargo Bay Control Room


Before making your way into the Cargo Bay of the factory, look for a small metal grate against the wall.
Make your way through this crawl space to find a Goat of Warding on top of a steel barrel.
19. Factory Elevator

After meeting Chris in the basement of the factory, jump into the makeshift tank and take the elevator up to the surface.
Keep your eyes peeled for a Goat of Warding as you make your way up. You'll need to shoot it with the tank's machine gun.
20. Megamycete Statue

When playing as Chris and fighting your way through the village, you'll eventually come to the Megamycete.
To the right of this is an area with some spikes and a statue. The final Goat of Warding will be at the bottom of this statue.
Reap the rewards for finding the Goats of Warding

And there you have every location for all 20 Goats of Warding in Resident Evil Village. Now you're probably wondering what the point of finding all these collectibles is, or even if it's worth the effort.
Well, the rewards I can guarantee are worth the effort because just finding one of these things will unlock the Cynic in-game award, 500 Challenge Points (CP for short), and one RE.NET icon.
If you find all twenty, you will unlock a Heretic award, 16,000 Challenge Points, and another RE.NET icon.
Challenge Points are a special currency that can be used to purchase special items or unlock bonus content from Resident Evil Village's Extra Content Shop (which is available after completing the game once).
You can purchase all kinds of goodies from there, including concept art, 3D models, Special Weapons, Infinite Ammo, and even Mercenaries Mode.
If that isn't a huge incentive to find the Goats of Warding, then I don't know what is.
Resident Evil Village is now available on Xbox One, Xbox Series X|S, PS4, PS5, and PC via Steam.
")
FAQ
Should I destroy the goats in RE8?
Yes, you should, as the Challenge Points you get for finding the Goats of Warding can be spent on unlocking content from the Extra Content Shop, like Concept Art, 3D character models, Special Weapons, infinite ammo, and Mercenaries Mode.
What happens when you get all Goats of Warding?
Finding a Goat of Warding will reward the player with the Cynic award, 500 Challenge Points, and one RE.NET icon. Finding all twenty will unlock a Heretic award, 16,000 CP, and another RE.NET icon.
How many Goats of Warding are there in Resident Evil Village?
There are 20 Goats of Warding to find in total.
What do Goats of Warding do in Resident Evil Village?
The Goats of Warding are merely collectibles that reward Challenge Points and unlock achievements/trophies, rather than provide passive or active power-ups to the player.

Are you looking forward to playing the upcoming Resident Evil Requiem? If so, are you planning to revisit Resident Evil Village or any other previous game in preparation?
If you have any thoughts on the matter, please share them with us in the comments below.

Follow Windows Central on Google News to keep our latest news, insights, and features at the top of your feeds!

