How to back up data in Outlook 2016 for Windows
All the latest news, reviews, and guides for Windows and Xbox diehards.
You are now subscribed
Your newsletter sign-up was successful

Many reasons exist for why you might want to backup and save your Microsoft Outlook email to an archive file. Maybe you want to transfer that mail to a new Outlook account or a new PC. Or perhaps you want to a back-up copy, to help prevent data loss.
Here's how to create and save a data archive file using Outlook 2016 for Windows.
How to export an Outlook backup file
- Open the Outlook 2016 desktop app.
- Click the File tab in the top-left corner of the Outlook screen.
- Click the Open & Export option in the blue vertical column that appeared on the left side of the page.
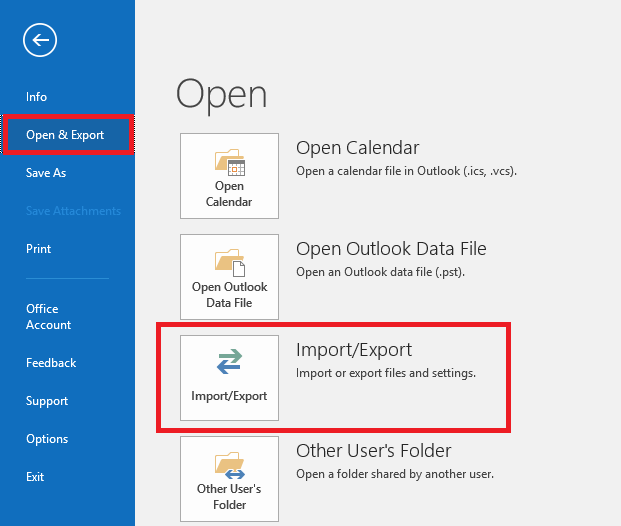
- Select the Import/Export box to launch the Import and Export Wizard.
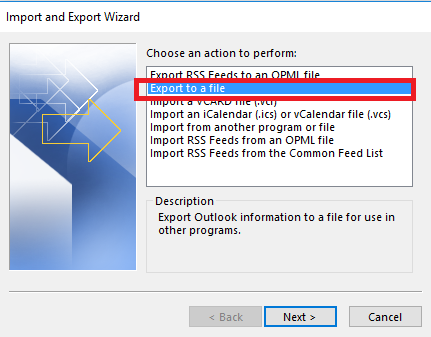
- Choose the Export to a file option using your mouse or the arrow-up and arrow-down buttons on your keyboard.
- Click Next.
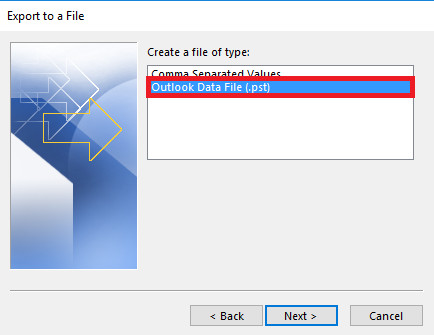
- Navigate to and highlight the Outlook Data File (.pst) option.
- Click Next.
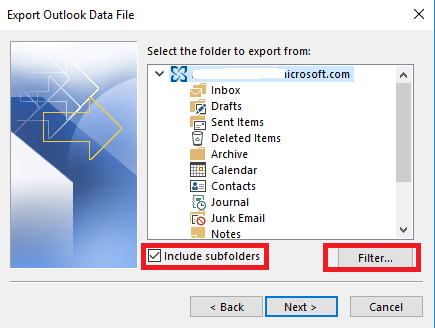
- Select the information you want to back up.
- If you want to back up and archive your entire Outlook account, select the name of your account (often your email address).
- If you're looking to backup only specific Outlook folders or data, such as your inbox, contacts, calendar or notes, pick the specific folder. You should also make sure that the Include subfolders box below the menu is checked if you want to back up all data within each folder. (Note: You must create individual Outlook backup archives for each folder, unless you back up your entire account. You cannot, for example, create a single backup file for both the Inbox and Calendar folders.)
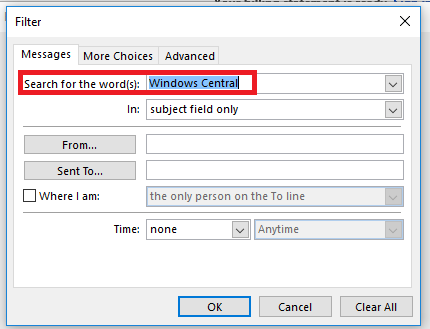
- Use the Filter button below the vertical menu options to access advanced back-up filtering features. You could, for example, use the filter to back up only messages in your inbox that include the words "Windows Central." Or you could choose to only back up your unread messages
- When you're ready to create your Outlook back-up archive, click Next.
- Name your document in the Save exported file as: field.
- Choose the location to which you want to save your backup by hitting the Browse button and navigating to your folder of choice.
- Next you see options that let you manage duplicate item, if you already saved Outlook backup archives in the past.
- Replace duplicates with items exported overwrites any existing data with the new data, even if it's the same.
- Allow duplicate items to be created does not overwrite any existing data and it creates new data, even if it's the same.
- Do not export duplicate items detects duplicate information and does not export and save any data that already exist.
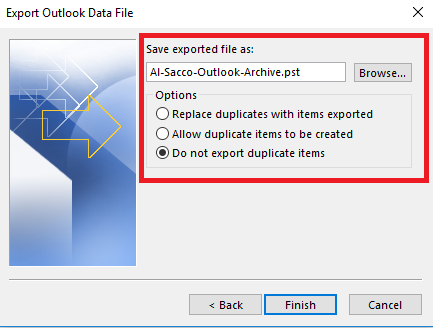
- Click Finish and you'll see a final prompt that asks you if you want to protect your archive with a password. If so, enter and confirm your password and then click OK.
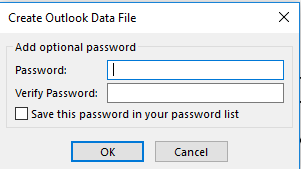
- If you don't want to use a password, leave the fields blank and click OK. Your shiny new Outlook data file will then save to your pre-specified location, but be patient, because the process can take a while if your account includes a lot of data.
For more Office for Windows tutorials, check out:
- How to skip the Start screen in Microsoft Word 2016 for Windows
- How to master Zoom settings in Word 2016 for Windows
- See all Office 365 subscription options on Microsoft.com
All the latest news, reviews, and guides for Windows and Xbox diehards.

Al Sacco is the Former Content Director of Future PLC's Mobile Technology Vertical, which included AndroidCentral.com, iMore.com and WindowsCentral.com. He is a veteran reporter, writer, reviewer and editor who has professionally covered and evaluated IT and mobile technology, and countless associated gadgets and accessories, for more than a decade. You can keep up with Al on Twitter and Instagram.
