How to connect to Wi-Fi network on Windows 11 and Windows 10
You can connect your Windows 11 device to a Wi-Fi network in various ways, and in this guide, you will learn how.
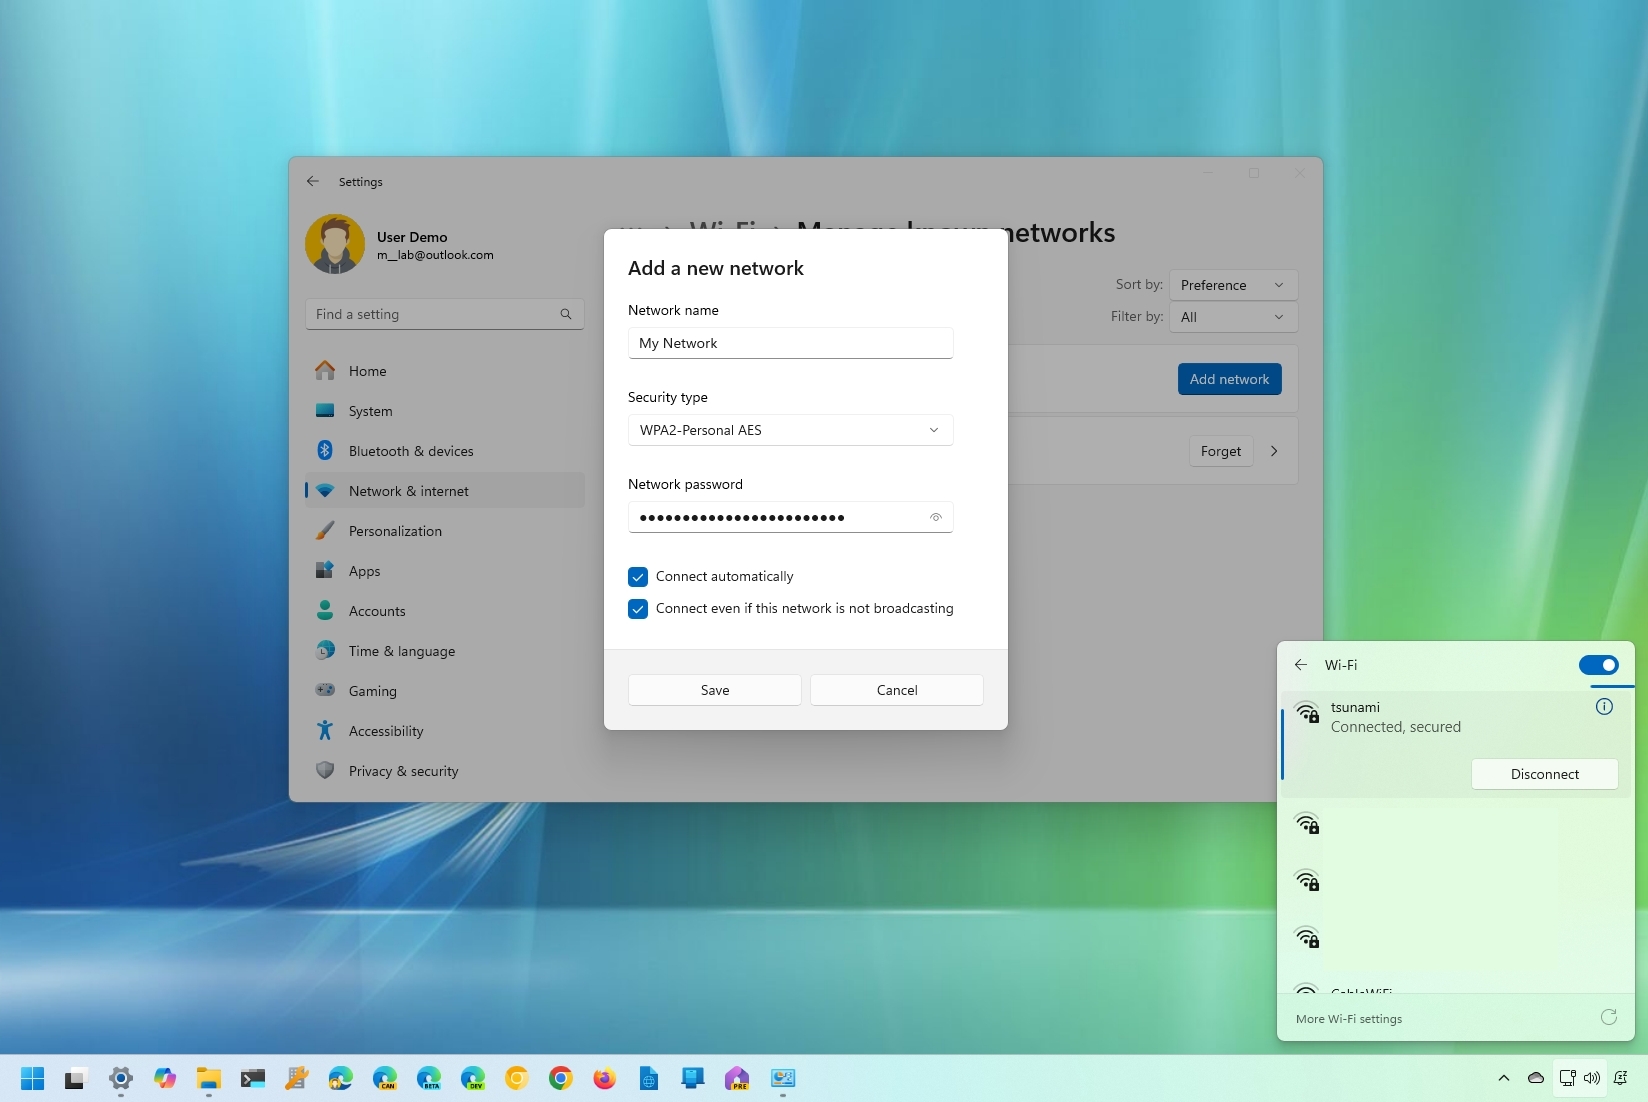
- Windows 11: Connect from the Taskbar
- Win 11: Connect from Settings
- Win 11: Connect with a QR Code
- Win 11: Connect with the Control Panel
- Win 11: Connect with the Command Prompt
- Win 10: Connect to Wi-Fi via Taskbar
- Win 10: Connect to Wi-Fi via Settings
- Win 10: Connect to Wi-Fi via Control Panel
- Win 10: Connect to Wi-Fi using CMD
All the latest news, reviews, and guides for Windows and Xbox diehards.
You are now subscribed
Your newsletter sign-up was successful
Windows 11 makes it easy to connect laptops, tablets, and desktop computers to a wireless network to access the internet and other local network resources. However, it's only easy if you know the tools and process to connect.
If you are setting up a connection in a new network or want to learn a more efficient way to connect multiple computers, Windows 11 has different tools to connect without cables, using the Taskbar, Settings, Control Panel, and Command Prompt. Also, starting with the release of version 24H2, it's also possible to connect using a QR Code.
In this how-to guide, I'll walk you through how to connect your computer to a Wi-Fi network on Windows 11.
How to connect to Wi-Fi network from Taskbar
To connect to a Wi-Fi network through the Windows 11 Taskbar, use these steps:
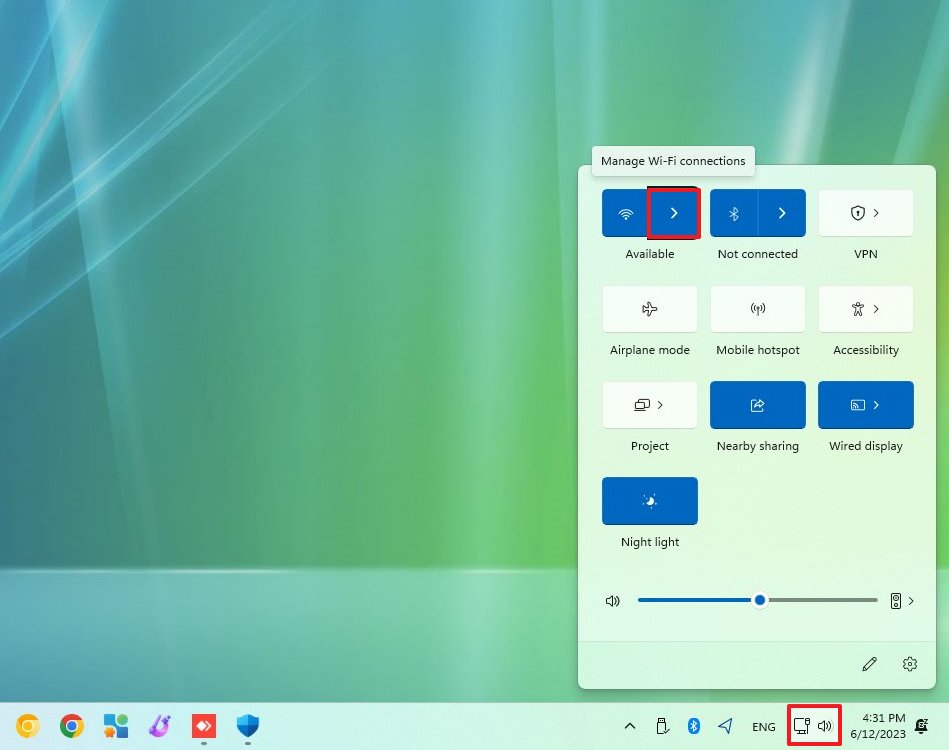
- Click the Network icon in the bottom-right corner to open Quick Settings.
- Quick tip: You can also use the "Windows key + A" keyboard shortcut to open the settings flyout. On Windows 11, there are several other shortcuts, you can learn more in this guide.
- Click the button next to the wireless icon.
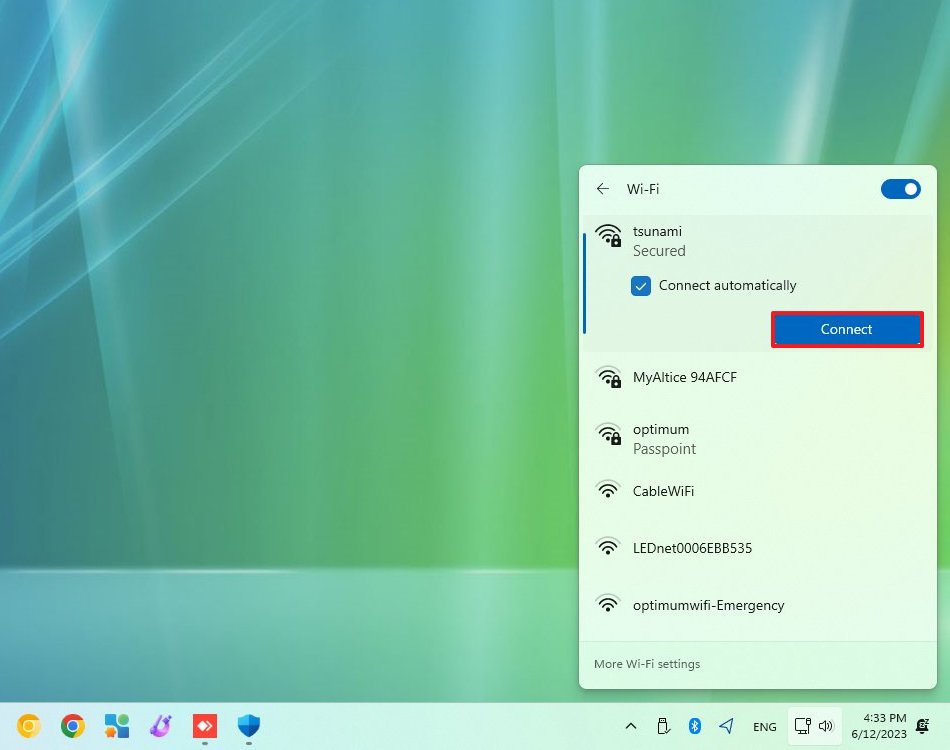
- Select the wireless connection.
- (Optional) Check the Connect automatically option.
- Click the Connect button.
- Confirm the network security key (password).
- Click the Next button.
- Confirm whether the device should be discoverable in the network.
Once you complete the steps, the laptop will connect to the network using the wireless connection.
Reconnect automatically
In addition, Windows 11 also offers an option to reconnect the device automatically after manually disconnecting the adapter.
To set the Wi-Fi adapter to reconnect automatically on Windows 11, use these steps:
All the latest news, reviews, and guides for Windows and Xbox diehards.
- Click the wireless icon in the system tray.
- Click the button next to the wireless icon.
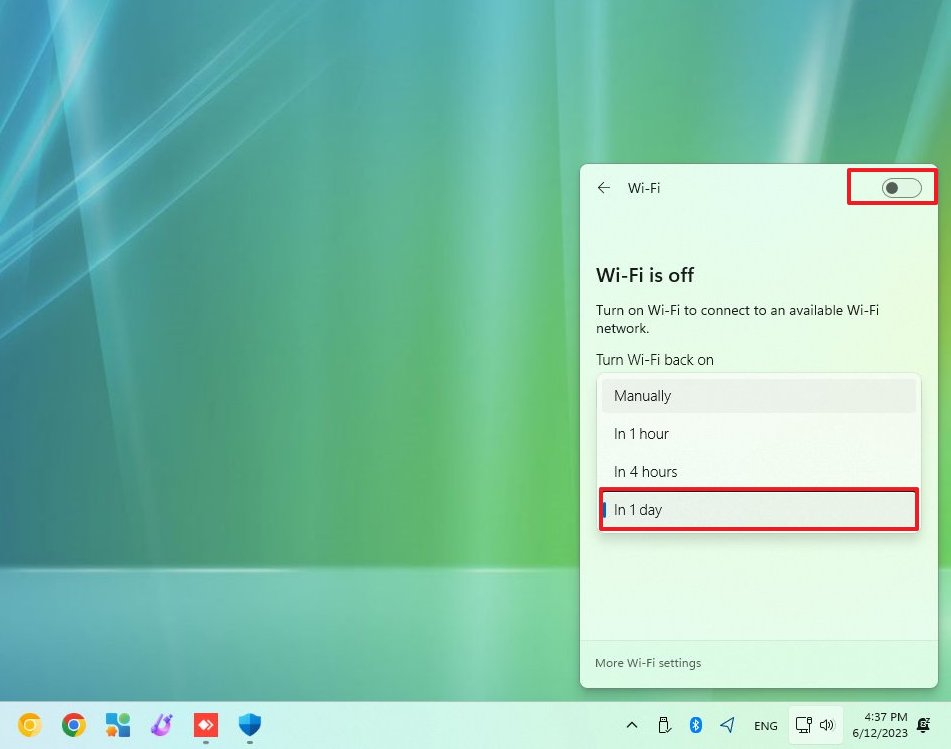
- Turn off the Wi-Fi toggle switch in the top-right corner.
- Use the drop-down menu and select when to reconnect automatically:
- Manually.
- In one hour.
- In four hours.
- In one day.
After you complete the steps, Windows 11 won't reconnect until the time you selected. When using this functionality, the computer will only connect automatically to the networks you have connected to in the past.
How to connect to Wi-Fi network from Settings
You can also set up wireless connections manually using the Settings app. This way, when the network is in range or hiding its SSID (Service Set Identifier), the laptop or desktop computer can connect automatically.
To add a wireless connection manually, use these steps:
- Open Settings.
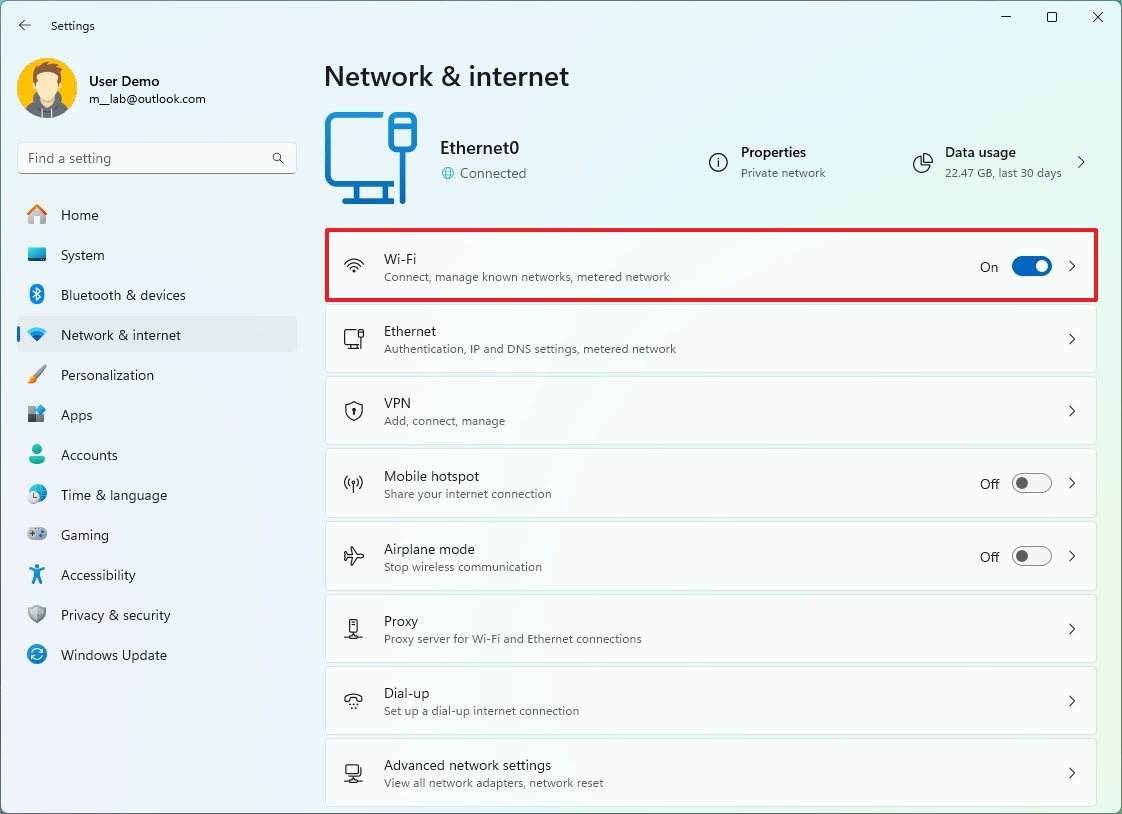
- Click on Network & internet.
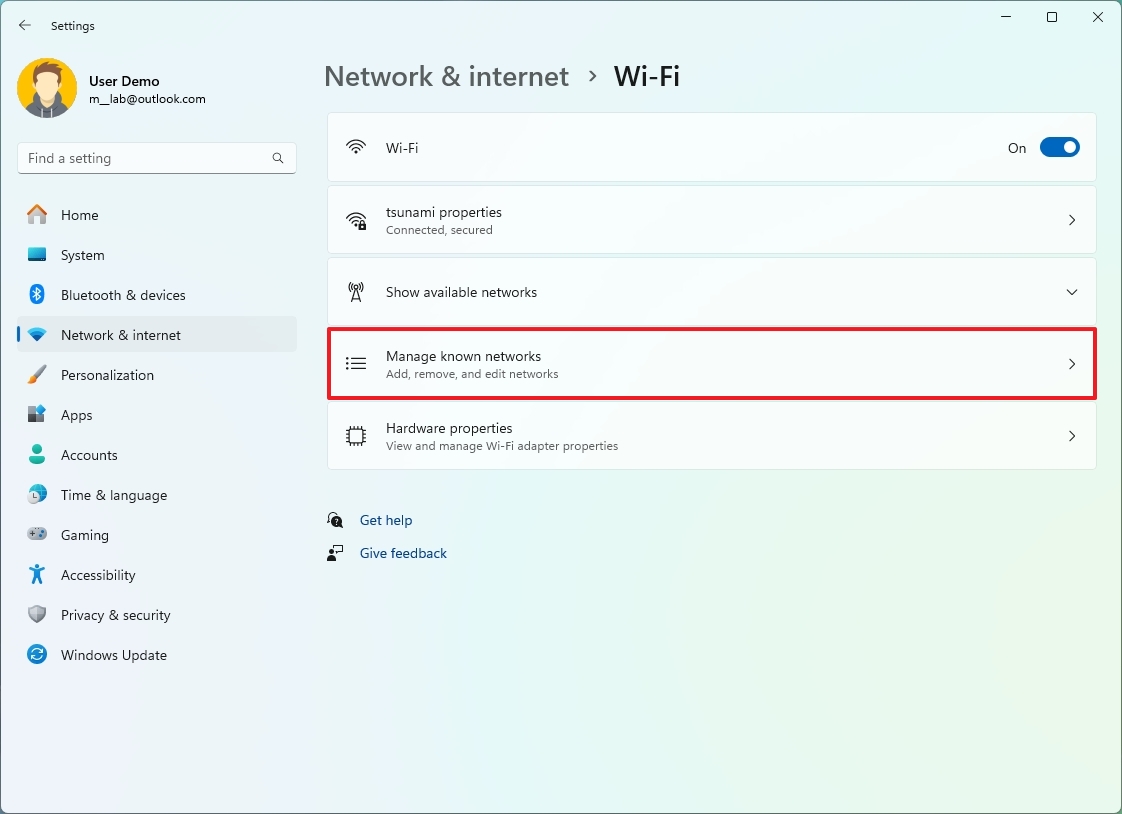
- Click on Wi-Fi.
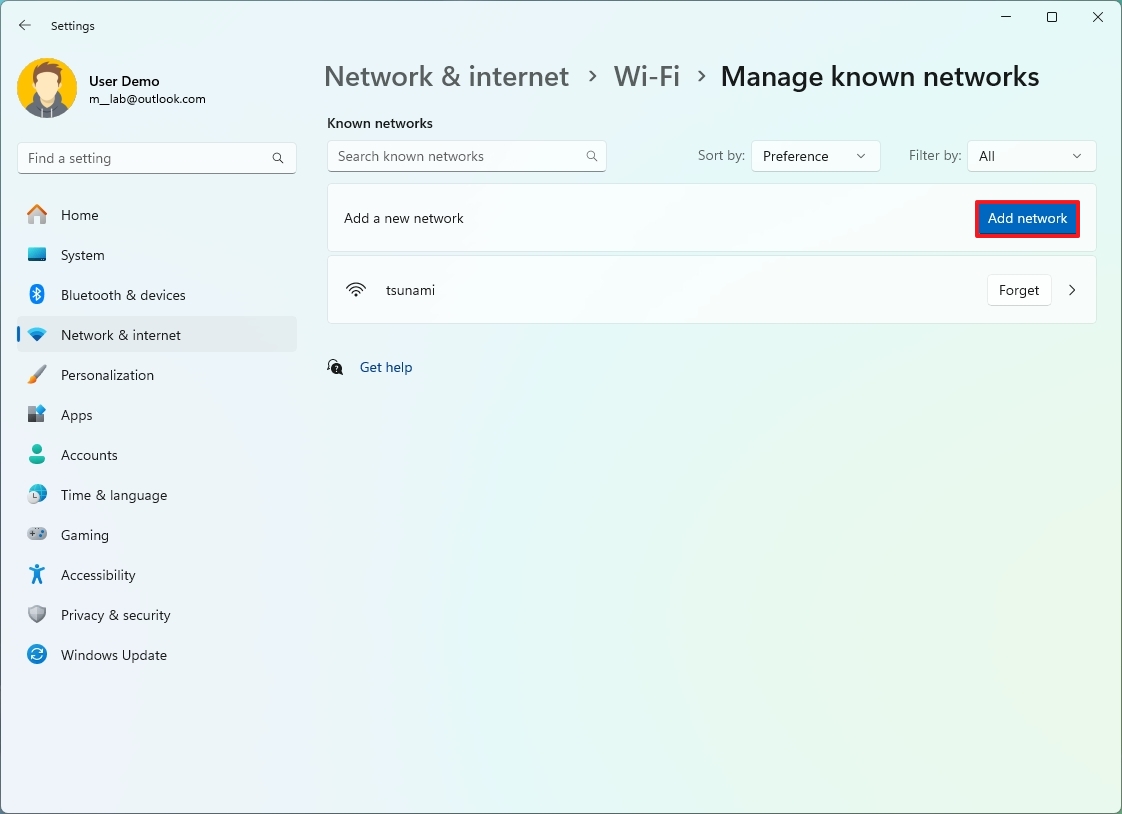
- Click the "Manage known networks" page on the right side.
- Click the Add network button.
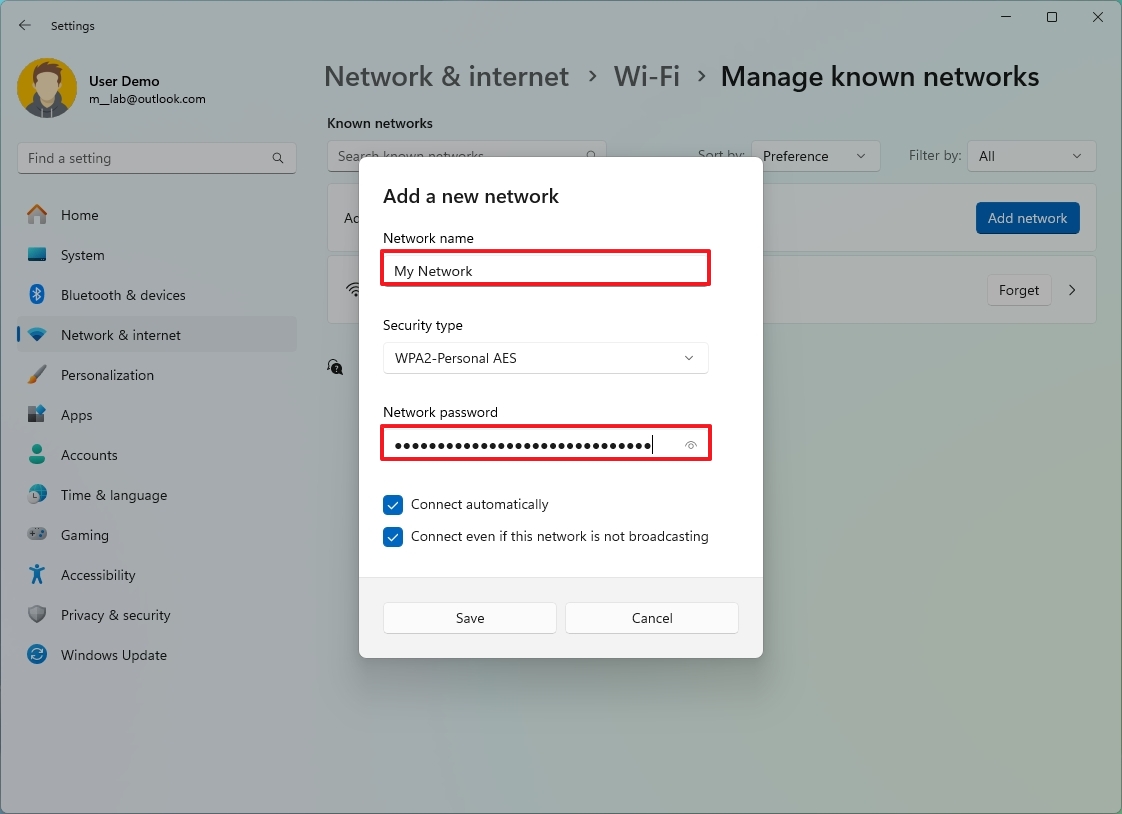
- Confirm the name of the network.
- Use the drop-down menu to select the Security type – For example, WPA2-Personal AES.
- Confirm the network security key (password).
- Check the Connect automatically option.
- Check the "Connect even if this network is not broadcasting" option (if applicable).
- Click the Save button.
Once you complete the steps, the device will connect automatically when the wireless network is in range and whether it's hidden or visible.
How to connect to Wi-Fi network from QR Code
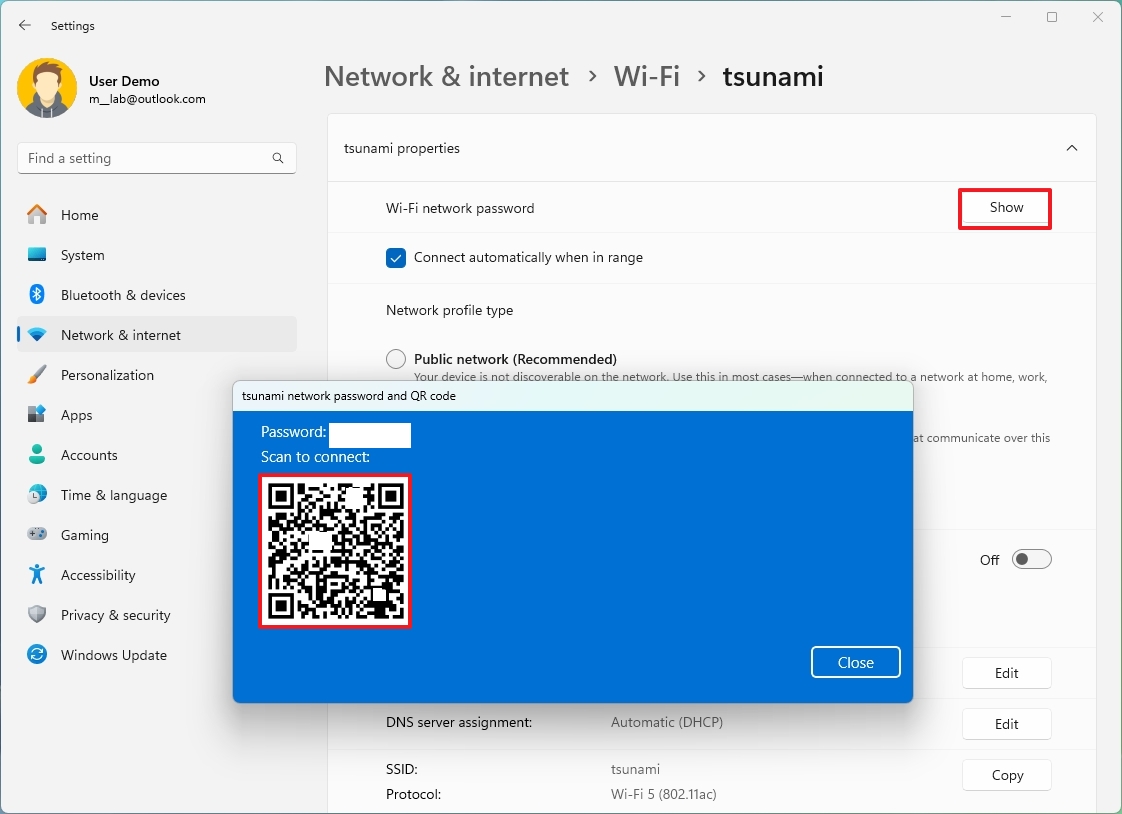
Starting with the release of Windows 11 version 24H2 (2024 Update), Microsoft is adding a new option that allows you to generate a QR Code that you can use with other devices to connect to a wireless network using the camera app.
To connect to a wireless network scanning a QR Code, use these steps:
- Open Settings.
- Click on Network & internet.
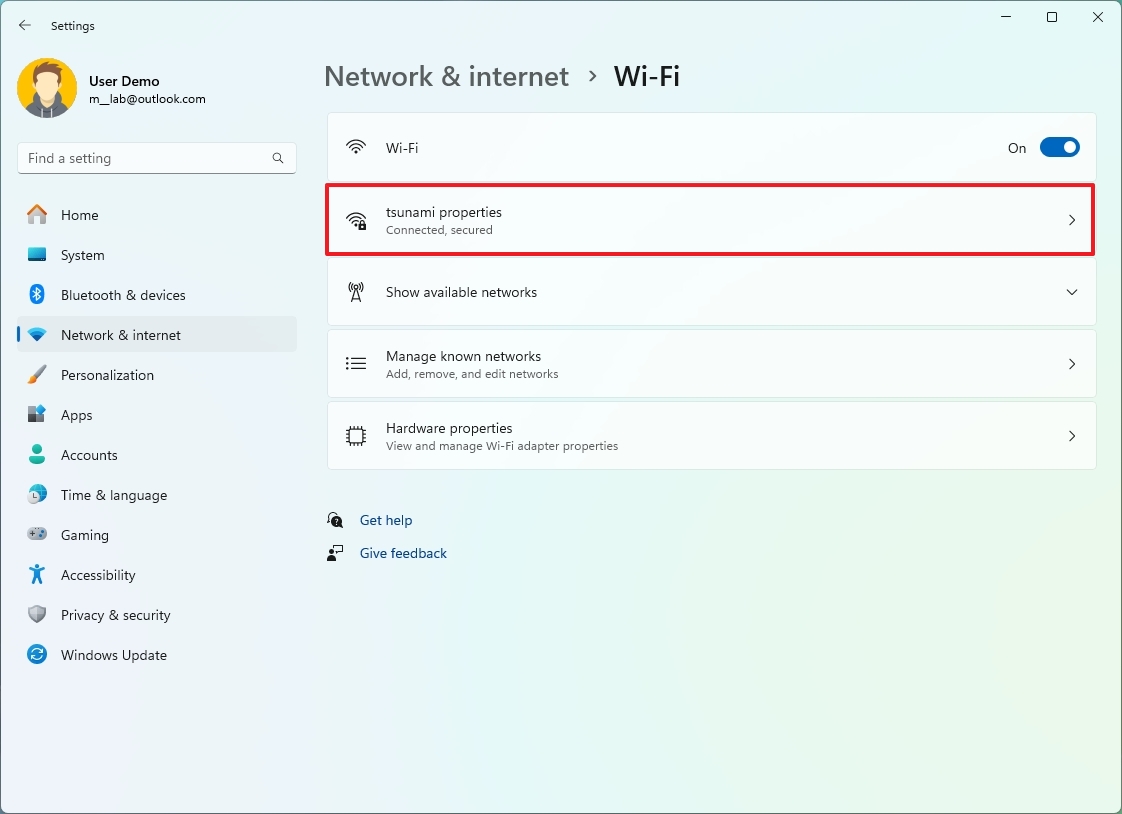
- Click the Wi-Fi page on the right side.
- Click the wireless connection properties option.
- Click the Show button in the "Wi-Fi network password" setting.
- Using another computer, open the camera app.
- Quick tip: You can use another computer, tablet, laptop, or even your phone.
- Scan the generated code using the camera.
- Click on the button that appears on the camera app.
How to connect to Wi-Fi network from Control Panel
To connect to a wireless network with Control Panel on Windows 11, use these steps:
- Open Control Panel.
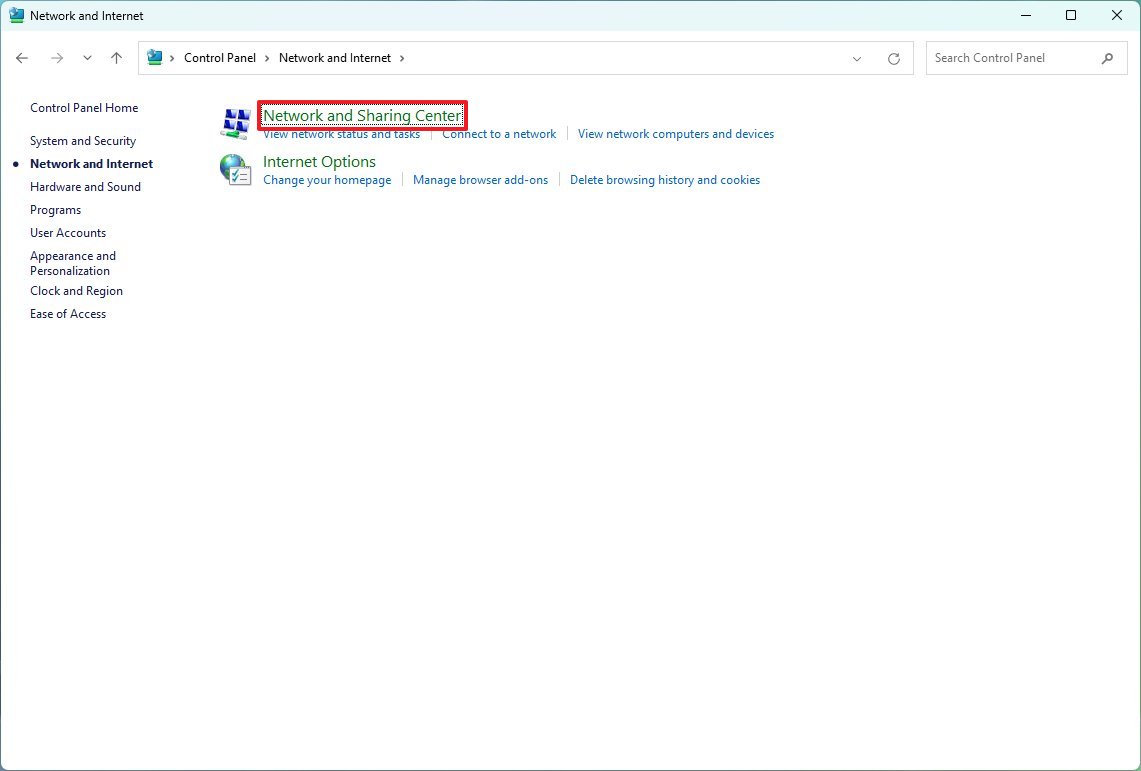
- Click on Network and Internet.
- Click on Network and Sharing Center.
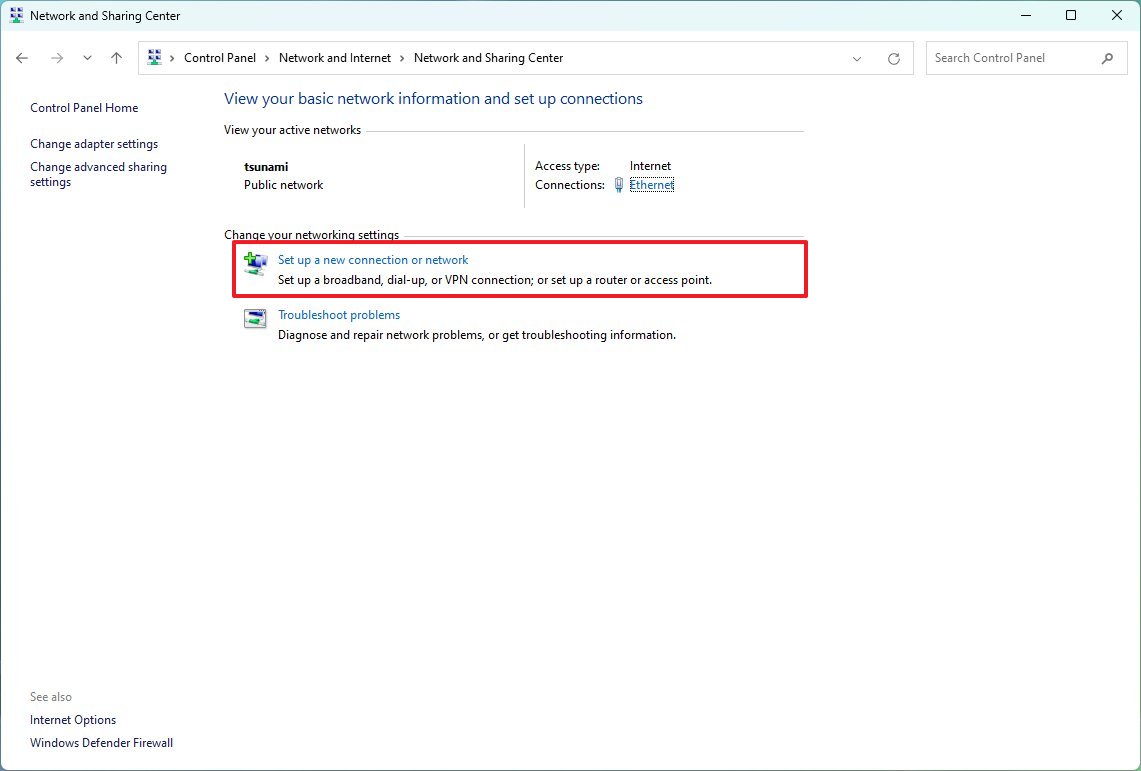
- Under the "Change your networking settings" section, click the "Set up a new connection or network" option.
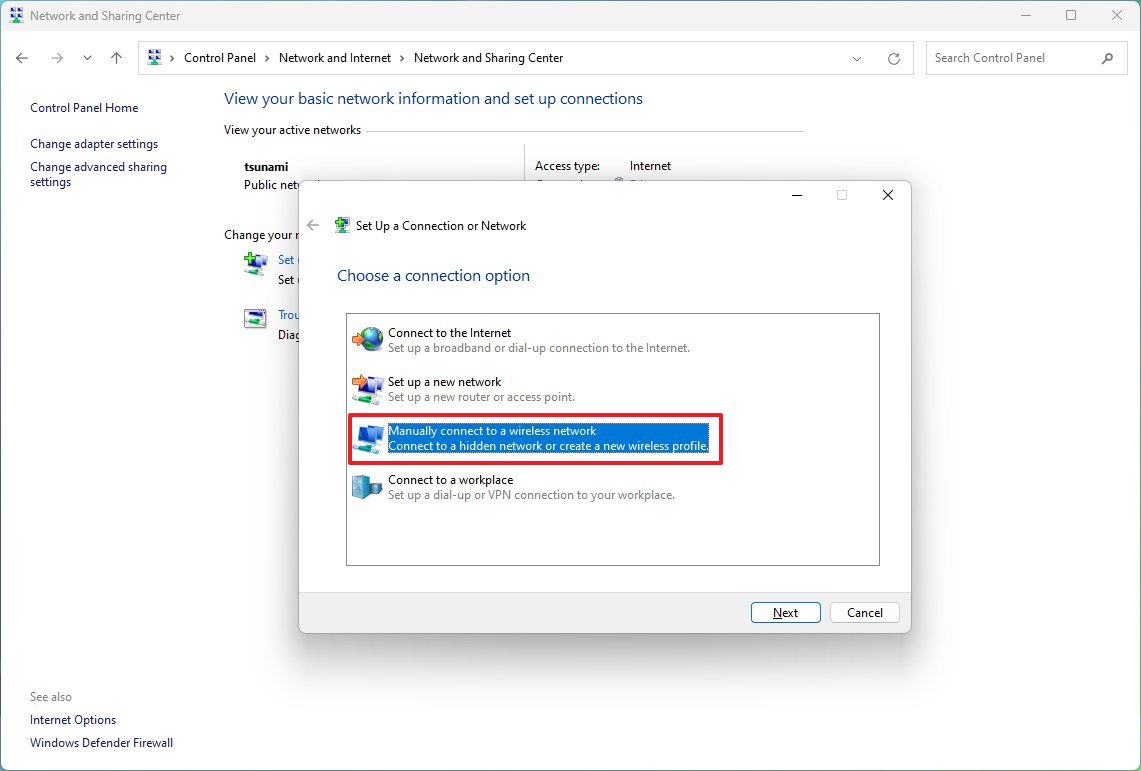
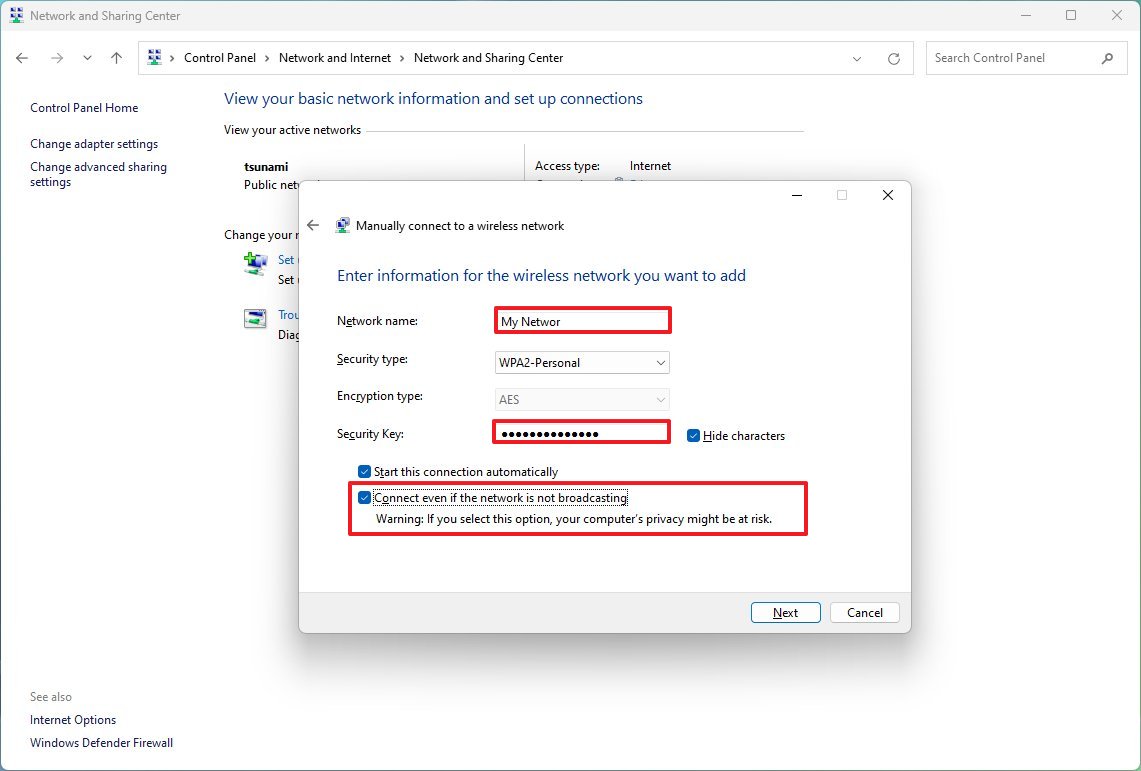
- Select the "Manually connect to a wireless network" option.
- Click the Next button.
- Confirm the network name.
- Use the drop-down menu to select the Security type — for example, WPA2-Personal.
- Confirm the network security key (password).
- Check the "Start this connection automatically" option.
- (Optional) Check the "Connect even if the network is not broadcasting" option.
- Click the Next button.
- Click the Close button.
Once you complete the steps, the computer will automatically connect to the Wi-Fi network.
How to connect to Wi-Fi network from Command Prompt
You can also use the netsh command-line tool in Command Prompt to connect to a Wi-Fi network on Windows 11.
To connect to a Wi-Fi network with commands, use these steps:
- Open Start.
- Search for Command Prompt, right-click the top result, and select the Run as administrator option.
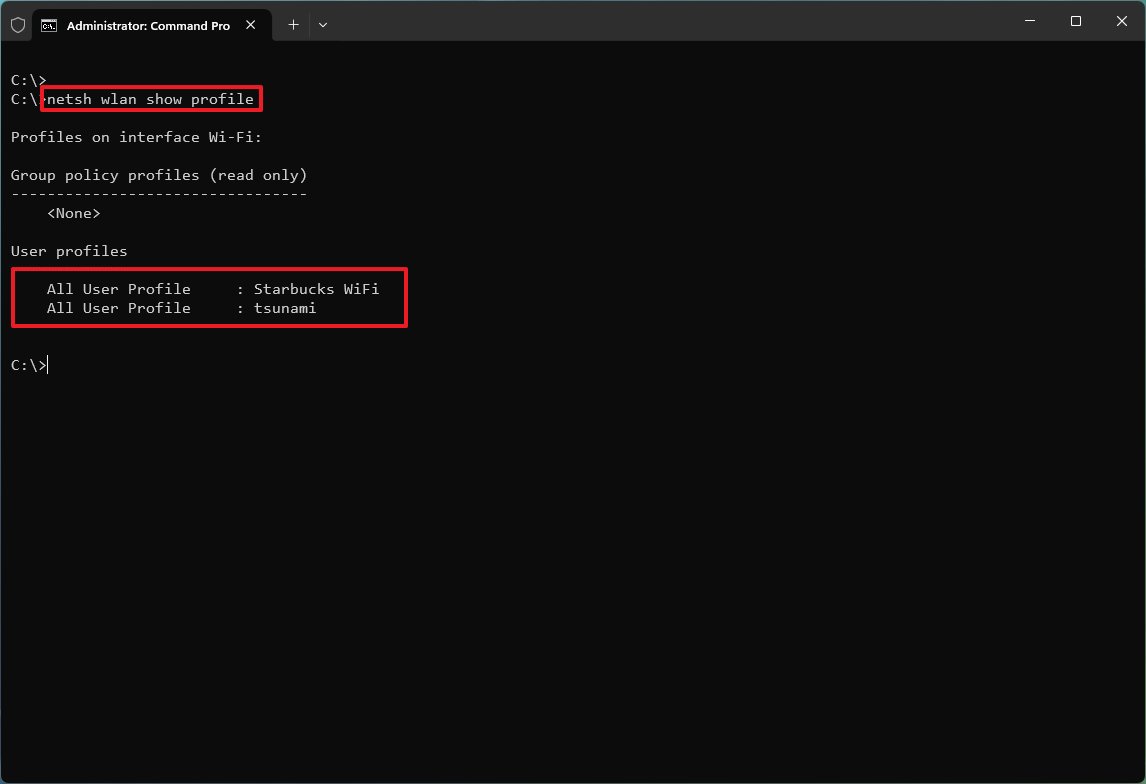
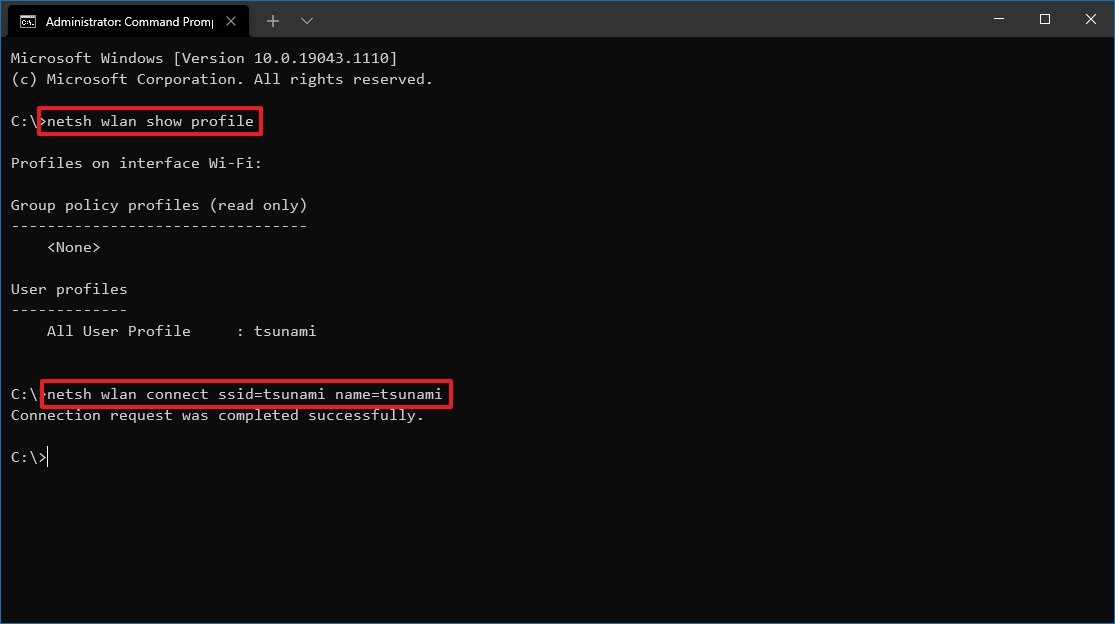
- Type the following command to view the available network profiles and press Enter: netsh wlan show profile
- Confirm the wireless profile.
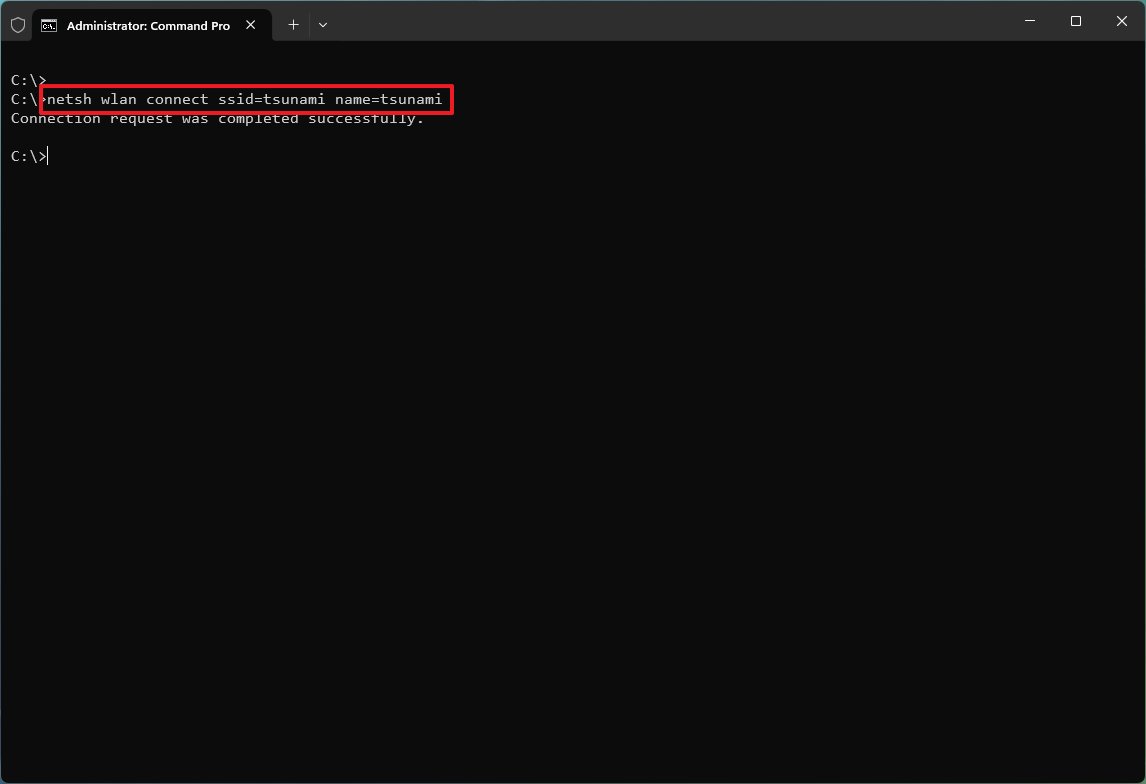
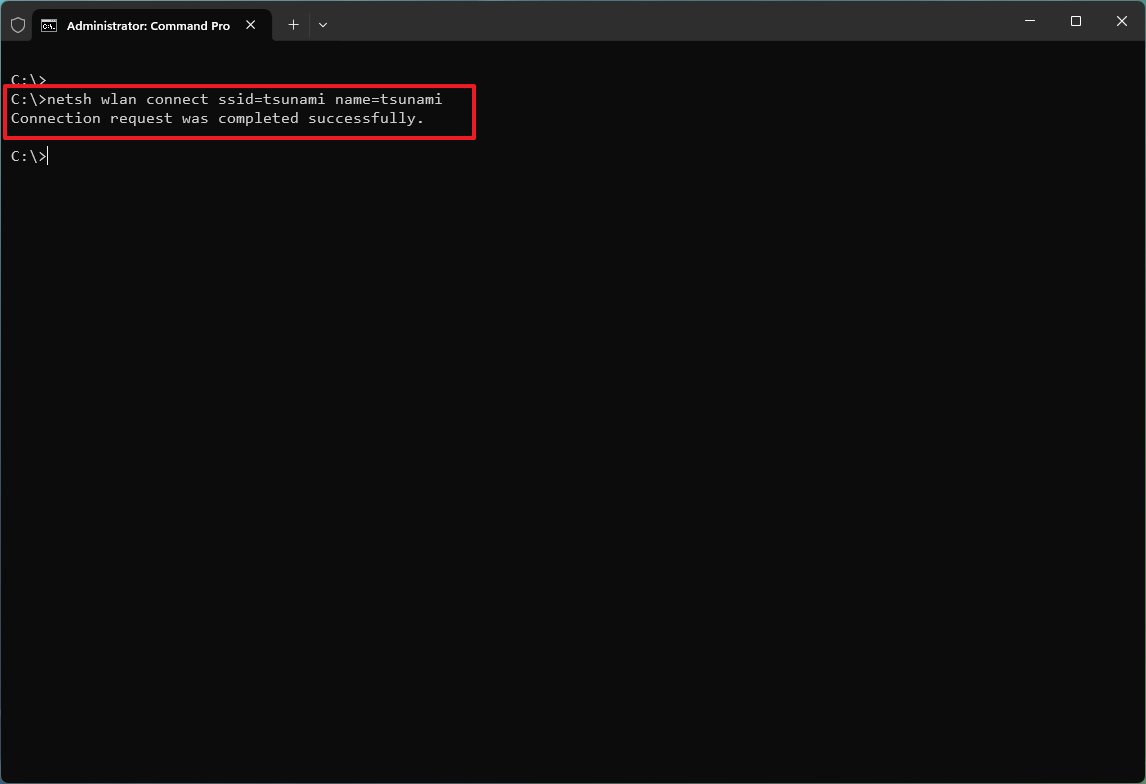
- Type the following command to connect to the wireless network on Windows 11 and press Enter: netsh wlan connect ssid=YOUR-WIFI-SSID name=PROFILE-NAME
In the command, update the name (SSID) of the network and profile name with your network information. For example, this command connects to the "tsunami" network using the "tsunami" profile: netsh wlan connect ssid=tsunami name=tsunami.
- Quick tip: On a computer with multiple adapters, you also have to specify the adapter name in the command. For example: netsh wlan connect ssid=YOUR-WIFI-SSID name=PROFILE-NAME interface=Wi-Fi.
After you complete the steps, the laptop will connect to the Wi-Fi network.
Create network connection
The netsh command tool also allows you to manage Wi-Fi adapters and networks. The only issue is that you can only manage existing profiles. You cannot create new network profiles with this tool.
If you have to use Command Prompt to connect one or multiple computers to the same wireless network, you can export the profile created automatically during the first connection. Then you can import it using netsh to connect using commands.
Export Wi-Fi profile
To export a Wi-Fi profile with commands on Windows 11, use these steps:
- Open Start.
- Search for Command Prompt, right-click the top result, and select the Run as administrator option.
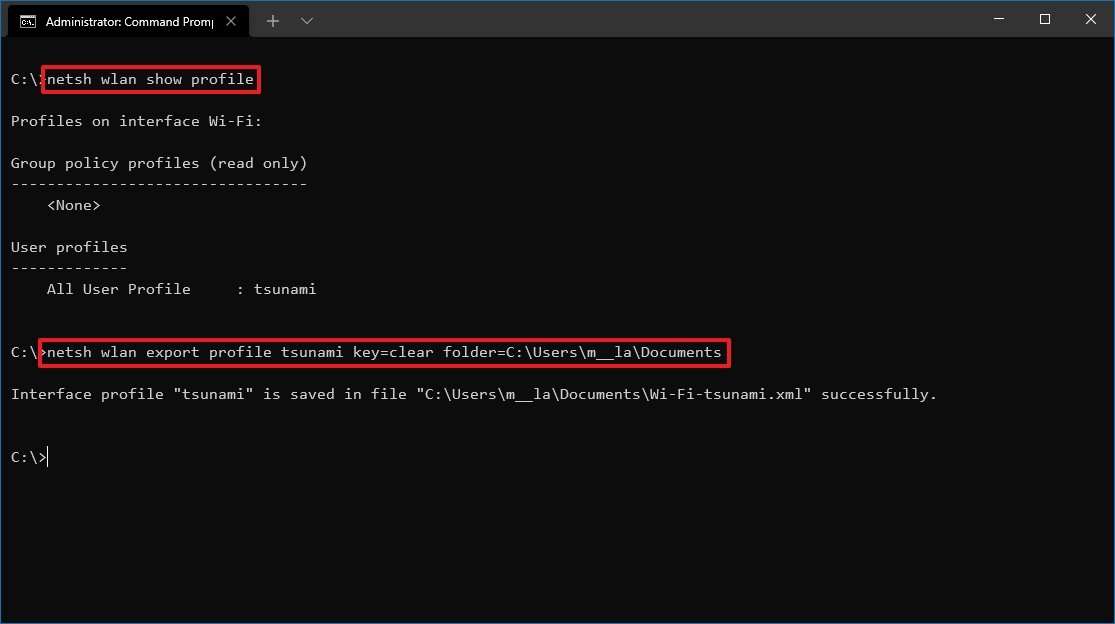
- Type the following command to view the available network profiles and press Enter: netsh wlan show profile
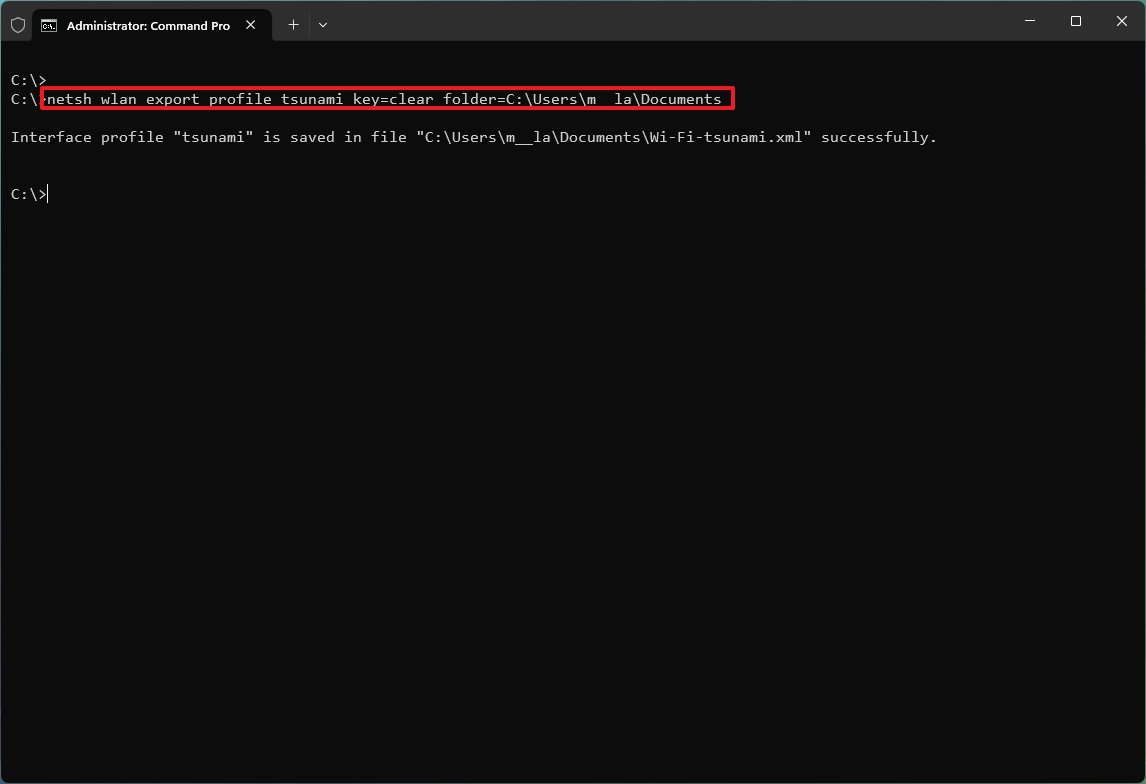
- Type the following command to export a profile and press Enter: netsh wlan export profile PROFILE-NAME key=clear folder=PATH\TO\EXPORT\FOLDER
For example, this command exports the tsunami profile to the "Documents" folder: netsh wlan export profile tsunami key=clear folder=C:\Users\m\Documents
Once you complete the steps, you can import the same XML file to connect other computers to the wireless network.
Import Wi-Fi profile
To import a Wi-Fi profile on Windows 11, use these steps:
- Open Start.
- Search for Command Prompt, right-click the top result, and select the Run as administrator option.
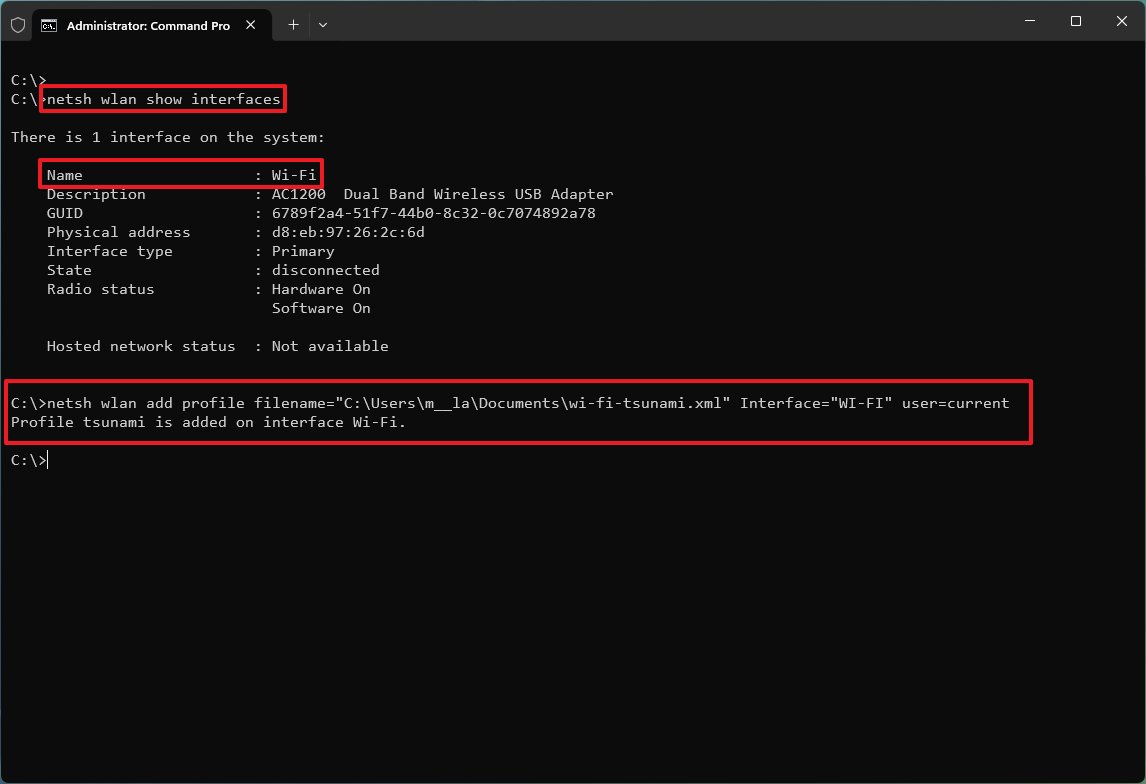
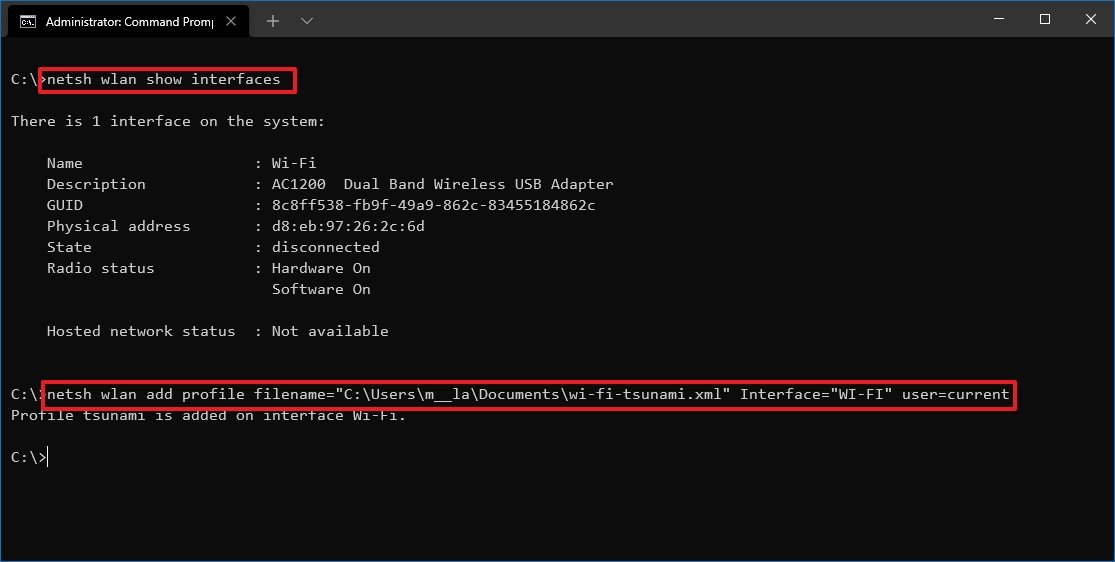
- Type the following command to determine the name of the network adapter and press Enter: netsh wlan show interfaces
- Confirm the name of the adapter that will connect to the network.
- Type the following command to import the wireless profile and press Enter: netsh wlan add profile filename="PATH\TO\PROFILE.XML" Interface="YOUR-WIFI-ADAPTER-NAME" user=current
In the command, you must specify the location of the XML file and network interface name. For example, this command imports the XML profile located in the "Documents" folder to the Wi-Fi adapter: netsh wlan add profile filename="C:\Users\m\Documents\wi-fi-tsunami.xml" Interface="WI-FI" user=current.
- Type the following command to connect to the wireless network and press Enter: netsh wlan connect ssid=YOUR-WIFI-SSID name=PROFILE-NAME
In the command, you must specify the SSID and profile name that corresponds to your network. For example, this command connects to an access point using the "tsunami" SSID and "tsunami" profile name: netsh wlan connect ssid=tsunami name=tsunami.
- Quick tip: If you have multiple wireless interfaces, you must also specify which adapter you want to use in the command. For example, netsh wlan connect ssid=YOUR-WIFI-SSID name=PROFILE-NAME interface=Wi-Fi.
After you complete the steps, the computer should connect to the wireless network automatically.
More resources
For more helpful articles, coverage, and answers to common questions about Windows 10 and Windows 11, visit the following resources:
- Windows 10 on Windows Central — All you need to know
- Windows 11 on Windows Central — All you need to know
How to connect to Wi-Fi network using Taskbar
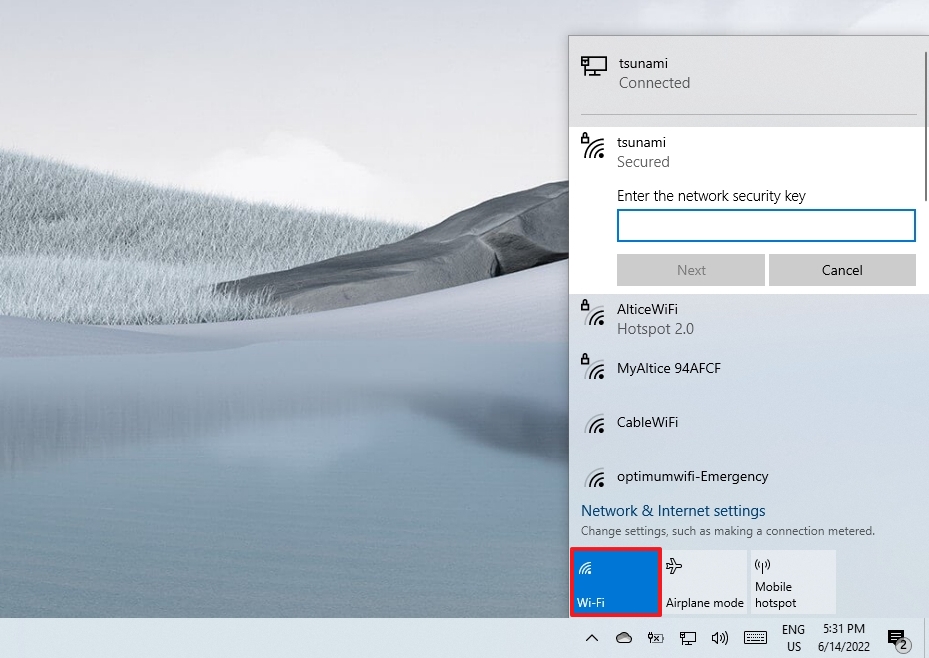
To connect to a Wi-Fi network through the taskbar on Windows 10, use these steps:
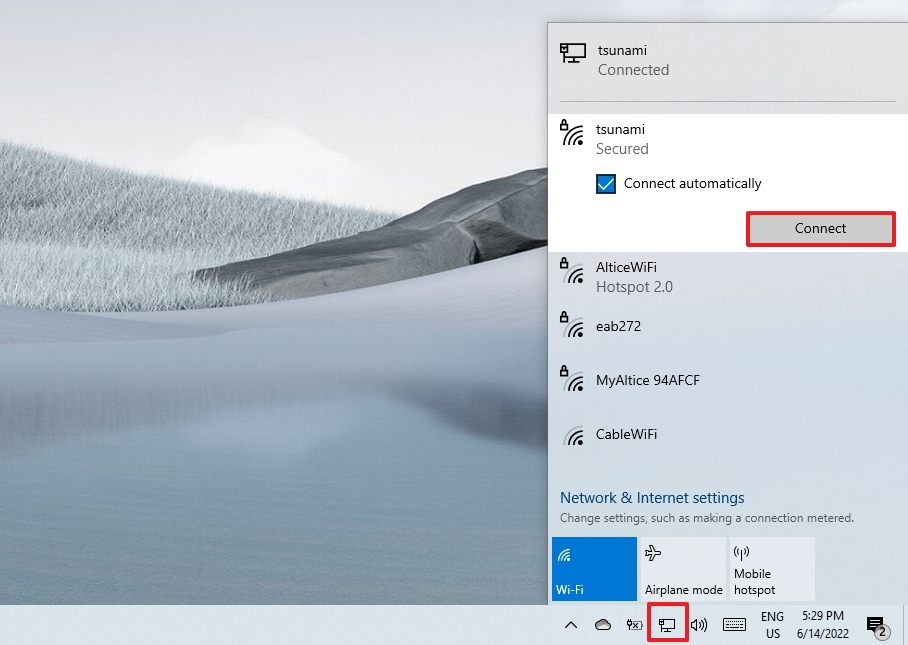
- Click the Network icon in the bottom-right corner of the taskbar.
- Quick note: Alternatively, you can open Action Center (Windows key + A), and then click the Network button in the "Quick actions" section to access the network flyout. If you don't see the button, click the up arrow button on the left.
- Select the wireless network to connect.
- (Optional) Check the Connect automatically option.
- Click the Connect button.
- Quick tip: If you do not see any wireless access point in the list, click the Wi-Fi button to turn on the adapter.
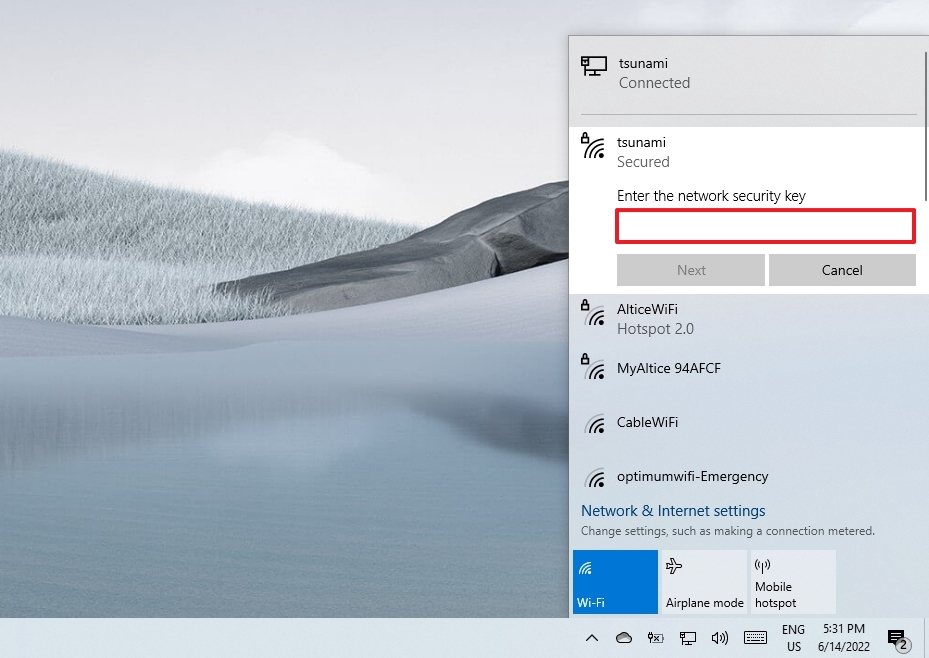
- Confirm the network security key (password).
- Click the Next button.
- Confirm whether the device should be discoverable in the network by other PCs.
Once you complete the steps, the laptop will connect to the network using the Wi-Fi connection.
Reconnect automatically
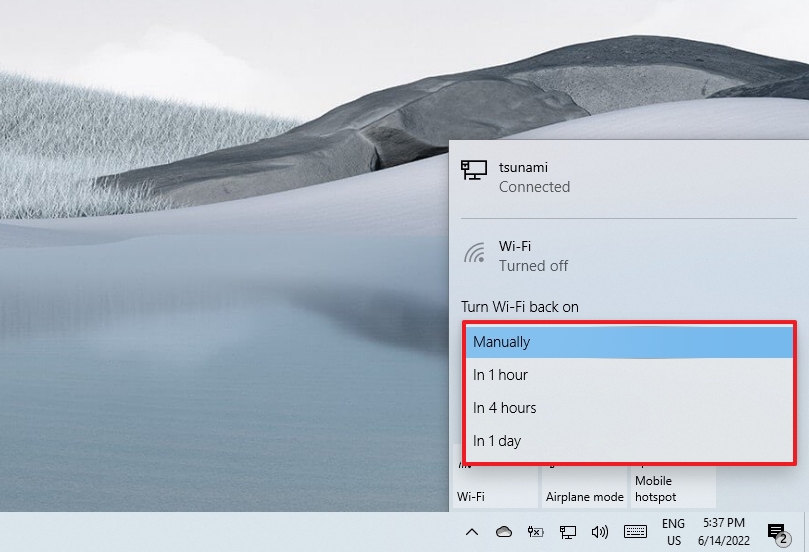
In addition, Windows 10 also offers an option to reconnect the device automatically after disconnecting the adapter manually.
To set the Wi-Fi adapter to reconnect automatically, use these steps:
- Click the network icon in the system tray.
- Click the Wi-Fi button to turn off wireless connectivity.
- Use the drop-down menu and select when to re-connect automatically:
- Manually.
- In one hour.
- In four hours.
- In one day.
After you complete the steps, Windows 10 won't try to connect to a wireless connection until the time you selected. When using this functionality, the device will only connect automatically to previously known networks.
How to connect to Wi-Fi network using Settings
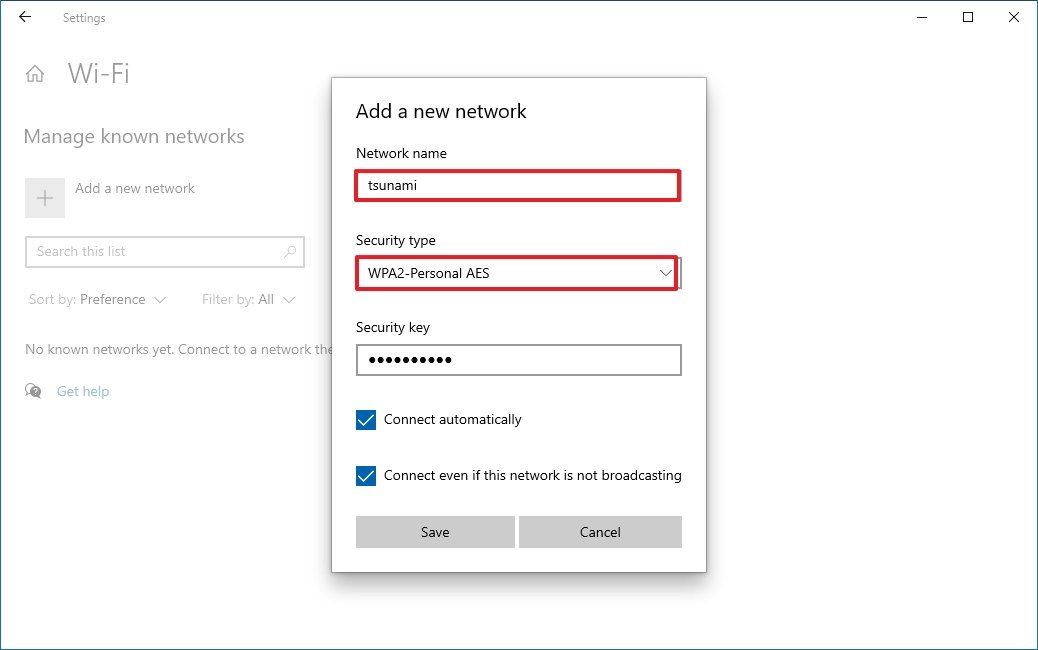
Using "Network & Security" settings, you can also add wireless connections manually, and then when the network is in range, the laptop will connect automatically.
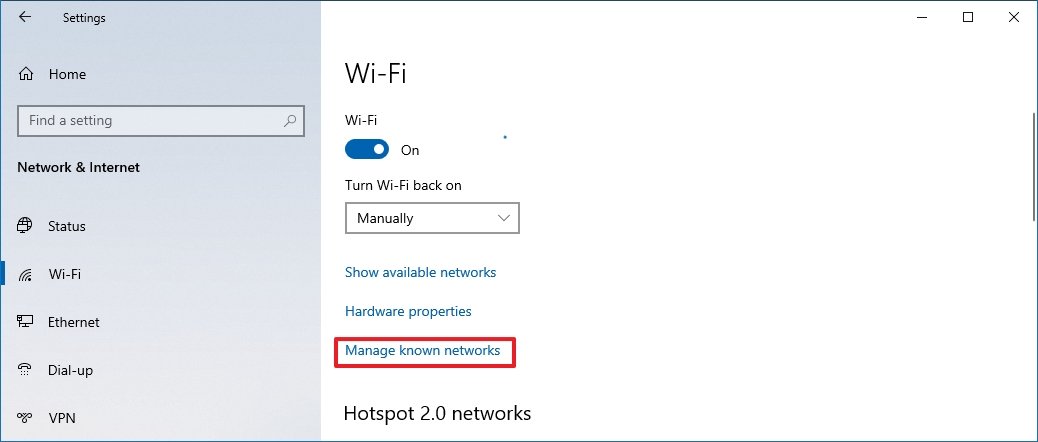
To prevision a Wi-Fi connection on Windows 10, use these steps:
- Open Settings.
- Click on Network & Security.
- Click on Wi-Fi.
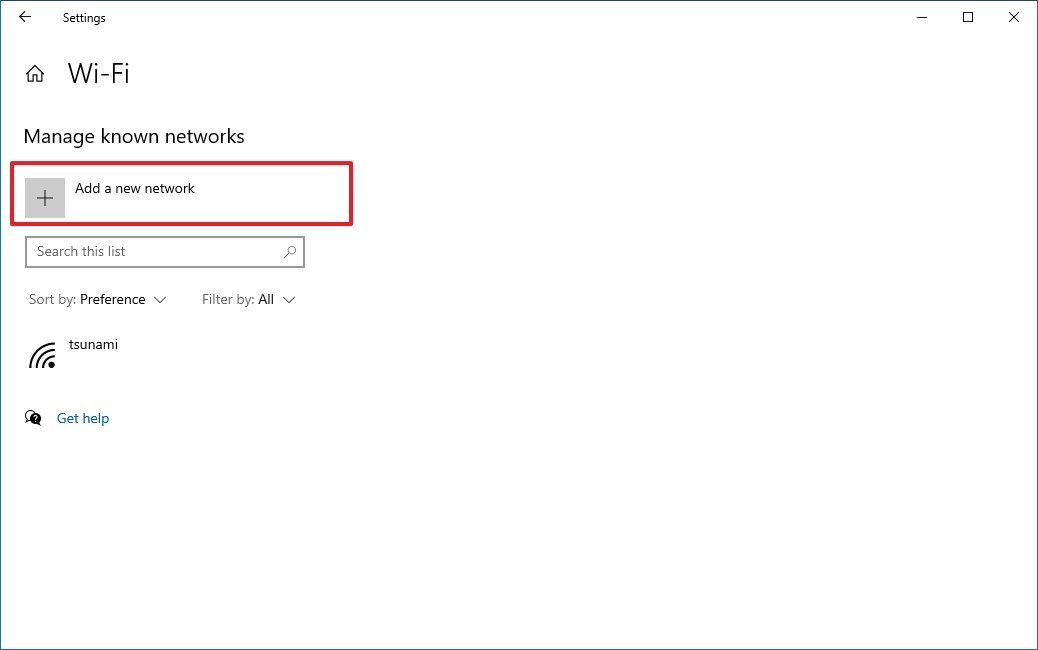
- Click the Manage known networks option.
- Click the Add a new network button.
- Confirm the name of the network.
- Use the drop-down menu to select the Security type — for example, WPA2-Personal AES.
- Confirm the network security key (password).
- Check the Connect automatically option.
- Check the Connect even if this network is not broadcasting option (if required).
- Click the Save button.
Once you complete the steps, the device will connect automatically when the wireless network is in range.
How to connect to Wi-Fi network using Control Panel
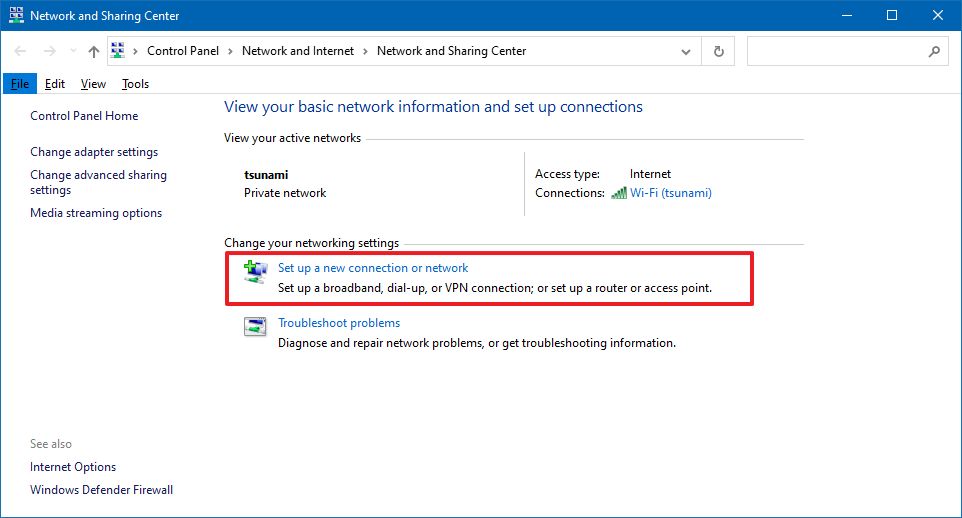
To connect to a Wi-Fi network with Control Panel, use these steps:
- Open Control Panel.
- Click on Network and Internet.
- Click on Network and Sharing Center.
- Under the "Change your networking settings" section, click the Set up a new connection or network option.
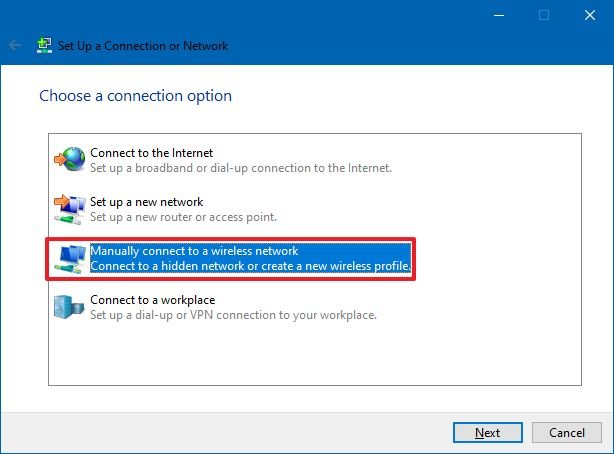
- Select the Manually connect to a wireless network option.
- Click the Next button.
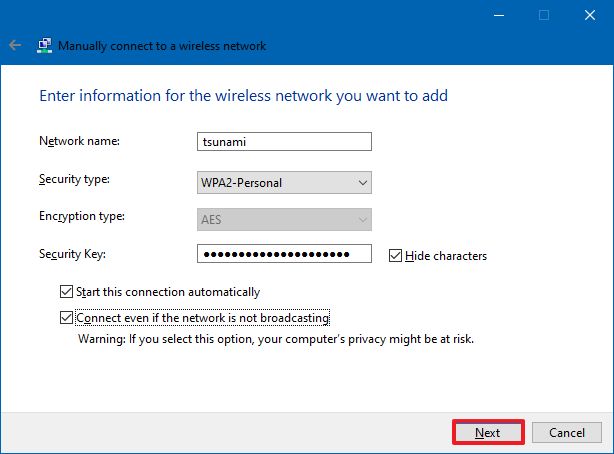
- Confirm the network name.
- Use the drop-down menu to select the Security type — for example, WPA2-Personal.
- Confirm the network security key (password).
- Check the Start this connection automatically option.
- (Optional) Check the Connect even if the network is not broadcasting option.
- Click the Next button.
- Click the Close button.
Once you complete the steps, the computer will automatically connect to the Wi-Fi network.
How to connect to Wi-Fi network using Command Prompt
How to connect to Wi-Fi network using Command Prompt
Alternatively, you can also use the netsh command-line tool in Command Prompt to connect to a Wi-Fi network.
To connect to a Wi-Fi access point with commands, use these steps:
- Open Start.
- Search for Command Prompt, right-click the top result, and select the Run as administrator option.
- Type the following command to view the available network profiles and press Enter: netsh wlan show profile
- Confirm the Wi-Fi network profile with your preferred settings.
- Type the following command to connect to the wireless network on Windows 10 and press Enter: netsh wlan connect ssid=YOUR-WIFI-SSID name=PROFILE-NAME
In the command, remember to specify the name (SSID) of the network and profile name with your network settings. For example, this command connects to the "tsunami" network using the "tsunami" profile: netsh wlan connect ssid=tsunami name=tsunami.
- Quick tip: On devices with more than one wireless adapter, you must also specify which adapter you want to use in the command. For example: netsh wlan connect ssid=YOUR-WIFI-SSID name=PROFILE-NAME interface=Wi-Fi.
After you complete the steps, the device will connect to the wireless network.
New network connection
The netsh tool also lets you manage Wi-Fi adapters and networks. The only caveat is that you can only manage previously known networks since you cannot create new network profiles with this tool.
When you need to use Command Prompt to connect one or multiple computers to the same wireless network, you can export the network profile created automatically during the first connection. Then you can import it using the netsh tool to connect using the command-line tool.
Export Wi-Fi profile
To export a Wi-Fi profile with commands, use these steps:
- Open Start.
- Search for Command Prompt, right-click the top result, and select the Run as administrator option.
- Type the following command to view the available network profiles and press Enter: netsh wlan show profile
- Type the following command to export a profile and press Enter: netsh wlan export profile PROFILE-NAME key=clear folder=PATH\TO\EXPORT\FOLDER
For example, this command exports the tsunami profile to the "Documents" folder: netsh wlan export profile tsunami key=clear folder=C:\Users\m\Documents.
Once you complete the steps, you can import the same XML file to connect other devices to the same network.
Import Wi-Fi profile
To import a Wi-Fi profile on Windows 10, use these steps:
- Open Start.
- Search for Command Prompt, right-click the top result, and select the Run as administrator option.
- Type the following command to determine the name of the network adapter and press Enter: netsh wlan show interfaces
- Confirm the name of the adapter that will connect to the network.
- Type the following command to import the network profile and press Enter: netsh wlan add profile filename="PATH\TO\PROFILE.XML" Interface="YOUR-WIFI-ADAPTER-NAME" user=current
In the command, make sure to specify the location of the XML file and network interface name. For example, this command imports the xml profile located in the "Documents" folder to the Wi-Fi adapter: netsh wlan add profile filename="C:\Users\m\Documents\wi-fi-tsunami.xml" Interface="WI-FI" user=current.
- Type the following command to connect to the wireless network and press Enter: netsh wlan connect ssid=YOUR-WIFI-SSID name=PROFILE-NAME
In the command, specify the SSID and profile name that corresponds to your network. For example, this command connects to an access point using the "tsunami" SSID and "tsunami" profile name: netsh wlan connect ssid=tsunami name=tsunami.
- Quick tip: If you have multiple wireless interfaces, you must also specify in the command which adapter you want to use. For example, netsh wlan connect ssid=YOUR-WIFI-SSID name=PROFILE-NAME interface=Wi-Fi.
After you complete the steps, the computer should connect to the wireless network automatically.
More Windows resources
For more helpful articles, coverage, and answers to common questions about Windows 10 and Windows 11, visit the following resources:

Mauro Huculak has been a Windows How-To Expert contributor for WindowsCentral.com for nearly a decade and has over 22 years of combined experience in IT and technical writing. He holds various professional certifications from Microsoft, Cisco, VMware, and CompTIA and has been recognized as a Microsoft MVP for many years.
You must confirm your public display name before commenting
Please logout and then login again, you will then be prompted to enter your display name.
