


The IdeaPad Flex 14 is a budget convertible from Lenovo that's available with either an AMD or Intel processor. It starts at an affordable price, and it's built to handle some post-purchase upgrades to both RAM and solid-state drive to keep it relevant further into the future. If your model doesn't have enough memory or you need to replace some faulty hardware, this guide will show you what you need and how to complete the upgrade process.
Hardware to get the job done
- Compatible SODIMM RAM: Crucial DDR4-2400 (From $19 at Amazon)
- Prevent damage: Rosewill anti-static wristband ($8 at Amazon)
- All required tools: ORIA PC toolkit ($33 at Amazon)
- Budget 14-inch convertible: Lenovo IdeaPad Flex 14 ($530 at Amazon)
How to upgrade RAM in your Lenovo IdeaPad Flex 14
Note: Before beginning any upgrades on a PC, it's a good idea to back up your data in the unlikely event something should go wrong. You'll also want to ensure you're not working in a static-filled environment, as it can cause damage to a PC's internal hardware. Consider investing in an anti-static wristband to avoid unnecessary damage.
The IdeaPad Flex 14, depending on which configuration you buy, comes with either 4GB, 8GB, or 16GB of DDR4-2400MHz SODIMM RAM. Because there is only one slot for RAM inside the laptop, the upgrade likely only makes sense for those who don't already have 16GB of RAM, unless you're replacing faulty hardware. In any case, the process remains the same.

We recommend Crucial SODIMM RAM as an upgrade, available in 4GB, 8GB, and 16GB sticks. It's competitively priced, it's reliable, and it shouldn't have any compatibility issues with your Flex 14.
Once you have the RAM you'd like to upgrade with ready to go, clear out a well-lit workspace and power down your Flex 14 before proceeding with the steps below.
- Unscrew the 10 black fasteners on the back panel of the laptop using a T6 screwdriver. The screws will back out completely, so be sure to have a receptacle nearby to keep them together.

- Pry up the bottom panel using a pry tool. Start at one corner and work your way around the laptop.

- Remove the metal shield sitting over the RAM. It's held in place by pressure clips, so use your thumb or a pry tool to lift it away from the motherboard.

- Unclip the arms on either side of the RAM by applying pressure. The RAM should pop up and remain at an angle.

- Remove the RAM from the slot by pulling it away at about a 45-degree angle.

- Insert the new RAM into the slot at a 45-degree angle. Notice it is keyed and will only fit one way.
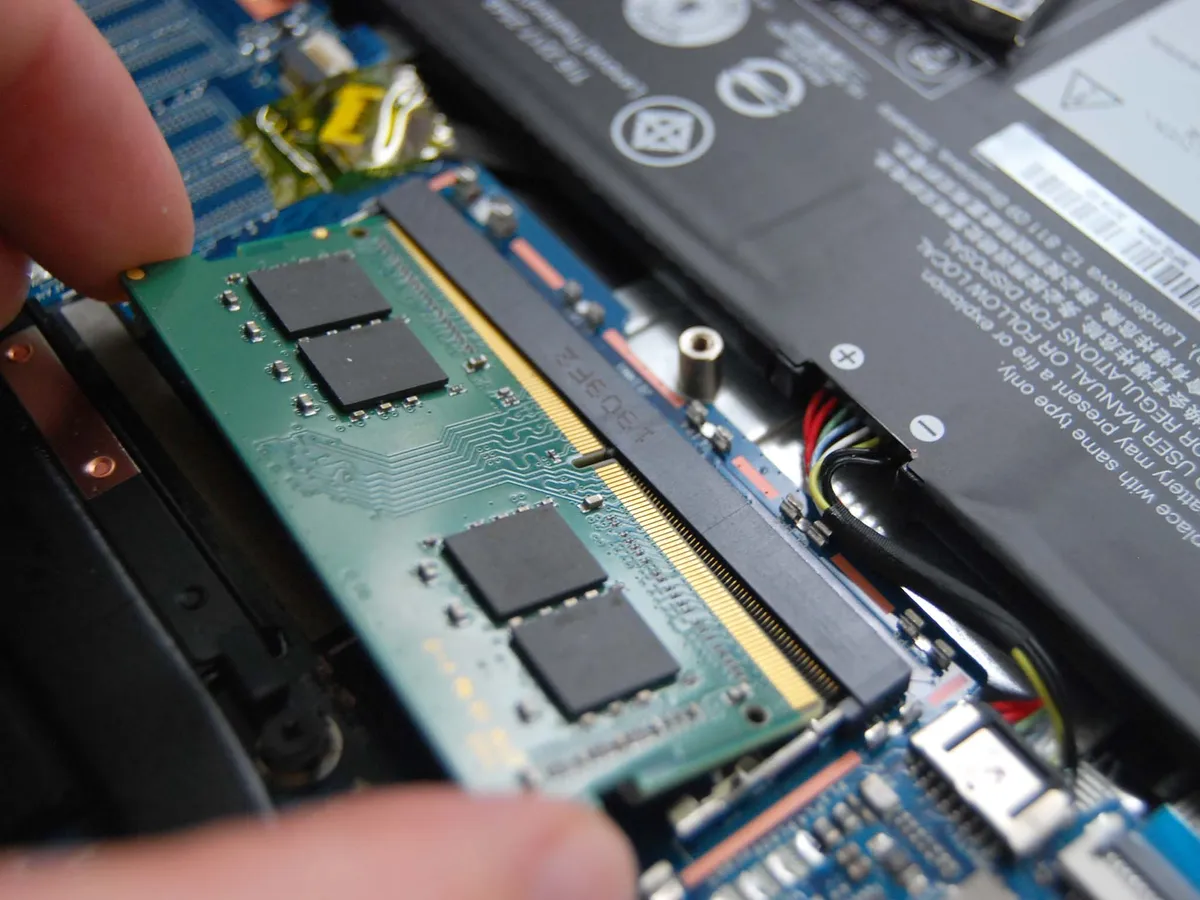
- Press down on the RAM so that the side arms clip back into place.

- Press the metal shield back over the RAM, ensuring the small clips on the motherboard line up with the edges of the shield.

- Replace the bottom panel of the laptop by applying pressure. It will click back into place.

- Screw in the 10 fasteners on the bottom panel.

You should now be free to power on your Flex 14 to ensure the RAM upgrade went according to plan. You can check to see if it's been recognized by your system with the following steps.
- Right-click the Start button.
- Click System.

You should now be able to see the total amount of installed RAM in the Device specifications section. As long as it matches the total amount you have installed, your upgrade was a success.
Our top hardware picks
We've had nothing but success with Crucial RAM, and this DDR4 SODIMM option is no different. It's available in 4GB, 8GB, and 16GB sticks so you can get the amount you want.

Reliable and affordable
It's not the only choice out there, but we love Crucial RAM for its price and durability. Choose from a number of sizes for your IdeaPad Flex 14.
Battery life and display take a hit to keep the price down, but otherwise the IdeaPad Flex 14 is a good looking laptop with strong performance, and it can be had with AMD or Intel hardware. Upgrade RAM and solid-state drive to keep it relevant longer into the future.

A solid laptop with some cut corners
If you're looking for a convertible laptop somewhere around the $500 mark, the Flex 14 should do the trick. It's built well, the keyboard is comfortable, and there's a generous selection of ports for connecting peripherals.
Additional Equipment

ORIA PC toolkit ($33 at Amazon)
Having the proper gear to work on your PC will always make the job much easier. Here you get a plethora of tools contained in a portable case.

Rosewill anti-static wristband ($8 at Amazon)
Static electricity can damage sensitive PC parts, so remove the risk with an anti-static wristband. Fasten it around your wrist and clip it onto your PC for peace of mind.

