Enable secure Boot and TPM 2.0 on Windows 10: a step-by-step guide
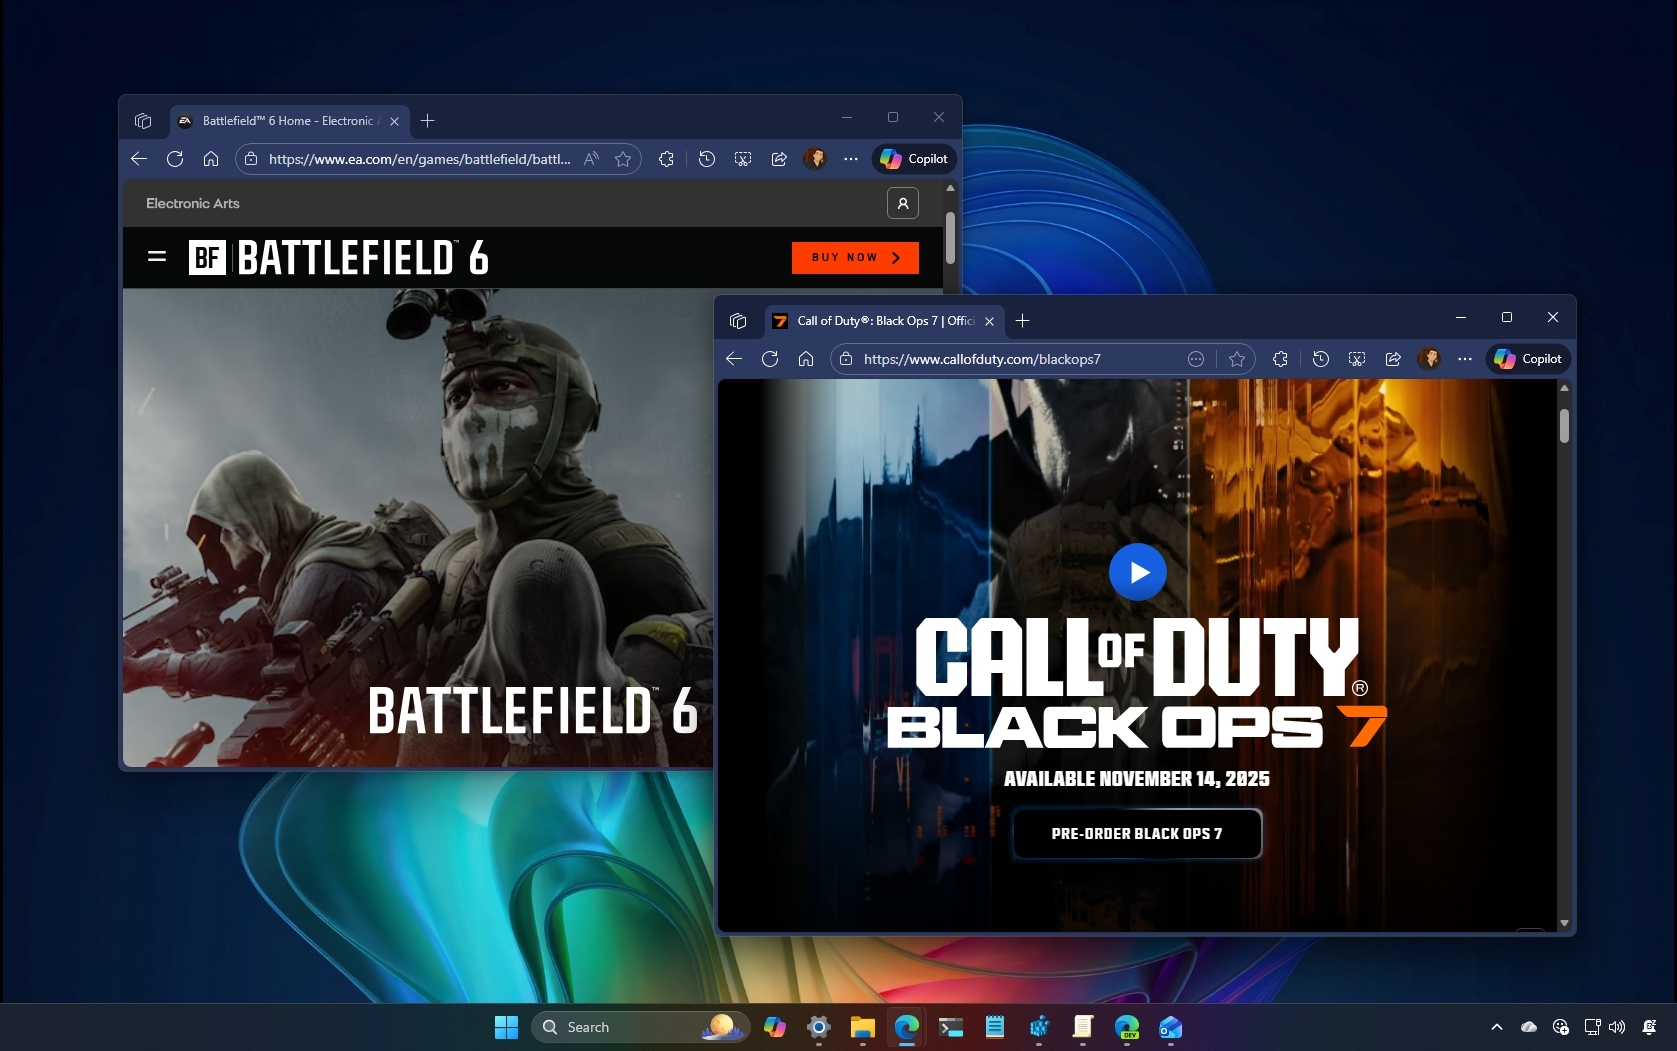
As modern games like Battlefield 6 and Call of Duty: Black Ops 7 raise the bar with stringent security requirements, Windows 10 users are left navigating essential upgrades — namely, enabling TPM 2.0 and Secure Boot—on legacy systems.
All the latest news, reviews, and guides for Windows and Xbox diehards.
You are now subscribed
Your newsletter sign-up was successful
On Windows 10 (and 11), certain modern games (for example, Battlefield 6 and Call of Duty: Black Ops 7) now require Secure Boot and TPM 2.0 to be enabled because of anti-cheat protections. The only caveat is that these features can only be turned on if your computer supports Unified Extensible Firmware Interface (UEFI), not the older legacy BIOS firmware.
If you are running Windows 11, this should not be a concern since both UEFI and TPM 2.0 are mandatory installation requirements. However, if your device is still running Windows 10, you may encounter compatibility issues. The reason is that many older desktops and laptops still use the legacy Basic Input/Output System (BIOS), which does not support TPM or Secure Boot. That means enabling these features takes extra steps to bring your system up to standard.
The main challenge is that most legacy systems use BIOS with the Master Boot Record (MBR) partition style, while UEFI requires the GUID Partition Table (GPT). To meet game security requirements, you must first convert your drive from MBR to GPT, switch the firmware mode to UEFI, and then enable TPM 2.0 and Secure Boot in the firmware settings.
In this how-to guide, I'll outline the process to enable TPM 2.0 and Secure Boot on Windows 10.
Warning: This is a non-destructive process, but it's still highly recommended to make a full backup of your PC before proceeding in case something goes wrong and you need to recover your setup.
These instructions are intended to provide general guidance on configuring your computer for modern games. Since individual games may have different requirements, you should always review your game vendor's support website for additional information. In most cases, enabling TPM 2.0 should also enable Secure Boot to improve your system's security.
How to convert a drive from MBR to GPT on Windows 10
On Windows 10, you can use the MBR2GPT tool to quickly change the partition style without having to reinstall the operating system.
If you have to switch to UEFI to enable the Secure Boot feature, the best approach is to perform a clean installation of Windows 10. However, if you want to keep your current setup, you can convert the drive to change the system firmware type, but keep in mind that in some situations, you may encounter issues along the way.
All the latest news, reviews, and guides for Windows and Xbox diehards.
Before proceeding
If you want to reduce the chances of issues, check that:
- The computer supports the UEFI firmware type.
- You're running Windows 10 version 1703 or higher.
- The setup has the BitLocker encryption feature disabled.
It's not always the case, but you also want to confirm in Disk Management that the current setup doesn't have an empty "2 MB RAW" partition. If it does, delete it before proceeding.
Check partition style type
Before making system changes, check the current settings to determine whether the system is set to MBR or GPT using these steps:
- Open Start.
- Search for Disk Management and click the top result to open the experience.
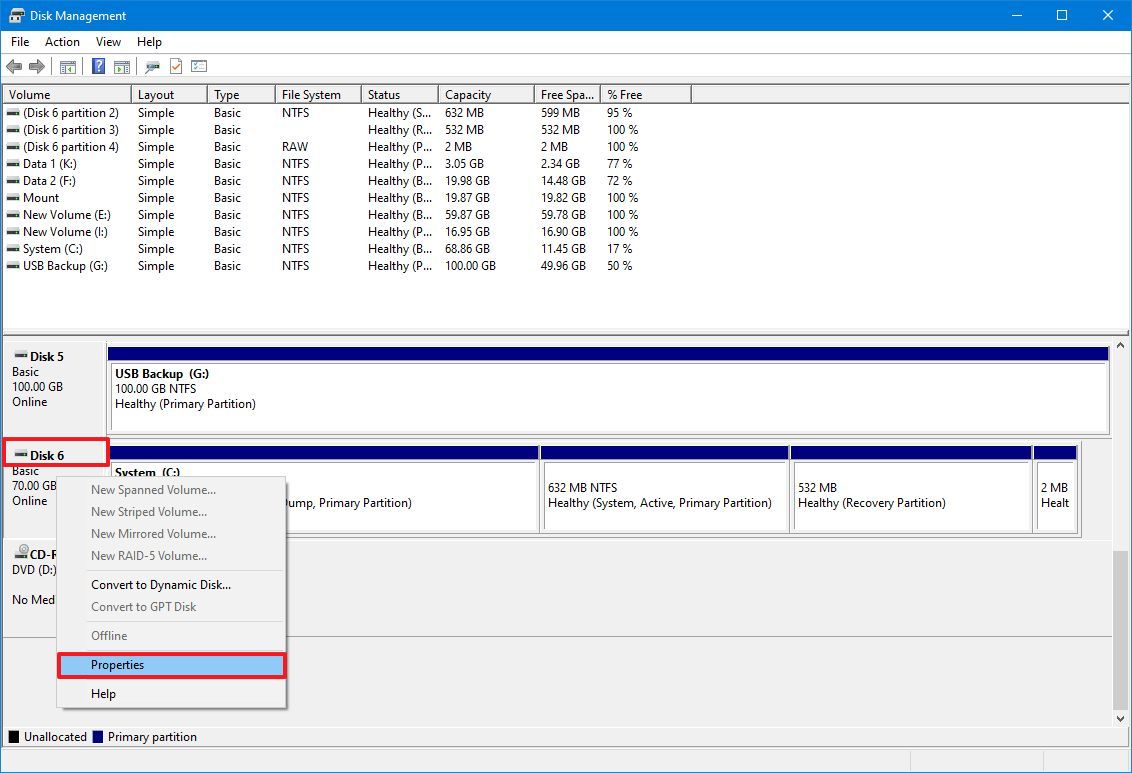
- Right-click the drive (where Windows 10 resides) and select the Properties option.
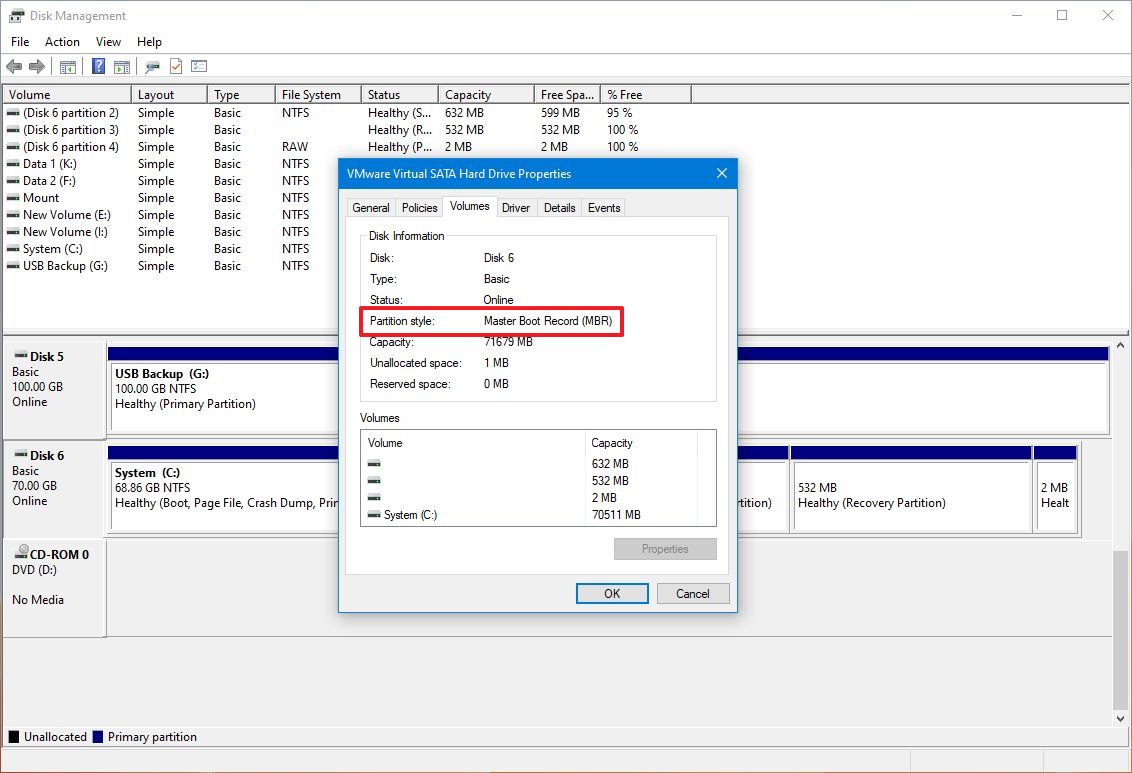
- Click on the Volumes tab.
- Under the "Partition style" field, if the field reads "GUID Partition Table (GPT)," the drive does not require conversion. However, if you see the "Master Boot Record (MBR)" label, you will need to use the conversion tool.
- Click the Cancel button.
Once you complete the steps, if the drive is configured as MBR, you'll have to change the partition style to GPT.
Also, if you need to change the partition, check your device manufacturer's support website to determine if the hardware supports UEFI before proceeding with these instructions.
Convert partition style (offline)
To convert partition style from the Windows Recovery Environment, use these steps:
- Open Settings.
- Click on Update & Security.
- Click on Recovery.
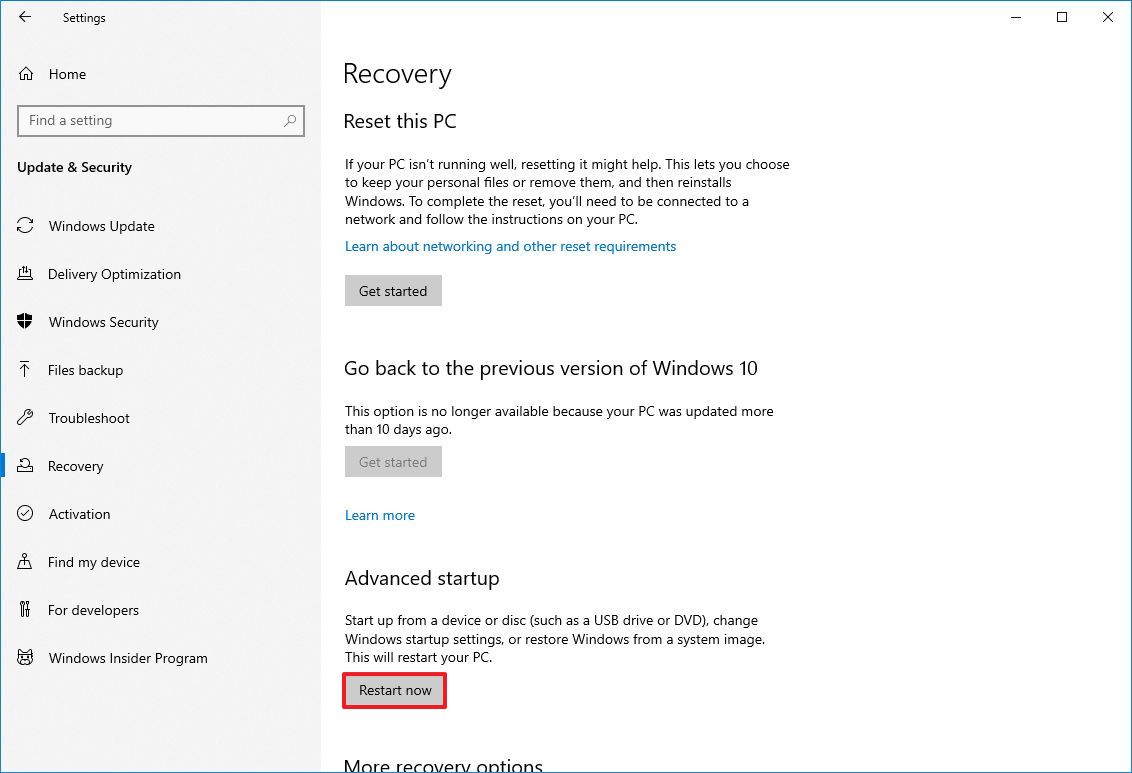
- Click the Restart now button under the "Advanced startup" section.
- Click the Troubleshoot option.
- Click on Advanced options.
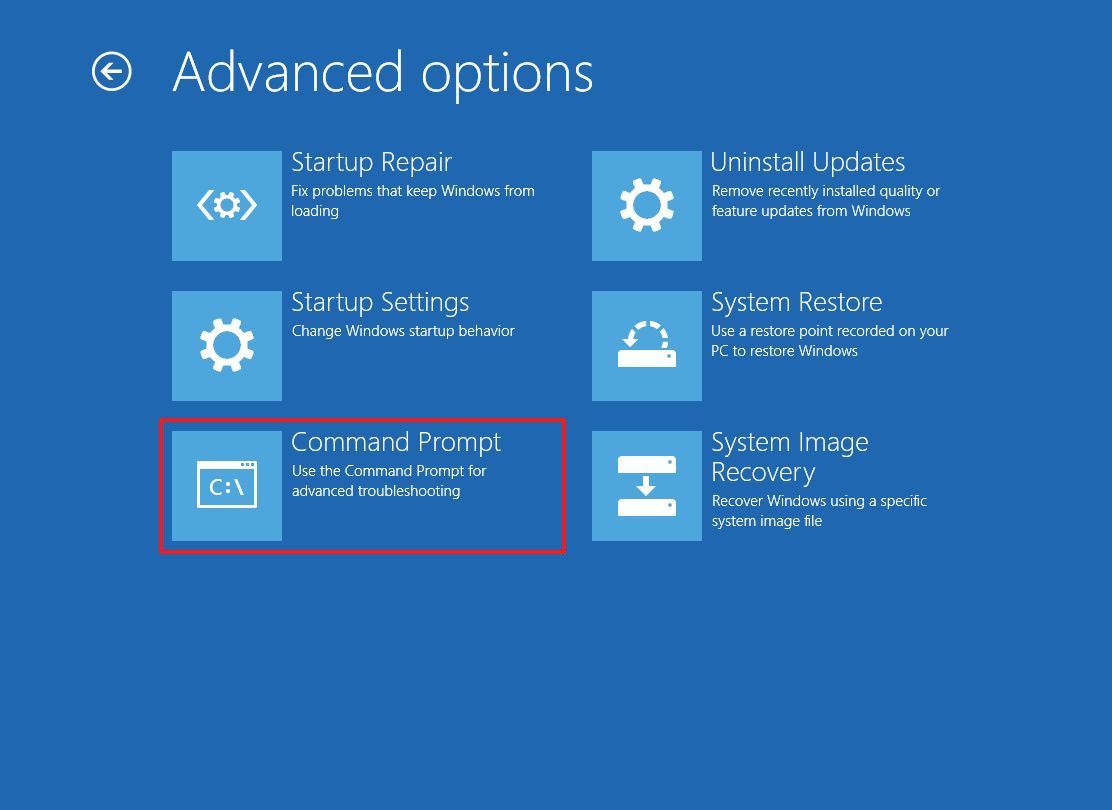
- Click the Command Prompt option.
- Select your administrator account and sign in (if applicable).
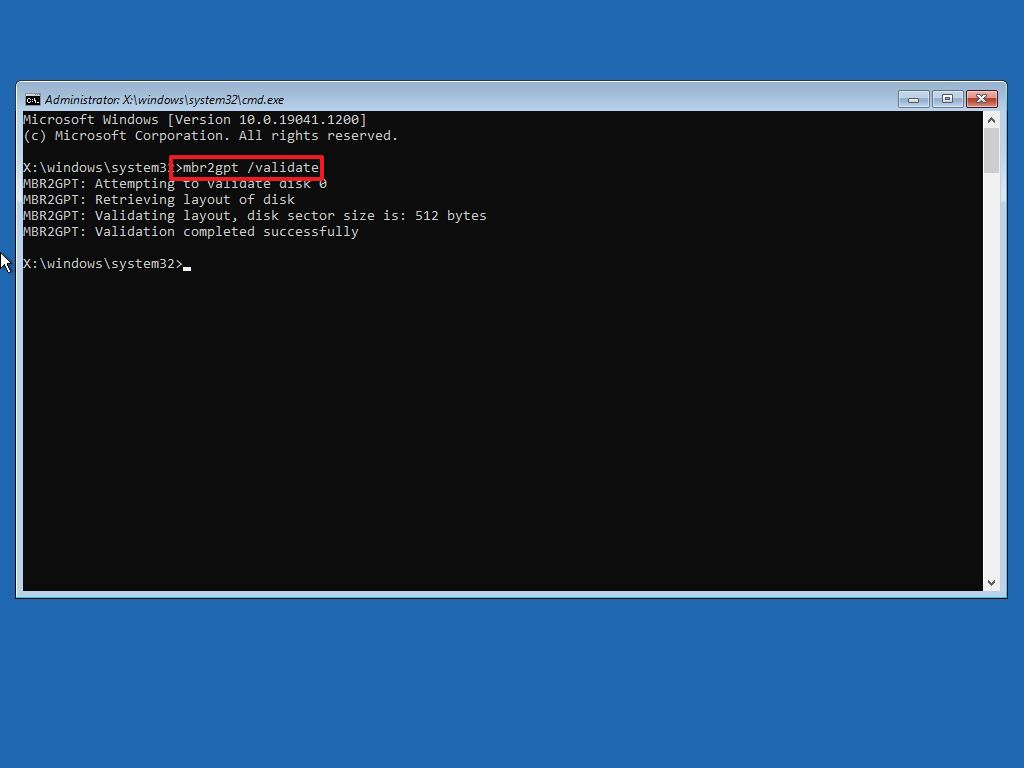
- Type the following command to validate the drive's requirements and press Enter: mbr2gpt /validate
- Quick tip: The mbr2gpt.exe is located in the "System32" folder inside the "Windows" folder. To view all available options, use the mbr2gpt /? command.
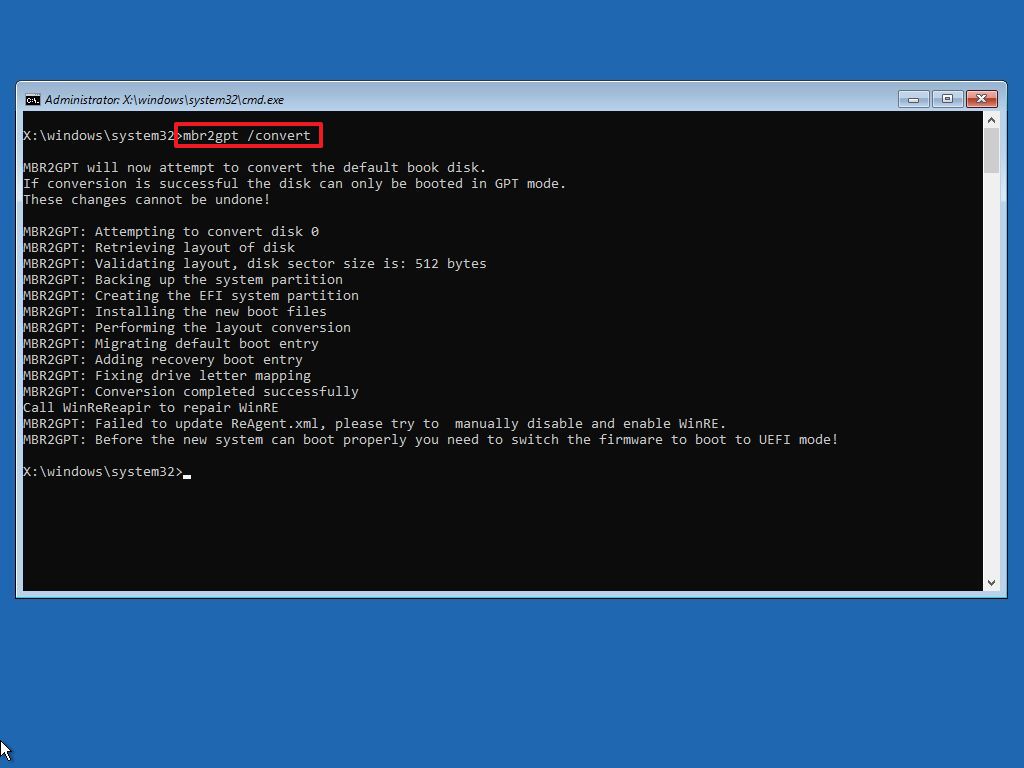
- Type the following command to convert the drive from MBR to GPT and press Enter: mbr2gpt /convert
- Quick note: The command output in this image indicates that the conversion has completed successfully, but there was an issue with the Windows Recovery Environment. If this happens, once you're in the desktop, run the reagentc /disable and reagentc /enable commands from Command Prompt (admin).
- Click the Close button.
- Click the "Turn off your PC" option.
After completing the steps, the tool will validate the drive and make the necessary changes to convert the partition style.
Once this process is complete, don't try to load the operating system, because it will fail.
Convert partition style (online)
If you want to run the MBR2GPT tool while the operating system is still running, it should work in most cases. However, you may also encounter issues. If you want to avoid problems, you should run the tool offline from the Windows Recovery Environment (see the above steps).
To convert a drive from MBR to GPT while the Windows 10 desktop is loaded, use these steps:
- Open Start.
- Search for Command Prompt, right-click the top result, and select the Run as administrator option.
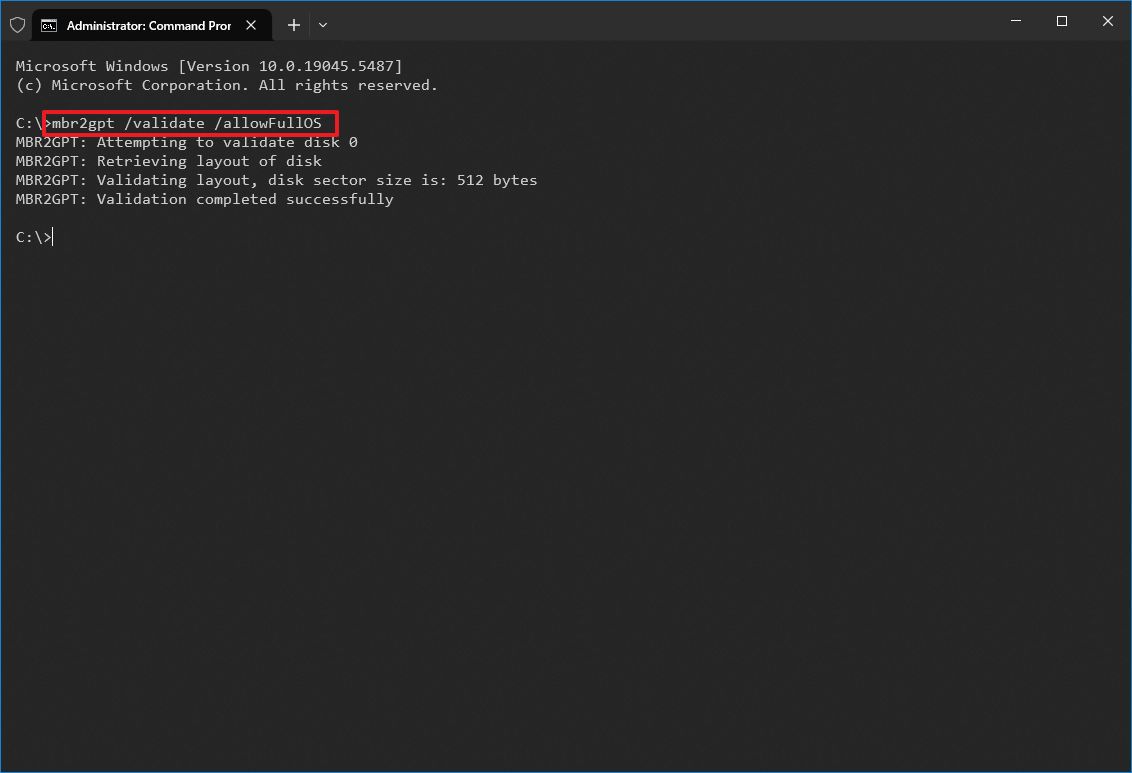
- Type the following command to validate the drive and press Enter: mbr2gpt /validate /allowFullOS
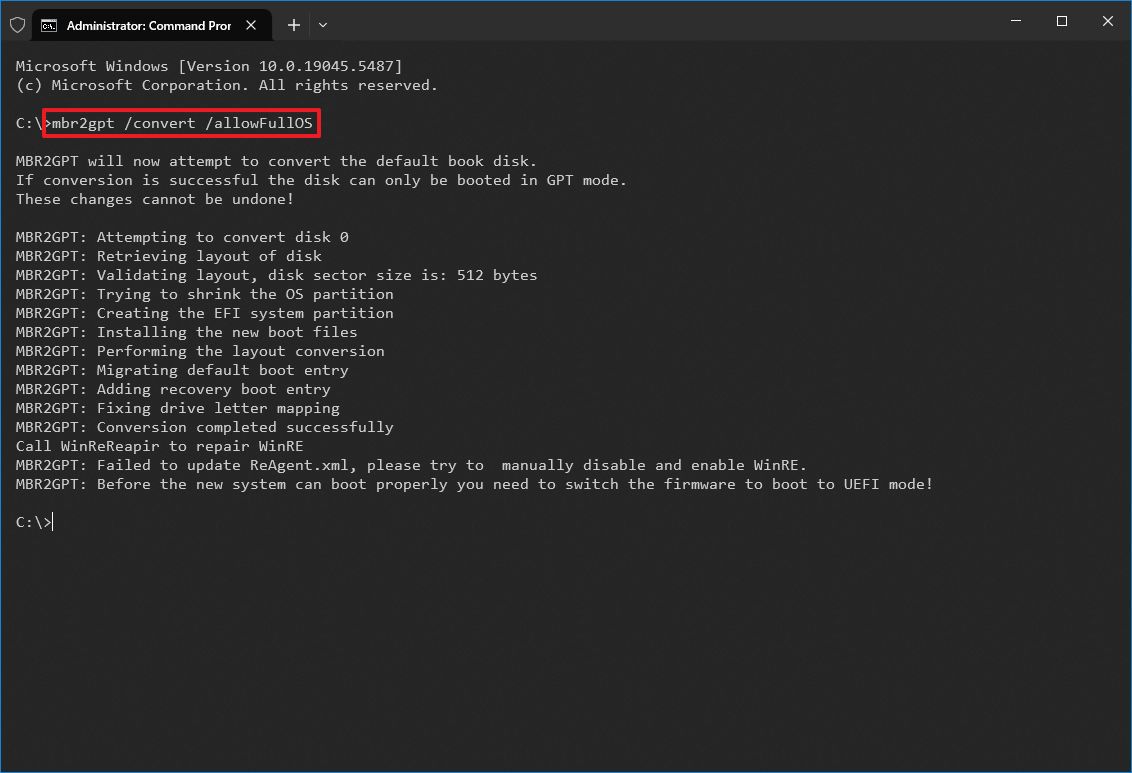
- Type the following command to convert the drive to GPT and press Enter: mbr2gpt /convert /allowFullOS
Once you complete the steps, the tool will perform the changes to convert the drive from MBR to GPT.
After this process is complete, don't try to load the operating system, because it will fail. Instead, power off the computer, and continue with the steps below to switch from BIOS to UEFI.
How to change the firmware type from BIOS to UEFI
After converting the drive to the newer partition style, the computer will no longer boot correctly until you change the firmware type from BIOS to UEFI in the motherboard.
To switch from BIOS to UEFI, use these steps:
- Power on the PC.
- Quick note: Typically, this process requires pressing one of the function keys (F1, F2, F3, F10, or F12), the "Esc" key, or the "Delete" key as soon as you start the device. However, since these options can always be different, it's best to check your device manufacturer's support website for more specific details.
- Open the boot menu page according to your motherboard settings.
- Change the firmware type to UEFI.
- Save the changes to reboot the system.
After you complete the steps, the computer should start normally.
How to enable Secure Boot on Windows 10
If the device starts correctly, then the partition style was converted correctly to GPT, the firmware has been successfully switched to UEFI, and you can now enable the Secure Boot feature.
To enable Secure Boot on Windows 10, use these steps:
- Open Settings.
- Click on Update & Security.
- Click on Recovery.
- Click the Restart now button under the "Advanced startup" section.
- Click on Troubleshoot.
- Click on Advanced options.
- Click the "UEFI Firmware settings" option.
- Click the Restart button.
- Open the boot or advanced settings page, depending on your motherboard.
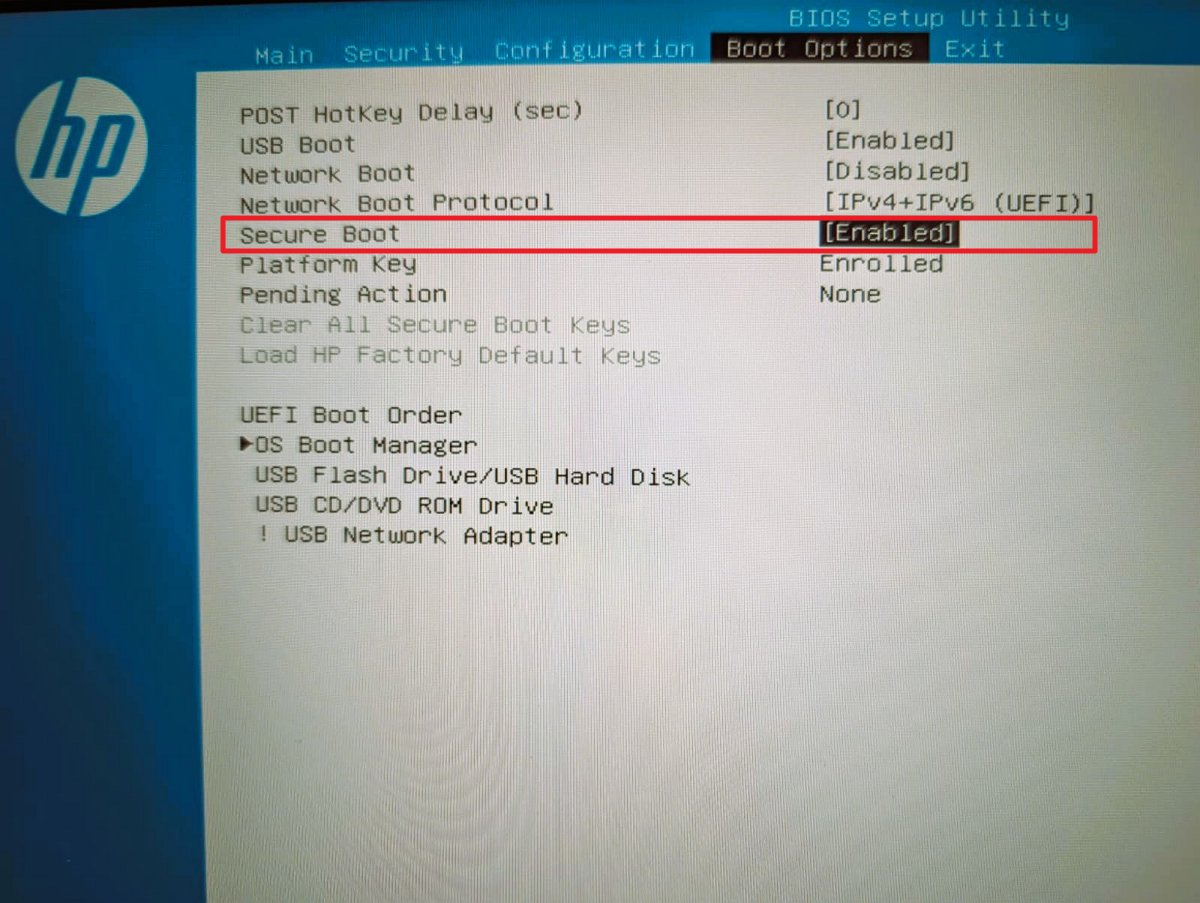
- Select the "Secure Boot" option.
- Choose the Enabled option.
- Save the changes to reboot the system.
Once you complete the steps, the Secure Boot feature will be enabled on your device.
How to enable TPM 2.0 on Windows 10
To enable TPM 2.0 on Windows 10, use these steps:
- Open Settings.
- Click on Update & Security.
- Click on Recovery.
- Click the Restart now button under the "Advanced startup" section.
- Click on Troubleshoot.
- Click on Advanced options.
- Click the "UEFI Firmware settings" option.
- Click the Restart button.
- Open the advanced or security page, depending on your motherboard.
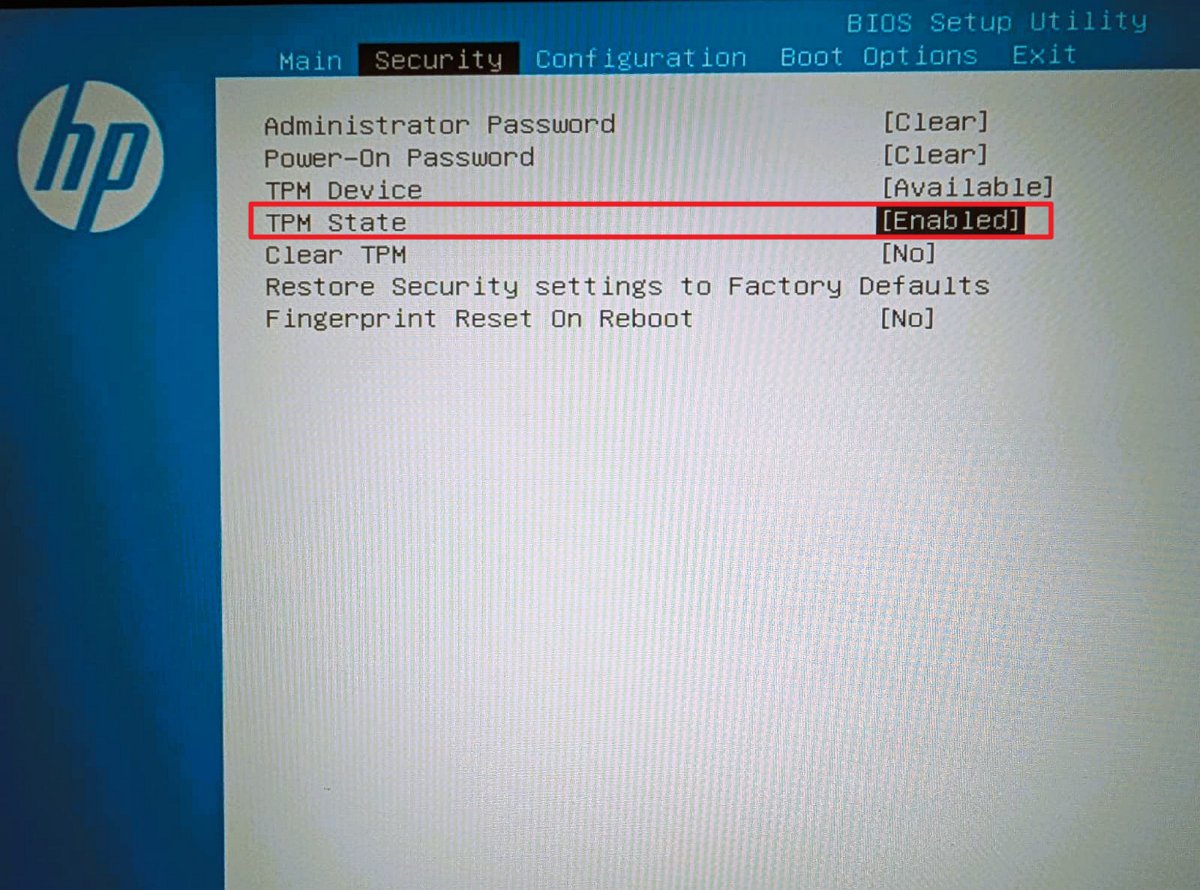
- Select the "TPM" option.
- Choose the Enabled option.
- Save the changes to reboot the system.
After you complete the steps, the TPM 2.0 feature will be enabled on your computer.
It's important to note that, depending on the motherboard, the TPM 2.0 option could appear with different names:
- Intel: The equivalent of fTPM on Intel platforms is called Platform Trust Technology (PTT).
- AMD: On AMD platforms, the fTPM feature is called fTPM or AMD fTPM Switch.
- ASUS: The company often uses the name TPM-SPI for its add-on TPM modules, but for the built-in firmware version, it uses the Intel PTT and AMD fTPM names.
- Gigabyte: The company also uses manufacturer-specific names, such as Intel Trusted Technology (PTT) and AMD CPU fTPM.
- MSI: The company often has a "Trusted Computing" section, where you'll find an option to enable "Security Device Support" and then select "TPM Device Selection" and choose the "PTT" or "fTPM" option.
If you can't determine where the option is located, it's best to consult with the motherboard's manual, which you can often find on the manufacturer's support website.
Once you complete these steps, you should now be able to install and play games that require Secure Boot and TPM 2.0 on Windows 10.
Although you can still use this operating system to play games, it's important to note that support for Windows 10 ended on October 14, 2025, meaning Microsoft is no longer offering support or updates unless you enroll in the Extended Security Updates (ESU) program.
If you're still on Windows 10, it's highly recommended to upgrade to Windows 11 as soon as possible.
More resources
Explore more in-depth how-to guides, troubleshooting advice, and essential tips to get the most out of Windows 11 and 10. Start browsing here:
- Windows 11 on Windows Central — All you need to know
- Windows 10 on Windows Central — All you need to know

Follow Windows Central on Google News to keep our latest news, insights, and features at the top of your feeds!

Mauro Huculak has been a Windows How-To Expert contributor for WindowsCentral.com for nearly a decade and has over 22 years of combined experience in IT and technical writing. He holds various professional certifications from Microsoft, Cisco, VMware, and CompTIA and has been recognized as a Microsoft MVP for many years.
You must confirm your public display name before commenting
Please logout and then login again, you will then be prompted to enter your display name.
