


Lenovo's Legion Y7000 gaming laptop is a great alternative to the more expensive Legion Y500- and Y700-series laptops that nevertheless delivers great performance. Upon removing the back panel of the laptop, you have easy access to the RAM, M.2 solid-state drive (SSD) and hard-disk drive (HDD) for upgrades. Whether you're looking to replace the stock 2.5-inch 5,400 RPM HDD with something larger or faster, we've laid out the entire process right here.
Hardware and software to get the job done
- 2.5-inch SATA SSD: Samsung 860 EVO (From $58 at Amazon)
- Enclosure for cloning: Inateck SATA drive enclosure ($20 at Amazon)
- Cloning tool: Macrium Reflect 7 (Free at Macrium)
- Prevent damage: Rosewill anti-static wristband ($6 at Amazon)
- All required tools: ORIA PC toolkit ($34 at Amazon)
- Mid-range gaming laptop: Lenovo Legion Y7000{.speciallink} ($1,100 at Costco)
How to upgrade the 2.5-inch HDD in your Lenovo Legion Y7000
Note: Before beginning any upgrades on a PC, it's a good idea to backup your data in the unlikely event something should go wrong. You'll also want to ensure you're not working in a static-filled environment, as it can cause damage to a PC's internal hardware. Consider investing in an anti-static wristband to avoid unnecessary damage.
The Lenovo Legion Y7000 comes with a 2.5-inch, 1TB HDD for mass storage and an M.2 PCIe SSD for quick Windows boots and increased performance. You can replace the HDD with either a SATA SSD (which we recommend) or another SATA HDD using this guide, as the steps won't change.

Because Windows 10 comes installed on the M.2 PCIe SSD, you don't have to worry about cloning Windows over to the new hardware. However, if you already have a lot of data saved on the old HDD that you can't re-download or can't temporarily save elsewhere — like on an external hard drive — you can still clone to the new SSD or HDD using an enclosure and Macrium Reflect.
We've had success with Macrium in the past and have even written a guide to get you through the cloning process. If you're upgrading to a Samsung drive, you can use its proprietary software to clone instead.
Once you've made the necessary backups and have completed any optional cloning, you can proceed with the steps below to upgrade the 2.5-inch HDD in your Legion Y7000. Be sure to power off your laptop before removing the back panel.
- Unscrew the 11 fasteners on the back panel of the Legion Y7000 using a Philips-head screwdriver. There are also two screws in the black venting along the back edge, but they can remain in place.

- Pry up the bottom panel using a thumb or pry tool. Start with a front corner and carefully work your way around so as to not damage the panel or keyboard deck.

- Unscrew the four black fasteners holding the HDD mount in place using a Philips-head screwdriver.
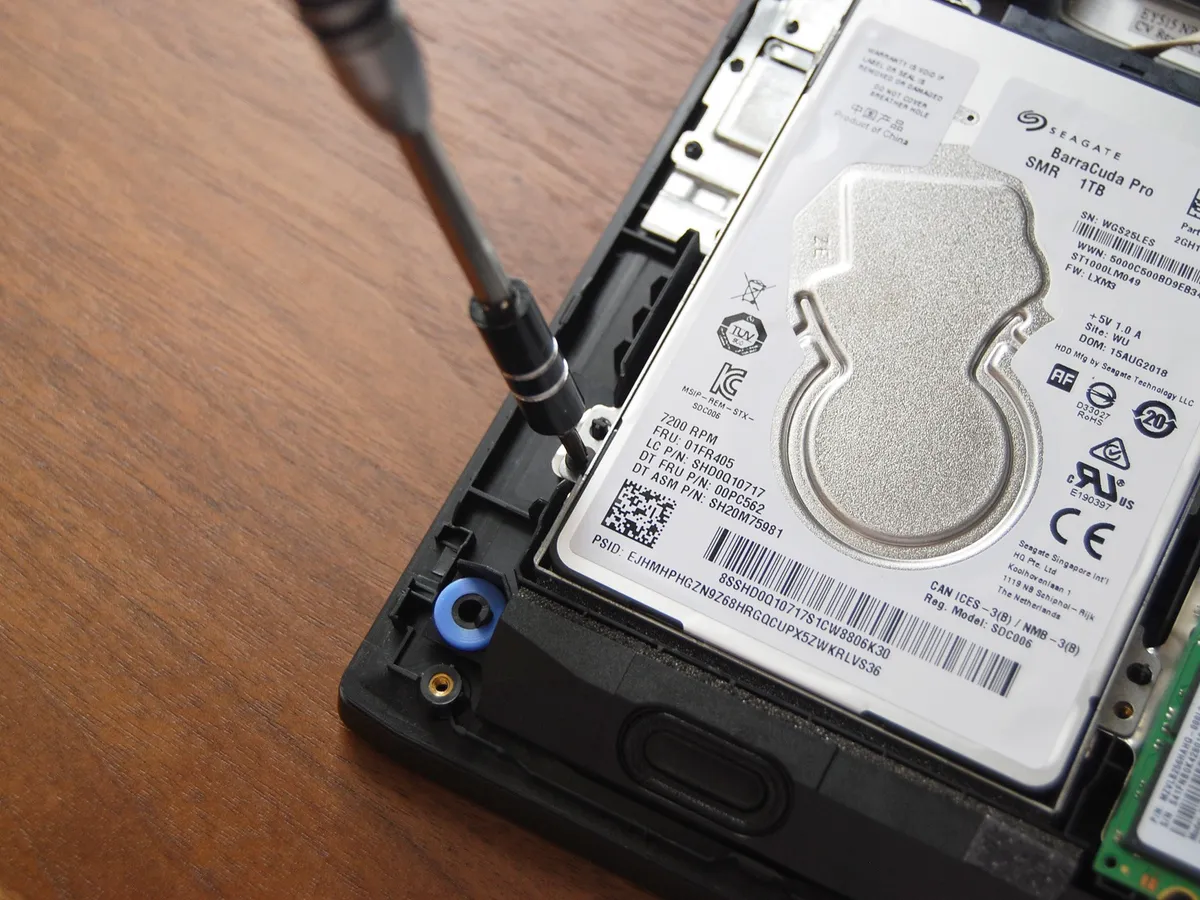
- Remove the SATA connector from the HDD. It will unplug with average force.

- Unscrew the four silver screws on the sides of the HDD mount using a Philips-head screwdriver. This will free the HDD from the mount.

- Remove the HDD from the mount.

- Fit the new 2.5-inch storage into the mount.

- Screw in the four silver fasteners on the sides of the mount.

- Plug the SATA connector into the new storage drive. Notice that it will only fit one way.

- Screw in the four black fasteners that hold the mount in place.

- Replace the bottom panel of the laptop by applying pressure around the edges. You should hear the panel snap back into place when it's seated properly.

- Screw in the 11 fasteners on the back panel.

You're now free to boot up your Legion Y7000 and check to see if the storage update went according to plan.
Our top hardware and software picks
Our pick for an upgrade is Samsung's 860 EVO 2.5-inch SATA SSD, which adds better performance and can add more space depending on the size you buy.

Up to 4TB of speedy storage
Get read speeds up to 550 MB/s and write speeds up to 520 MB/s for superior performance, and take advantage of a 5-year warranty. If you're going to the trouble of replacing your HDD, do it right with the 860 EVO.
Not only does the Legion Y7000 come with impressive specs straight from the factory, the RAM, SSD, and HDD can also be upgraded to keep it relevant longer.
Lenovo Legion Y7000

$1,100 at Costco
Gaming laptop with GTX 1060 and hexa-core Intel CPU
Lenovo's Legion Y7000 is a worthwhile alternative to the Legion 700 series, focusing more on power than on extra features that don't contribute to overall performance.
Powerful but affordable
Additional Equipment
To make the upgrade process easier and less risky, consider investing in some of these affordable PC tools, and don't forget about Macrium Reflect for those who want to clone drives.

Inateck SATA enclosure ($20 at Amazon)
If you'd like to clone the 2.5-inch HDD's data over to your new storage, an external enclosure will facilitate the process. Insert the new SSD or HDD into the enclosure, plug it into your laptop with USB-C or USB-A, and let the cloning software take over.

Macrium Reflect 7 (Free at Macrium)
We've had success cloning drives with Macrium Reflect 7, and have even written a complete guide on how to use it properly. A free edition is available, but you can purchase a full edition with a bunch more features for those who truly take backups seriously.

ORIA PC toolkit ($34 at Amazon)
Having the proper gear to work on your PC will always make the job much easier. Here you get a plethora of tools contained in a portable case.

Rosewill anti-static wristband ($6 at Amazon)
Static electricity can damage sensitive PC parts, so remove the risk with an anti-static wristband. Fasten it around your wrist and clip it onto your PC for peace of mind.

