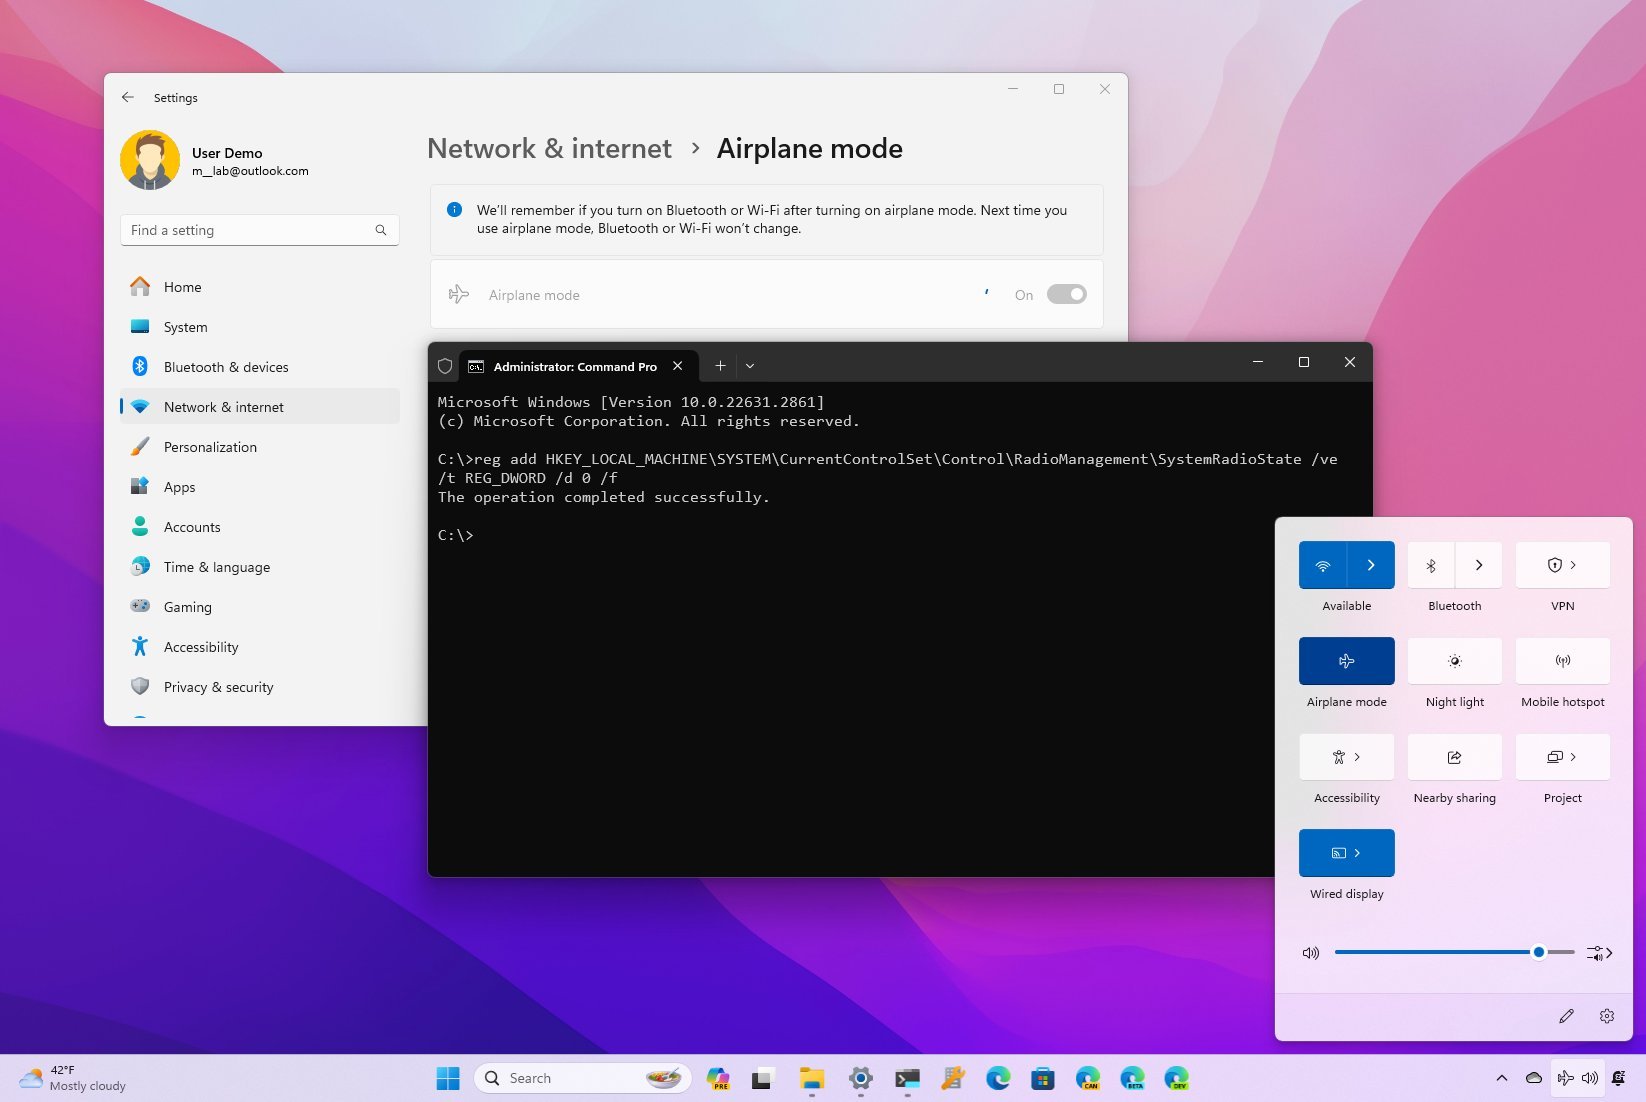
How to enable or disable Airplane mode on Windows 11 and Windows 10
Airplane mode helps to disable (and enable) all wireless communications quickly, and here's how.
All the latest news, reviews, and guides for Windows and Xbox diehards.
You are now subscribed
Your newsletter sign-up was successful
On Windows 11, the "Airplane mode" gives you a way to disable one or all wireless devices (Wi-Fi, Bluetooth, Global Positioning System (GPS), Near Field Communication (NFC), and cellular) quickly with one button as required, such as when you are boarding a plane or in a place that limits the use of wireless signals.
In addition, you can also use Airplane mode to conserve battery since while the feature is enabled, the device won't be using power to transmit data.
Whatever the situation might be, Windows 11 offers at least five ways to enable or disable Airplane mode using the keyboard's dedicated function key, Quick Settings, Settings app, Lock screen, and Command Prompt.
In this how-to guide, I will walk you through the steps to control Airplane mode on your computer.
How to enable Airplane mode on Windows 11
Windows supports multiple ways to manage Airplane mode on your laptop or desktop computer, including using a dedicated function key, Quick Settings flyout, networking settings, through the Lock screen, and with commands.
Function key method
Laptops usually include a dedicated physical key to enable or disable Airplane mode. If so, press the "Function key + Airplane" keyboard shortcut (or dedicated key) to turn on the feature.
Quick Settings method
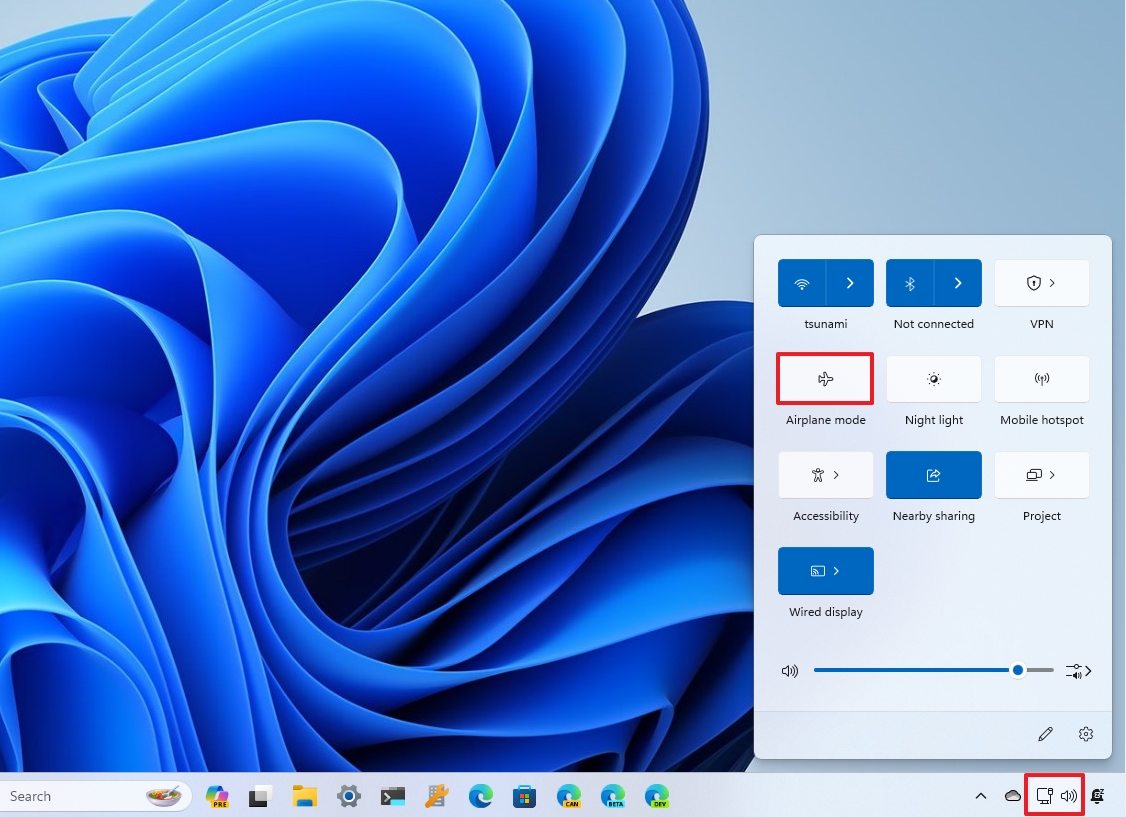
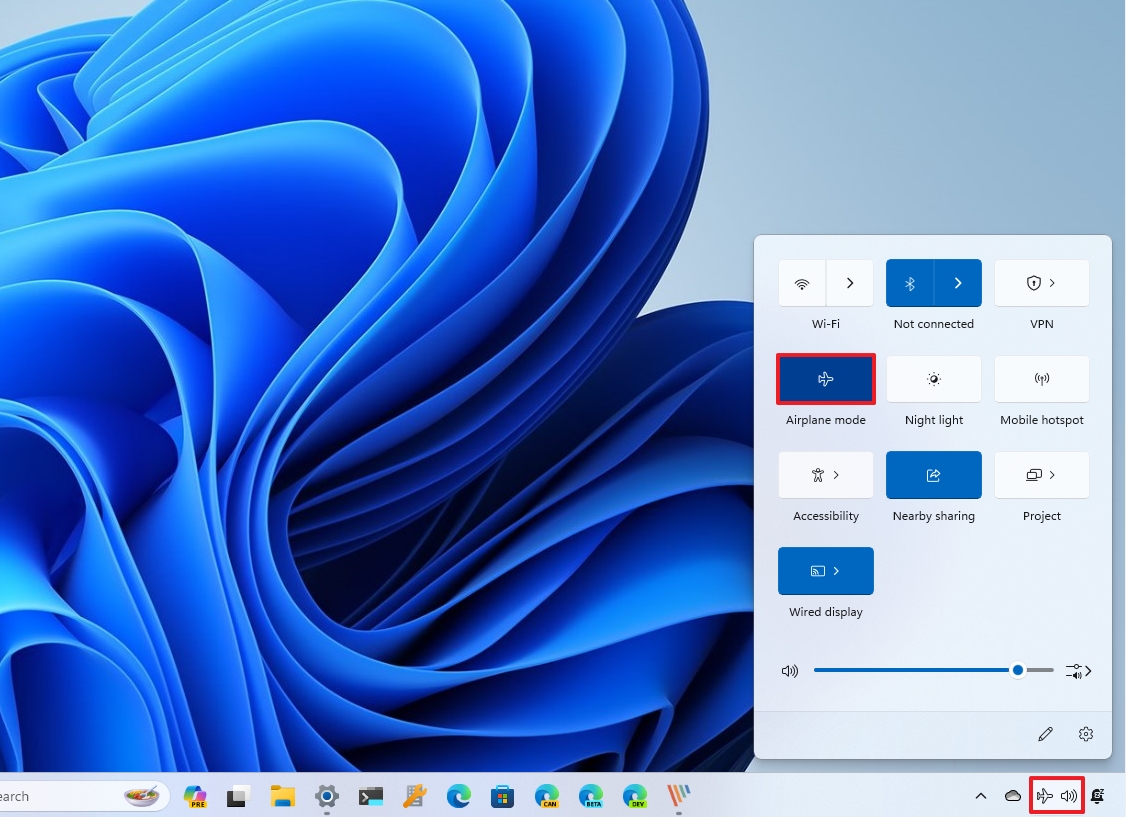
To configure Airplane mode using Quick Settings, use these steps:
All the latest news, reviews, and guides for Windows and Xbox diehards.
- Click the network and volume button in the system tray.
- Click the Airplane mode button to enable the feature.
- Quick tip: If the option isn't available, click the Edit (pen) button, and add the button to the list.
Settings method
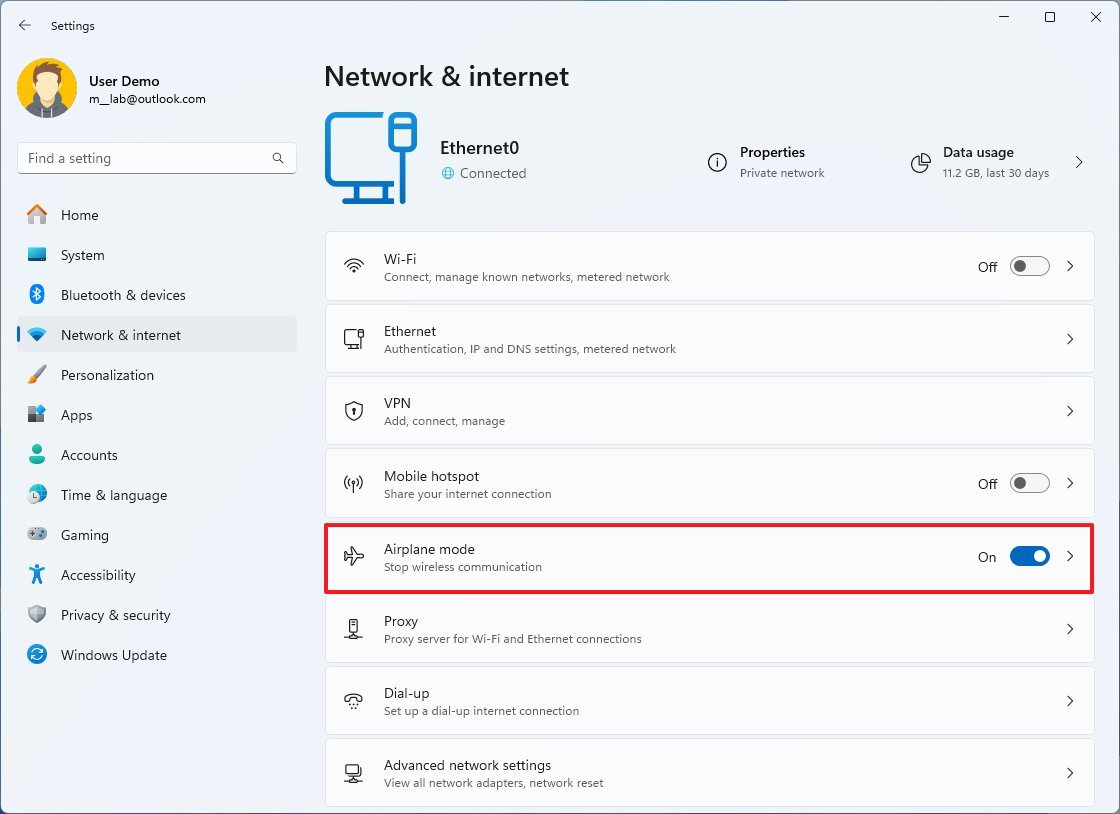
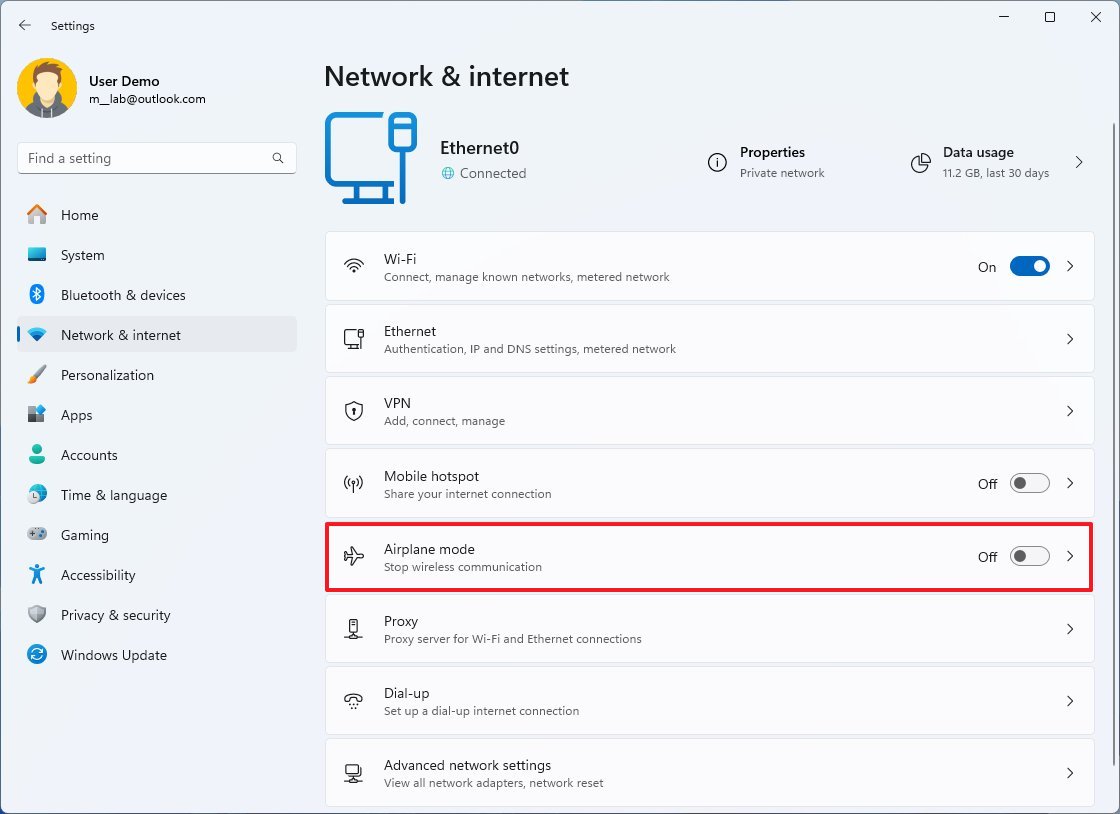
To enable Airplane mode from the networking settings page, use these steps:
- Open Settings.
- Click on Network & internet.
- Turn on the Airplane mode toggle switch to enable the feature.
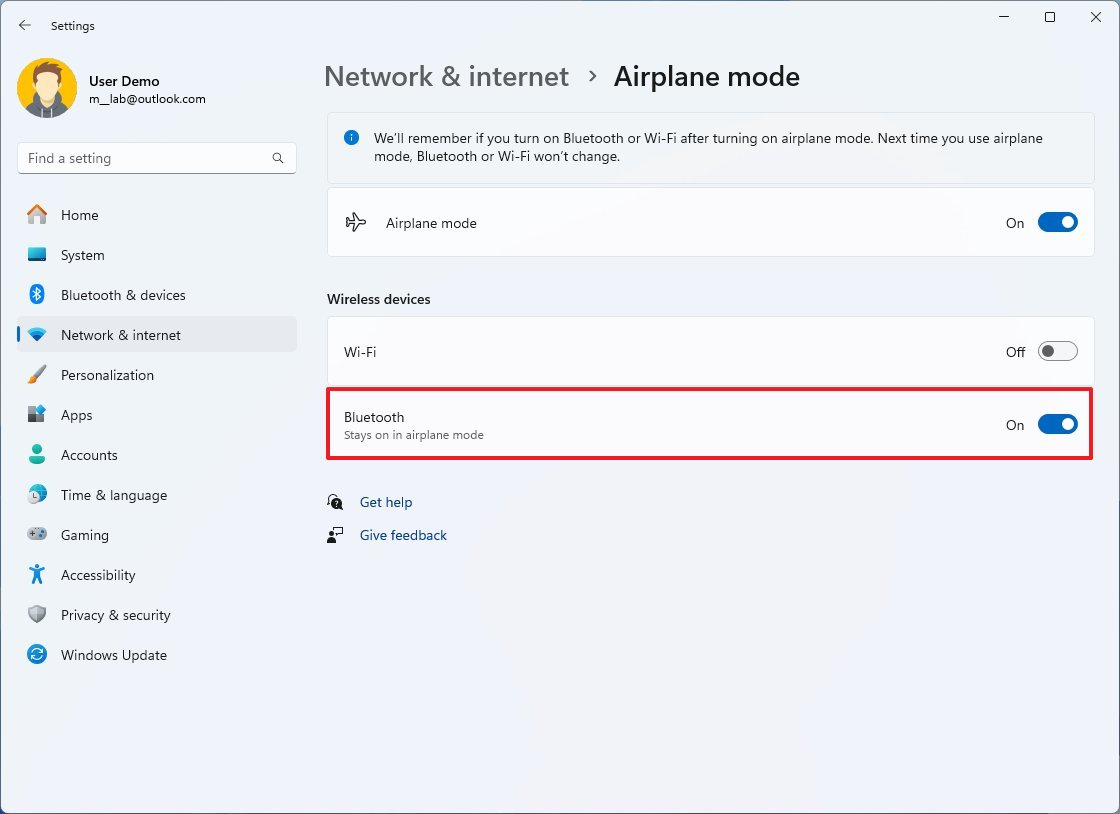
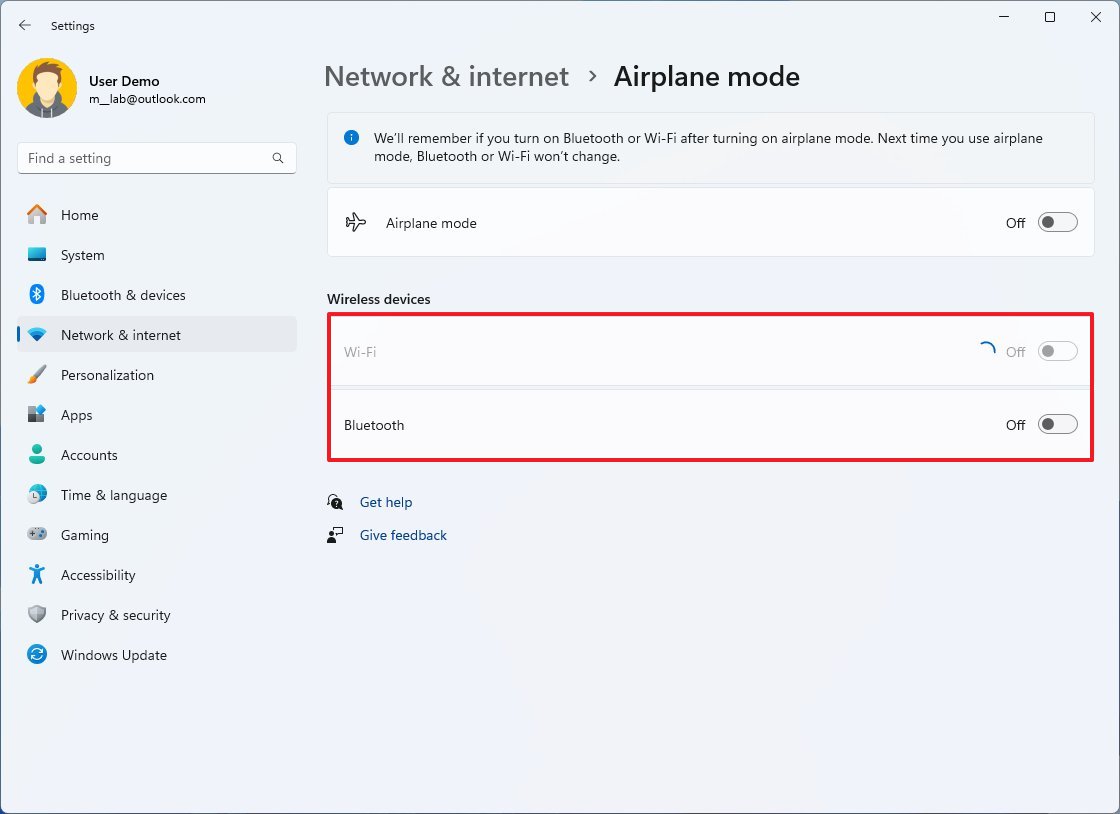
- (Optional) Turn on the Airplane mode toggle switch to enable the feature.
- Click the Airplane mode page from the right side.
- Turn on the Wi-Fi or Bluetooth toggle switch to enable Airplane mode for the features individually.
Command line method
Windows 11 doesn't include a tool to change the state of the Airplane mode, but you can use a command to modify the Registry to enable the feature.
Warning: This is a friendly reminder that editing the Registry is risky and can cause irreversible damage to your installation if you don't do it correctly. Before proceeding, it's recommended that you create a temporary full backup of your PC.
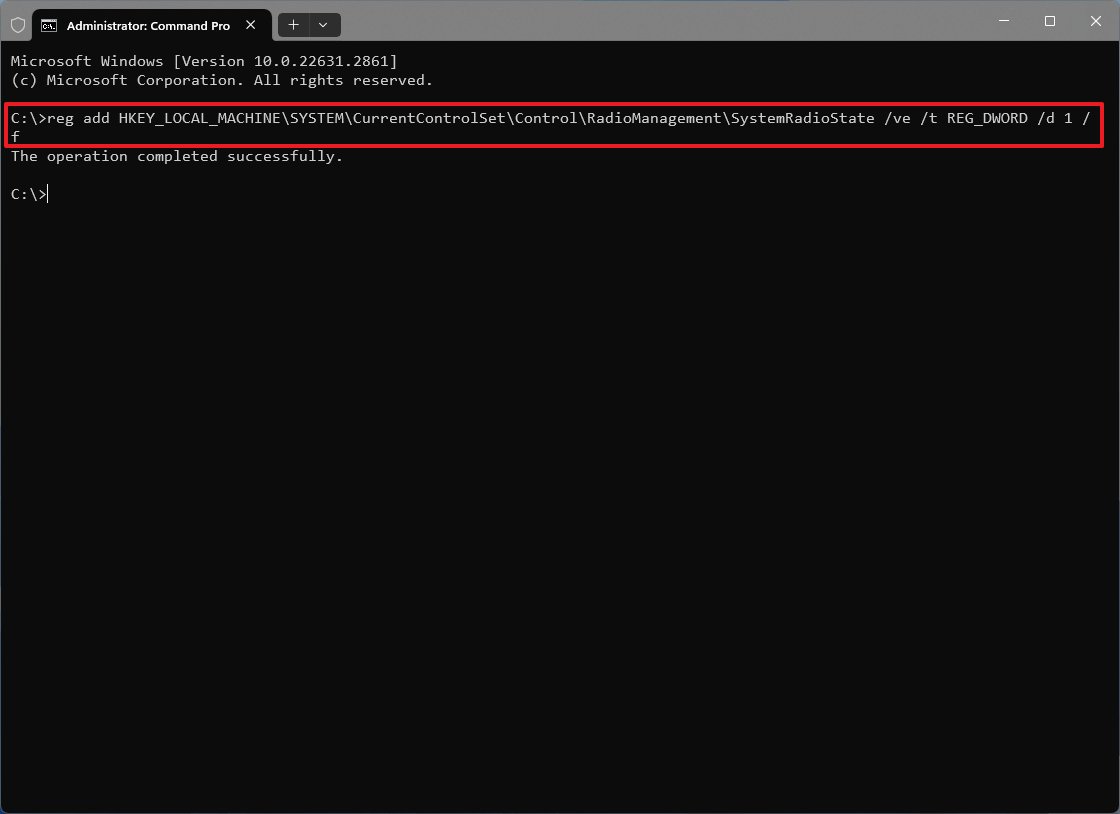
To enable Airplane mode with commands, use these steps:
- Open Start.
- Search for Command Prompt, right-click the top result, and select the Run as administrator option.
- Type the following command to enable Airplane mode and press Enter: reg add HKEY_LOCAL_MACHINE\SYSTEM\CurrentControlSet\Control\RadioManagement\SystemRadioState /ve /t REG_DWORD /d 1 /f
- Restart your computer.
Lock screen method
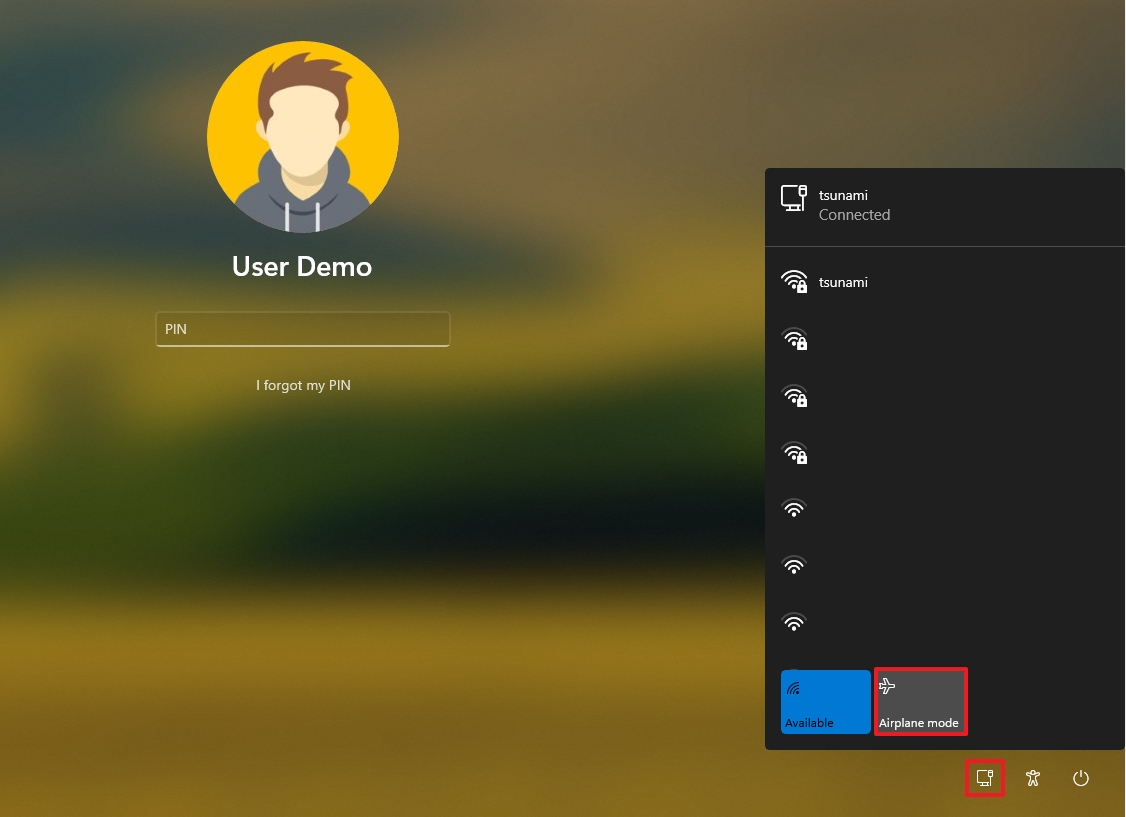
To turn on Airplane mode from the Lock screen, use these steps:
- Start the device.
- Stay in the Lock screen sign-in page.
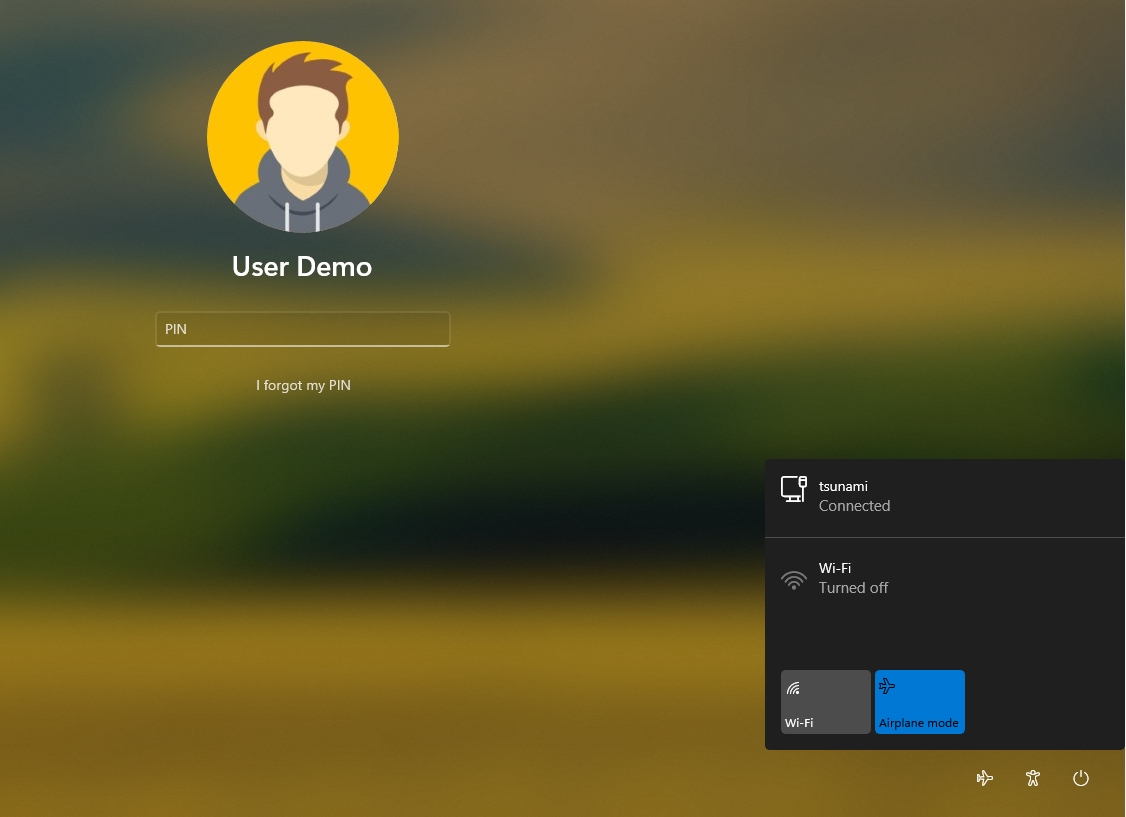
- Click the network icon in the bottom-right corner of the Lock screen.
- Turn on the Airplane mode toggle switch.
Once you complete these steps, Airplane mode will enable on Windows 11, disabling all wireless communications.
How to disable Airplane mode on Windows 11
It's also possible to disable all the wireless communications on your computer using the same methods.
Function key method
Use the "Function key + Airplane" keyboard shortcut or the dedicated key to turn off the feature.
Quick Settings method
To configure Airplane mode using Quick Settings, use these steps:
- Click the airplane and volume button in the system tray.
- Click the Airplane mode button to disable the feature.
Settings method
To disable Airplane mode from the "Network & internet" page, use these steps:
- Open Settings.
- Click on Network & internet.
- Turn off the Airplane mode toggle switch to enable the feature.
- (Optional) Turn off the Airplane mode toggle switch to disable the feature.
- Click the Airplane mode page from the right side.
- Turn off the Wi-Fi or Bluetooth toggle switch to disable Airplane mode for the features individually.
Lock screen method
To turn off Airplane mode from the Lock screen, use these steps:
- Start the device.
- Stay in the Lock screen sign-in page.
- Click the airplane icon in the bottom-right corner of the Lock screen.
- Turn off the Airplane mode toggle switch.
Command line method
To enable Airplane mode with commands, use these steps:
- Open Start.
- Search for Command Prompt, right-click the top result, and select the Run as administrator option.
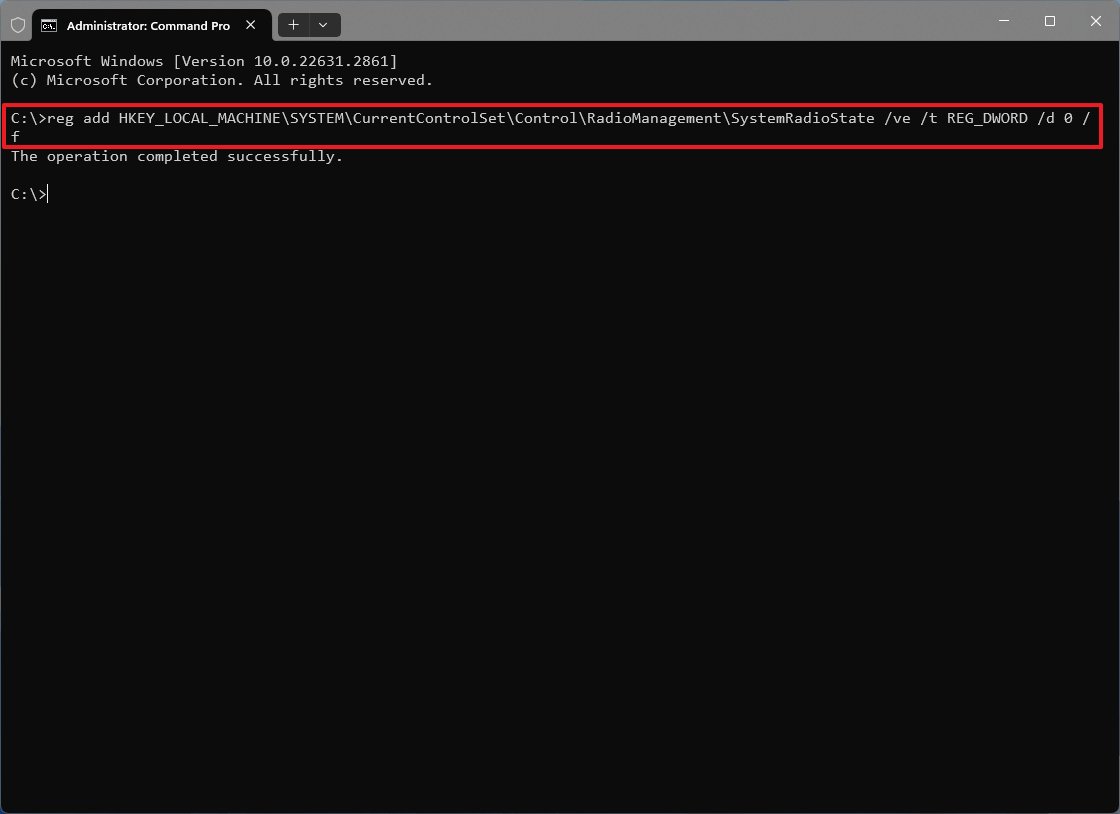
- Type the following command to disable Airplane mode on Windows 11 and press Enter: reg add HKEY_LOCAL_MACHINE\SYSTEM\CurrentControlSet\Control\RadioManagement\SystemRadioState /ve /t REG_DWORD /d 0 /f
- Restart your computer.
After you complete these steps, the wireless adapters will connect to the network and start transmitting data.
More resources
For more helpful articles, coverage, and answers to common questions about Windows 10 and Windows 11, visit the following resources:
- Windows 11 on Windows Central — All you need to know
- Windows 10 on Windows Central — All you need to know
On Windows 10, you can manage Airplane mode in multiple ways, and in this guide, I'll outline the steps to complete this configuration. Airplane mode is a feature that allows you to quickly disable wireless devices (such as Wi-Fi, Bluetooth, Near Field Communication (NFC), Global Positioning System (GPS), and cellular) with a single option. Usually, this feature comes in handy when you aboard a plane, or you're at a location that prohibits the use of radio signals.
The feature can also help save battery life since the wireless devices won't have to use additional power to scan, connect, and transmit signals to nearby networks or cellular towers.
Regardless of whether you are in a place that doesn't allow wireless signals or want to save batter, Windows 10 includes several ways to enable or disable Airplane mode using a dedicated key on the keyboard, options available on the desktop, Settings app, Lock screen, or even using Command Prompt.
In this how-to guide, I will walk you through the steps to manage Airplane mode on a laptop.
How to enable Airplane mode on Windows 10
On Windows 10, you can enable airplane mode in at least six ways, including Action Center, network flyout, Settings app, Lock screen, and Command Prompt.
Function key
Some portable computers include a dedicated hardware key to turn Airplane mode on or off. If so, press the "Function key + Airplane key" to turn on the feature.
Action Center side panel
To enable Airplane mode through Action Center on Windows 10, use these steps:
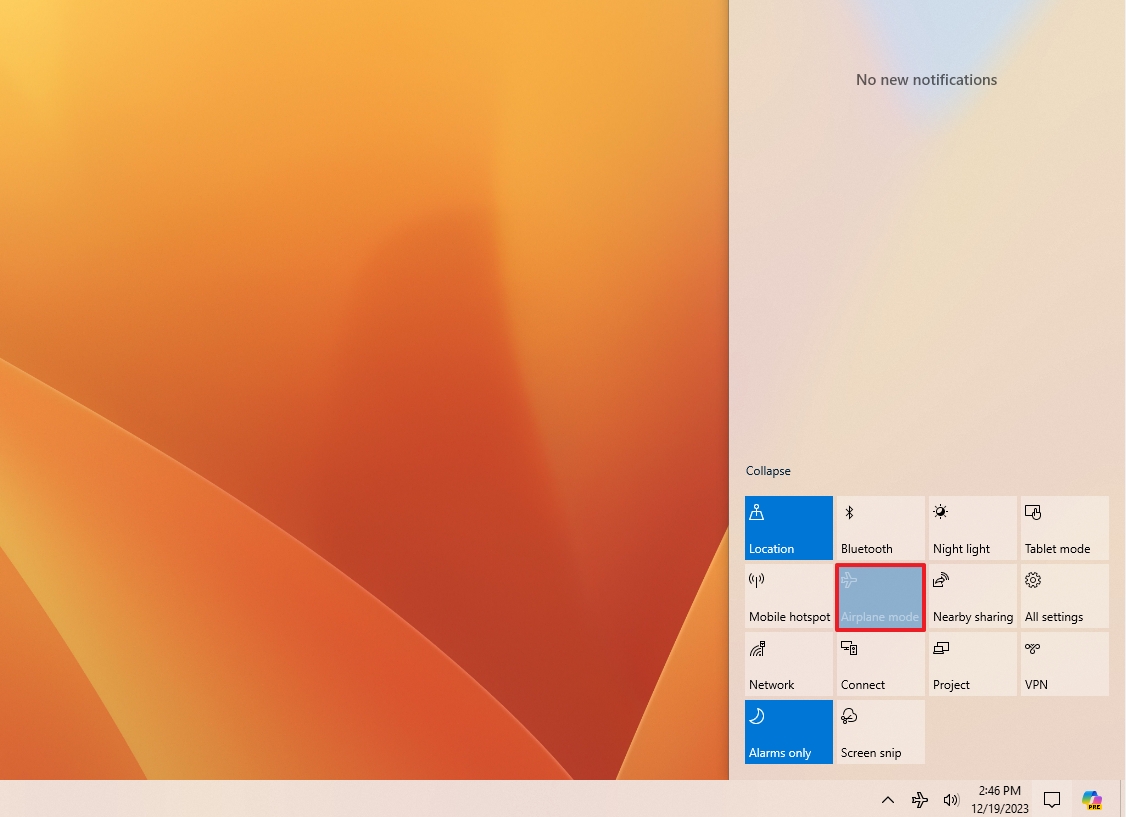
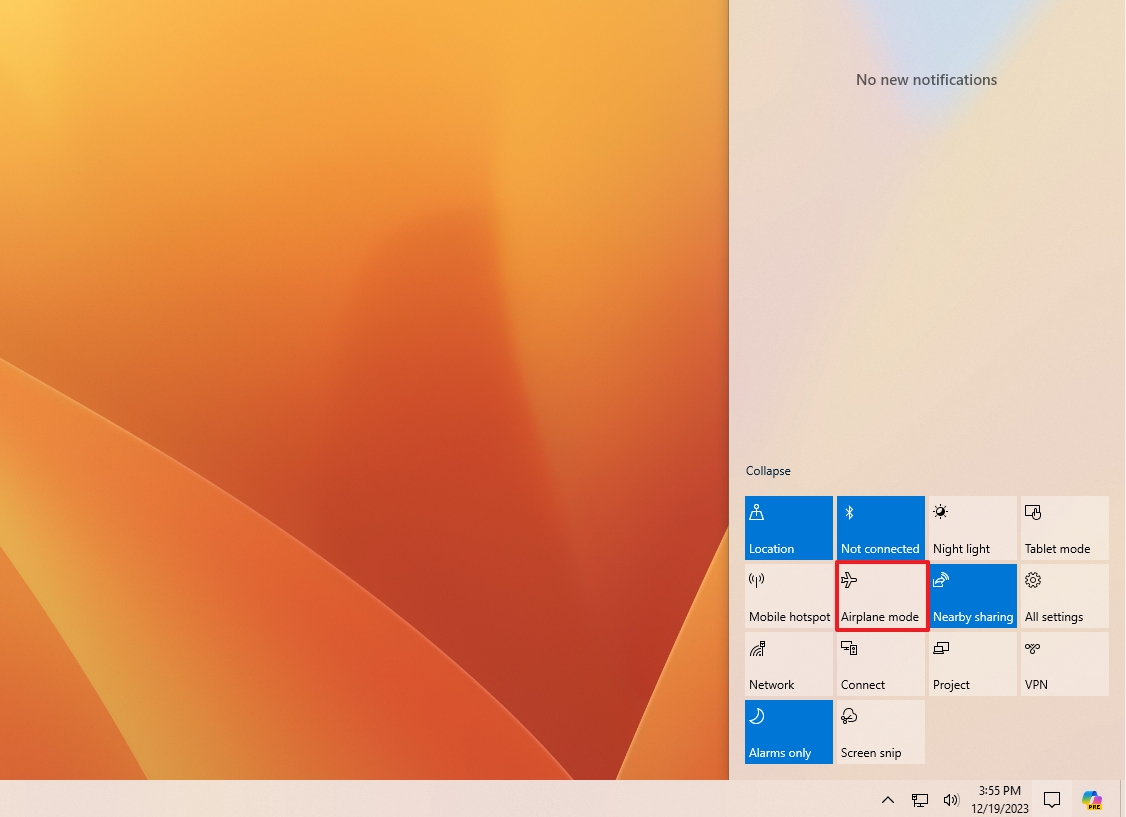
- Click the Action Center button.
- Quick note: The Action Center button is located on the bottom-right side of the screen. Alternatively, you can use the "Windows key + A" keyboard shortcut.
- Click the Expand option (if applicable).
- Click the Airplane mode button to turn on the feature.
Network side panel
To turn on the feature from the network side pane on Windows 10, use these steps:
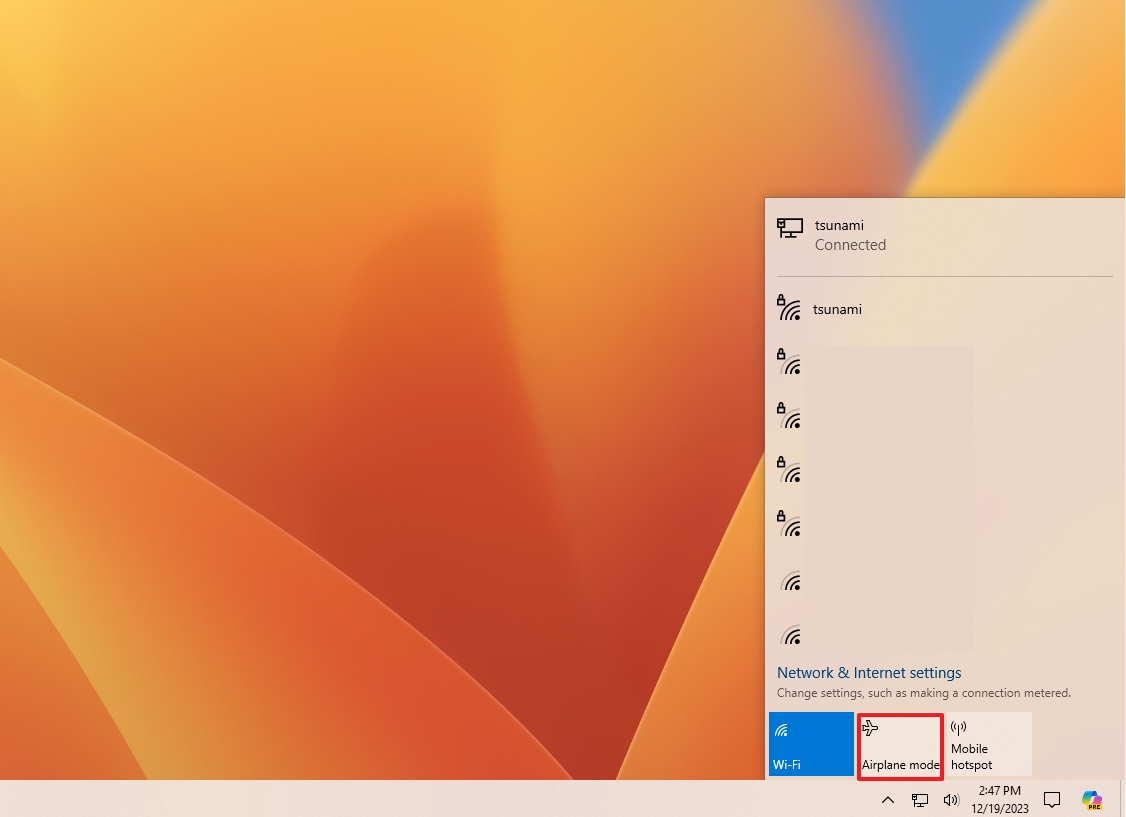
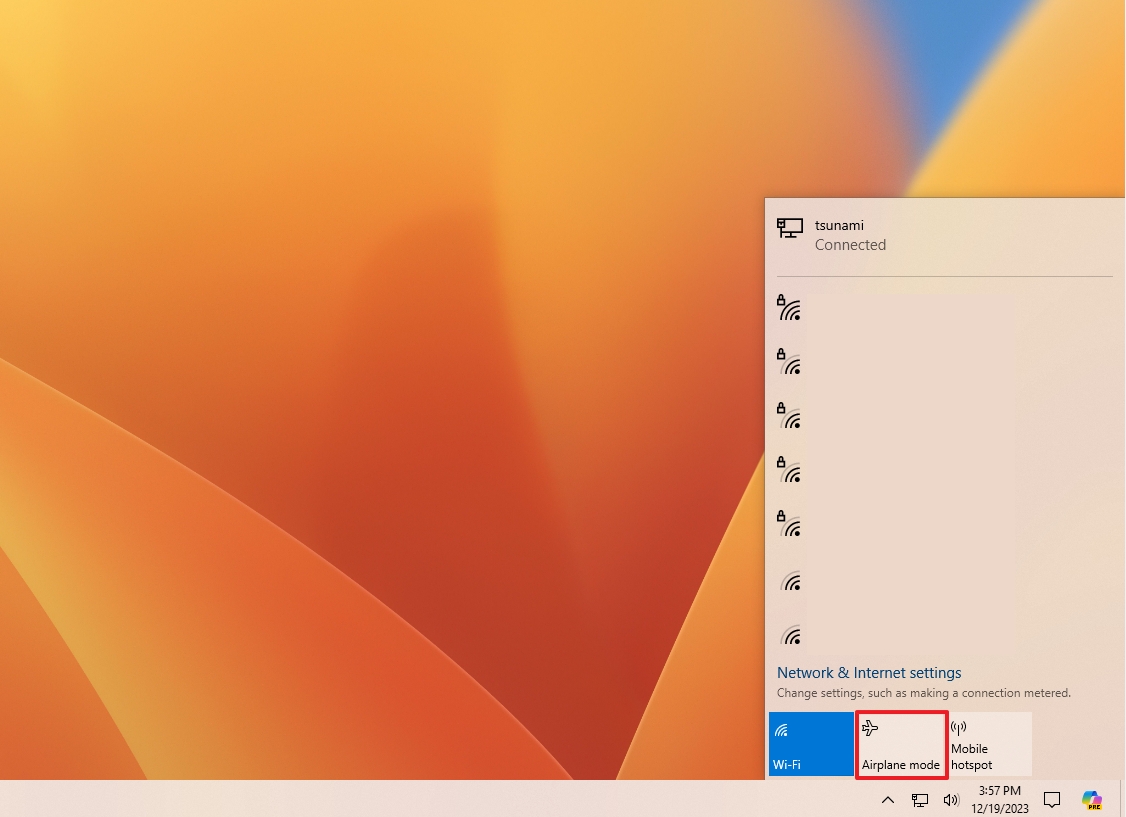
- Click the Network button in the notification area.
- Click the Airplane mode button to turn it on.
Settings app
To disable wireless communications through the Settings app, use these steps:
- Open Settings.
- Click on Network & Internet.
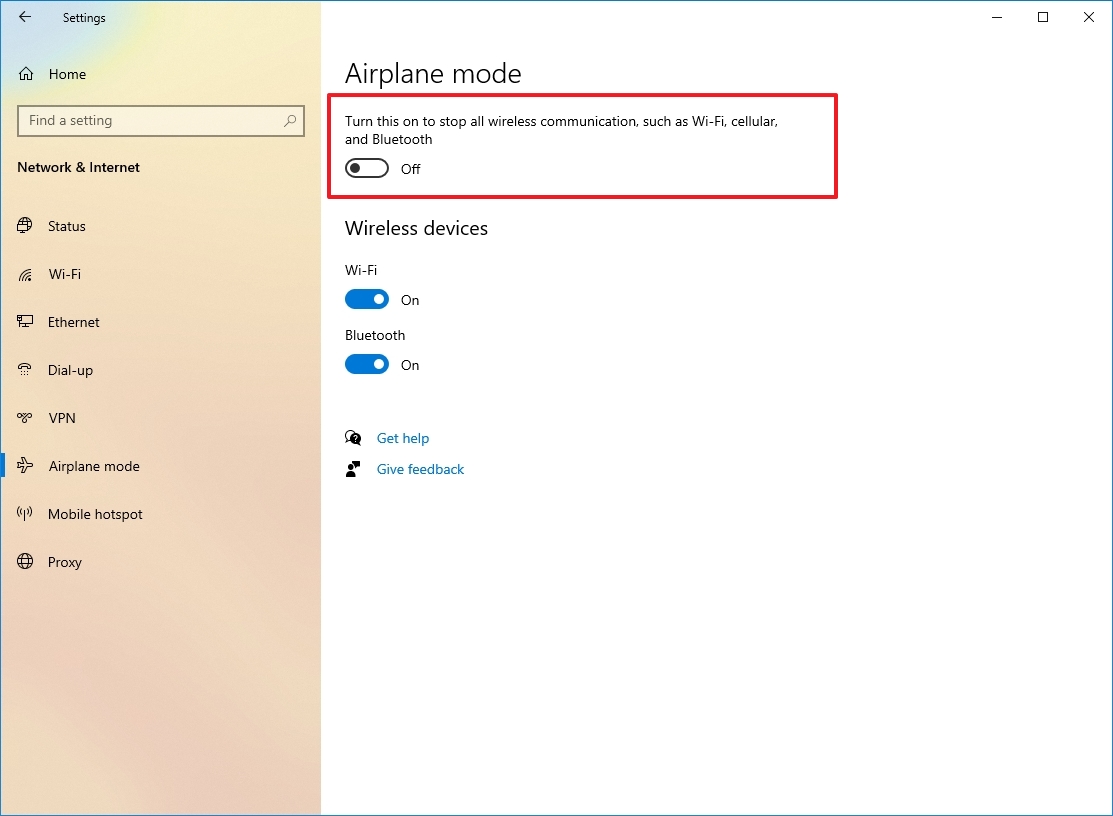
- Click on Airplane mode.
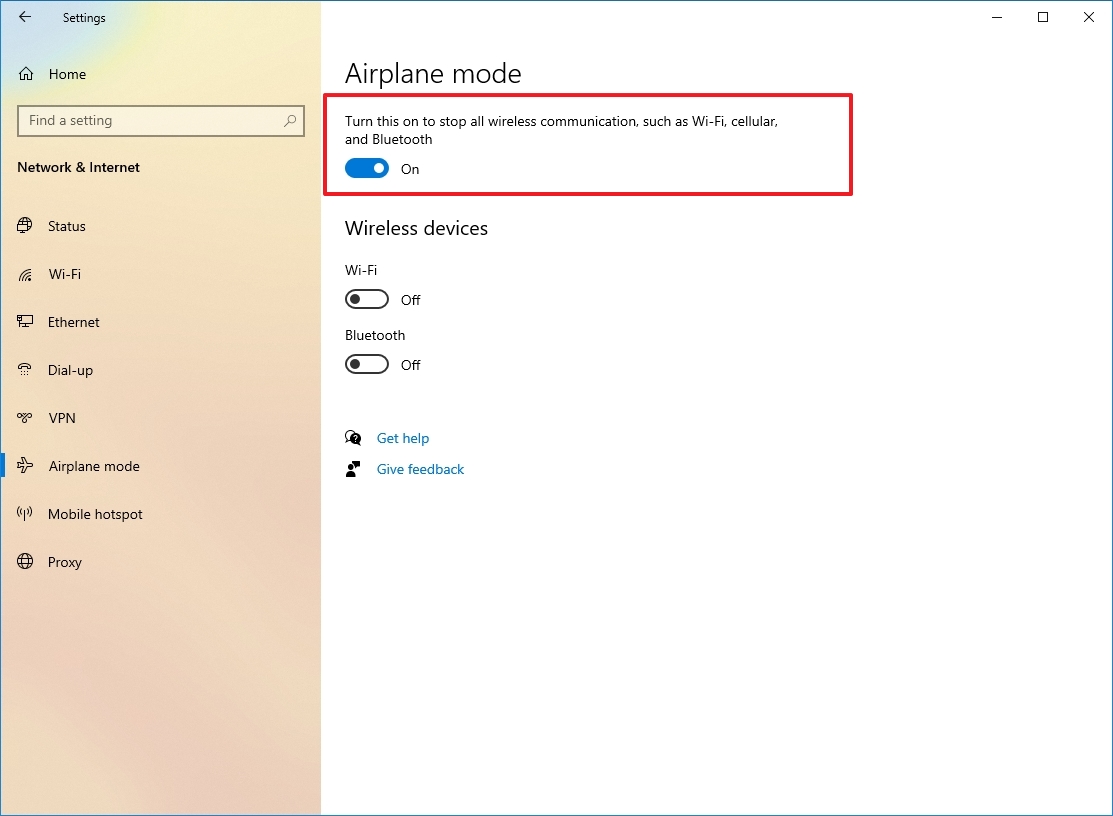
- Turn on the Airplane mode toggle switch.
- (Optional) Under the "Wireless devices" section, you can enable devices like Wi-Fi and Bluetooth separately.
Lock screen
To disable Wi-Fi, cellular, and Bluetooth connections from the Lock screen, use these steps:
- Start the computer.
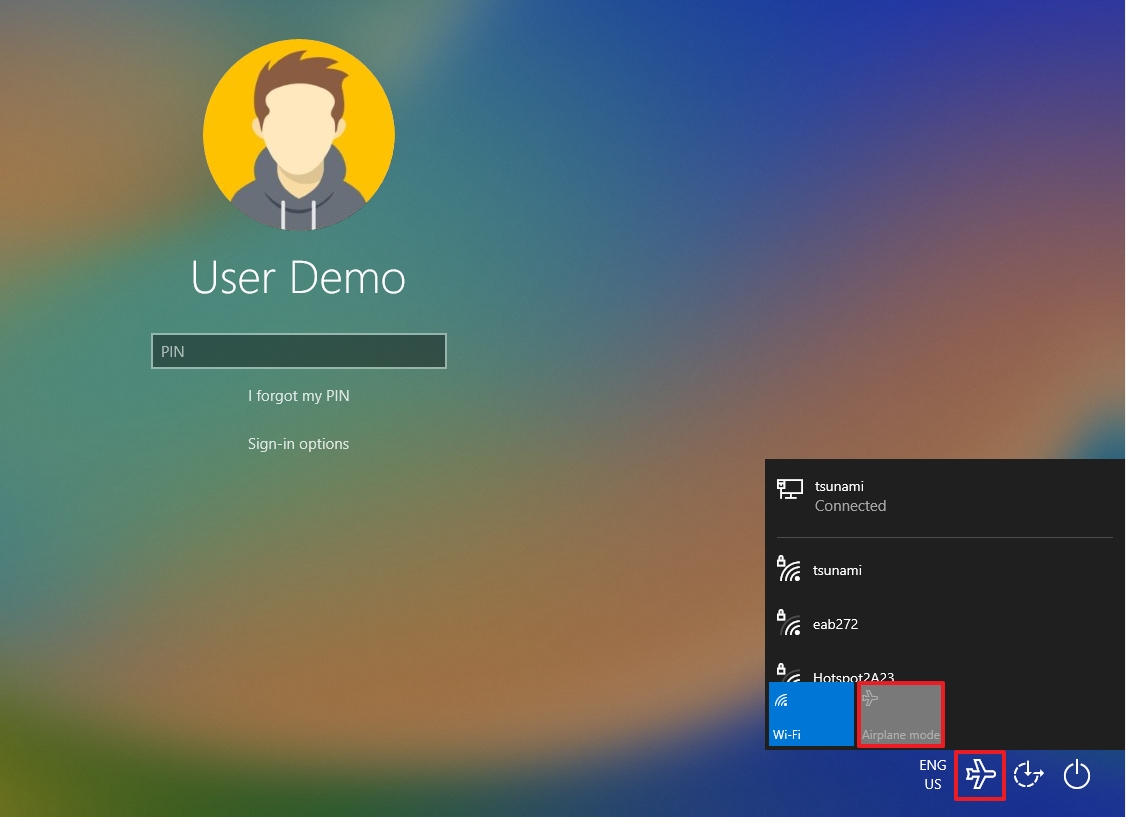
- Click the network icon in the bottom-right corner of the Lock screen.
- Turn on the Airplane mode toggle switch.
Command Prompt
Although there is no command-line tool to manage the Airplane mode states, you can still use Command Prompt to enable the feature by using a command to modify the Registry.
Warning: This is a friendly reminder that editing the Registry is risky and can cause irreversible damage to your installation if you don't do it correctly. It's recommended to make a full backup of your PC before proceeding.
To enable Airplane mode with Command Prompt, use these steps:
- Open Start.
- Search for Command Prompt, right-click the top result, and select the Run as administrator option.
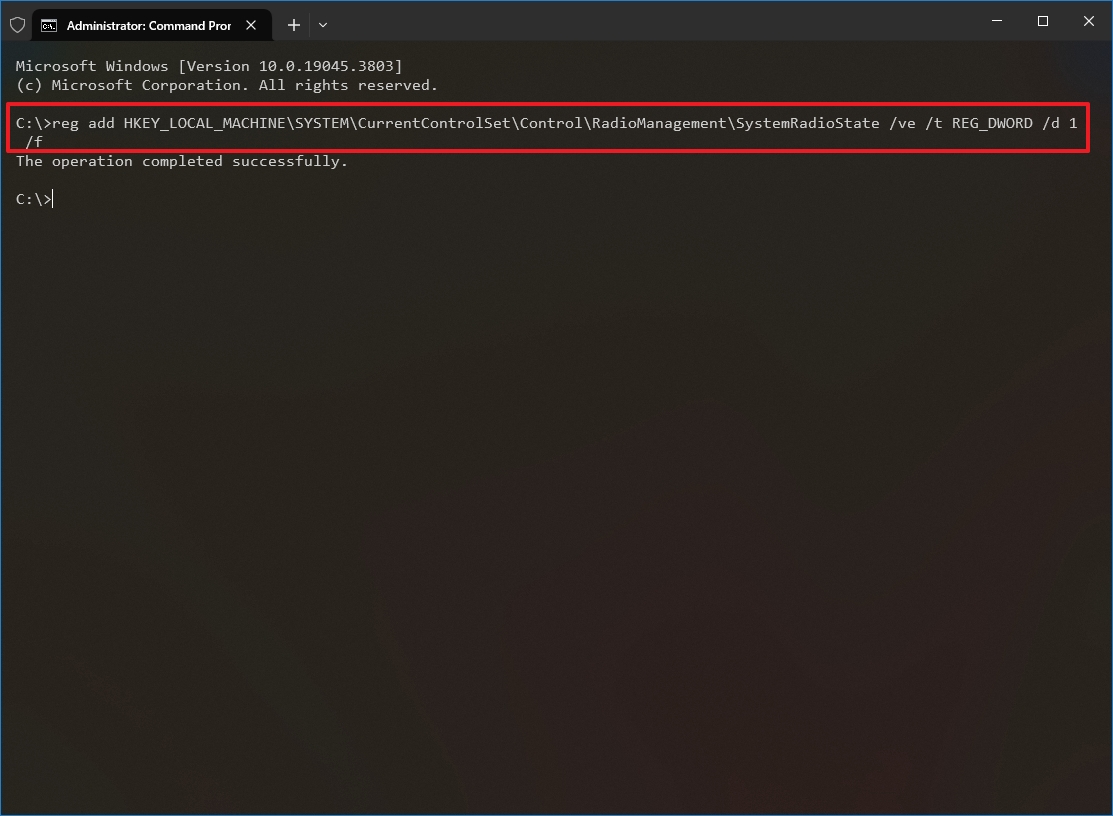
- Type the following command to enable Airplane mode and press Enter: reg add HKEY_LOCAL_MACHINE\SYSTEM\CurrentControlSet\Control\RadioManagement\SystemRadioState /ve /t REG_DWORD /d 1 /f
- Restart the computer.
Once you proceed with one of the methods outlined above, the Airplane mode feature will be enabled on Windows 10, turning off all wireless communications.
How to disable Airplane mode on Windows 10
You can turn off Airplane mode to enable all the wireless communications using the approach to turn on the feature.
Function key
If your device has a dedicated key, press the "Function key + Airplane key" to turn off the feature.
Action Center
To disable Airplane mode on Windows 10, use these steps:
- Click the Action Center button.
- Click the Expand option (if applicable).
- Click the Airplane mode button to turn off the feature.
Network side panel
To enable all wireless communications, use these steps:
- Click the Network button (with the airplane icon) in the notification area.
- Click the Airplane mode button turn it off.
Settings app
To disable Airplane mode to connect to the internet and use Bluetooth devices, follow these steps:
- Open Settings.
- Click on Network & Internet.
- Click on Airplane mode.
- Turn off the Airplane mode toggle switch.
Lock screen
To turn off Airplane mode from the Lock screen, use these steps:
- Start the device.
- Do not sign in.
- Click the network icon in the bottom-right corner of the Lock screen.
- Turn off the Airplane mode toggle switch.
Command Prompt
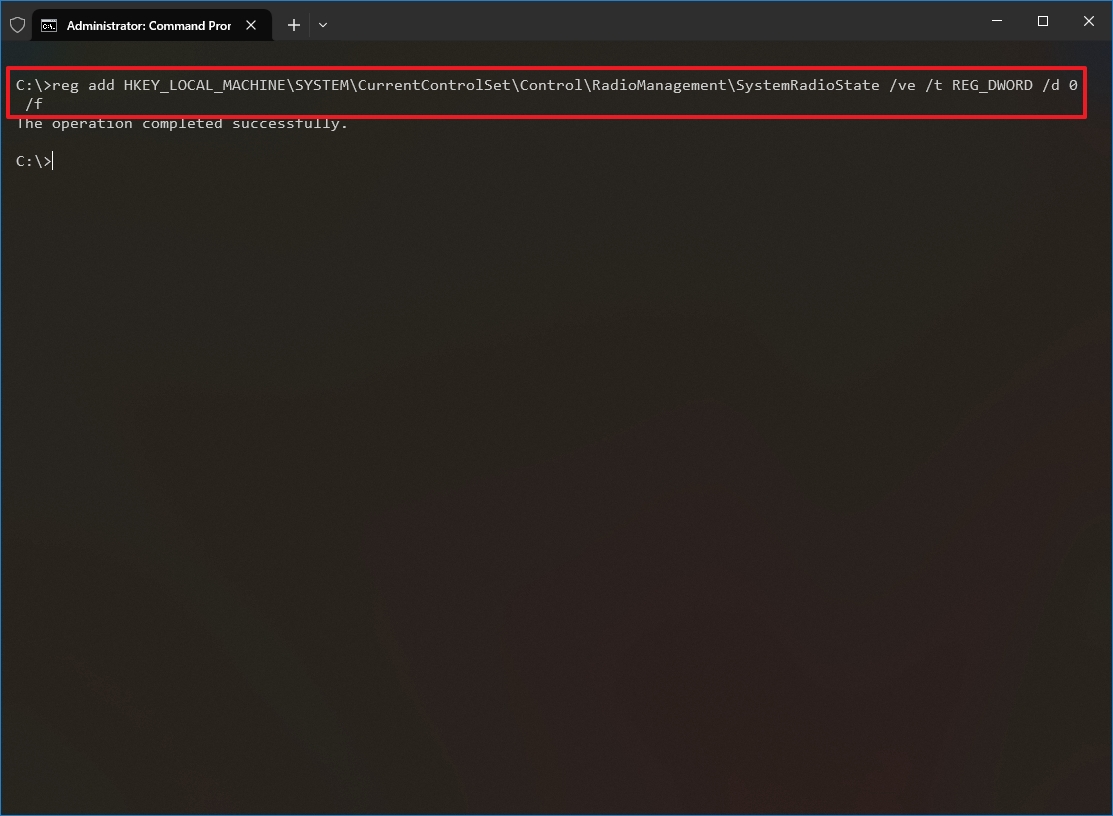
To re-enable Wi-Fi, cellular, and Bluetooth through Command Prompt, use these steps:
- Open Start.
- Search for Command Prompt, right-click the top result, and select the Run as administrator option.
- Type the following command to disable Airplane mode and press Enter: reg add HKEY_LOCAL_MACHINE\SYSTEM\CurrentControlSet\Control\RadioManagement\SystemRadioState /ve /t REG_DWORD /d 0 /f
- Restart the computer.
After you complete the steps, Airplane mode will be disabled, and all wireless devices will be enabled again on Windows 10.
How to fix Airplane mode problems on Windows 10
Although Airplane mode usually works as expected, you may sometimes encounter problems. For example, you may be unable to turn it on or off, or the feature may appear grayed out.
If you cannot get the feature to work, try these troubleshooting steps:
- Restart the computer and try to enable and disable the feature as outlined in the above steps.
- Shut down the device, unplug the peripherals and power cord, and wait for a minute. Then reconnect the power, start the device, and try enabling or disabling the feature. If Airplane mode works again, then continue reconnecting the remaining peripherals.
- If the Airplane mode option is grayed out, use the Command Prompt instructions outlined above to enable or disable the feature.
- Alternatively, you can also try resetting the network settings or updating the network adapter driver to get Airplane mode working again.
More resources
For more helpful articles, coverage, and answers to common questions about Windows 10 and Windows 11, visit the following resources:
- Windows 11 on Windows Central — All you need to know
- Windows 10 on Windows Central — All you need to know

Mauro Huculak has been a Windows How-To Expert contributor for WindowsCentral.com for nearly a decade and has over 22 years of combined experience in IT and technical writing. He holds various professional certifications from Microsoft, Cisco, VMware, and CompTIA and has been recognized as a Microsoft MVP for many years.
You must confirm your public display name before commenting
Please logout and then login again, you will then be prompted to enter your display name.
