How to change Recycle Bin settings in Windows 11 and Windows 10
Yes, you can modify the default to make the most out of the Recycle Bin, and here's how on Windows 11.
All the latest news, reviews, and guides for Windows and Xbox diehards.
You are now subscribed
Your newsletter sign-up was successful
On Windows 11, when you delete files, they are not immediately removed from the drive. Instead, they are marked for deletion and stored in the Recycle Bin in case you need them back.
The only caveat is that files in the Recycle Bin aren't kept forever. Depending on the drive (partition) size, the operating system will reserve a small percentage to store deleted files. As the space fills up, the system will begin removing the oldest files to free up space for files, limiting the number of files you can restore.
However, you can change the settings to allow the Recycle Bin to store more (or fewer) deleted files. You can even specify to skip the Recycle Bin altogether when removing a file, and you can enable a confirmation prompt to minimize the times you accidentally delete files.
In this how-to guide, I will explain how to manage your computer's Recycle Bin settings.
How to change Recycle Bin reserved storage on Windows 11
To change the amount of space Recycle Bin can use before deleting files completely, use these steps:
- Use the "Windows key + D" keyboard shortcut to see the desktop icons (if applicable).
- Quick tip: If you don't see any items, right-click the desktop, select "View," and click on "Show desktop icons."
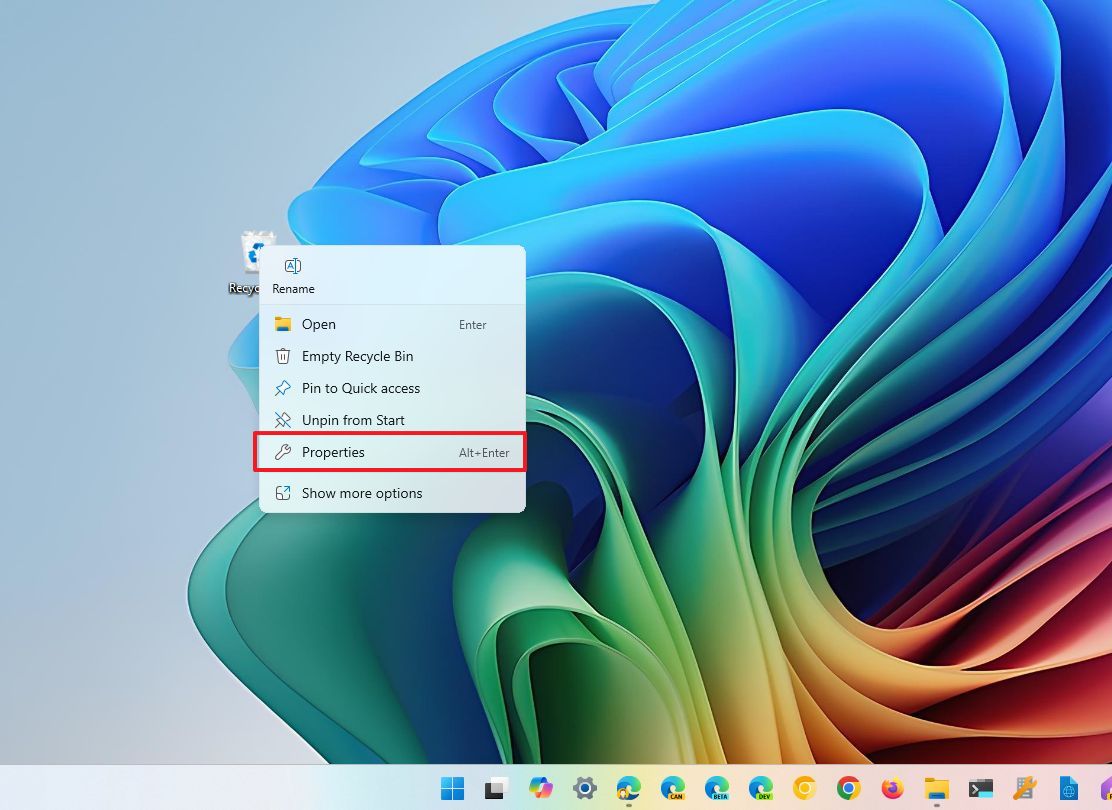
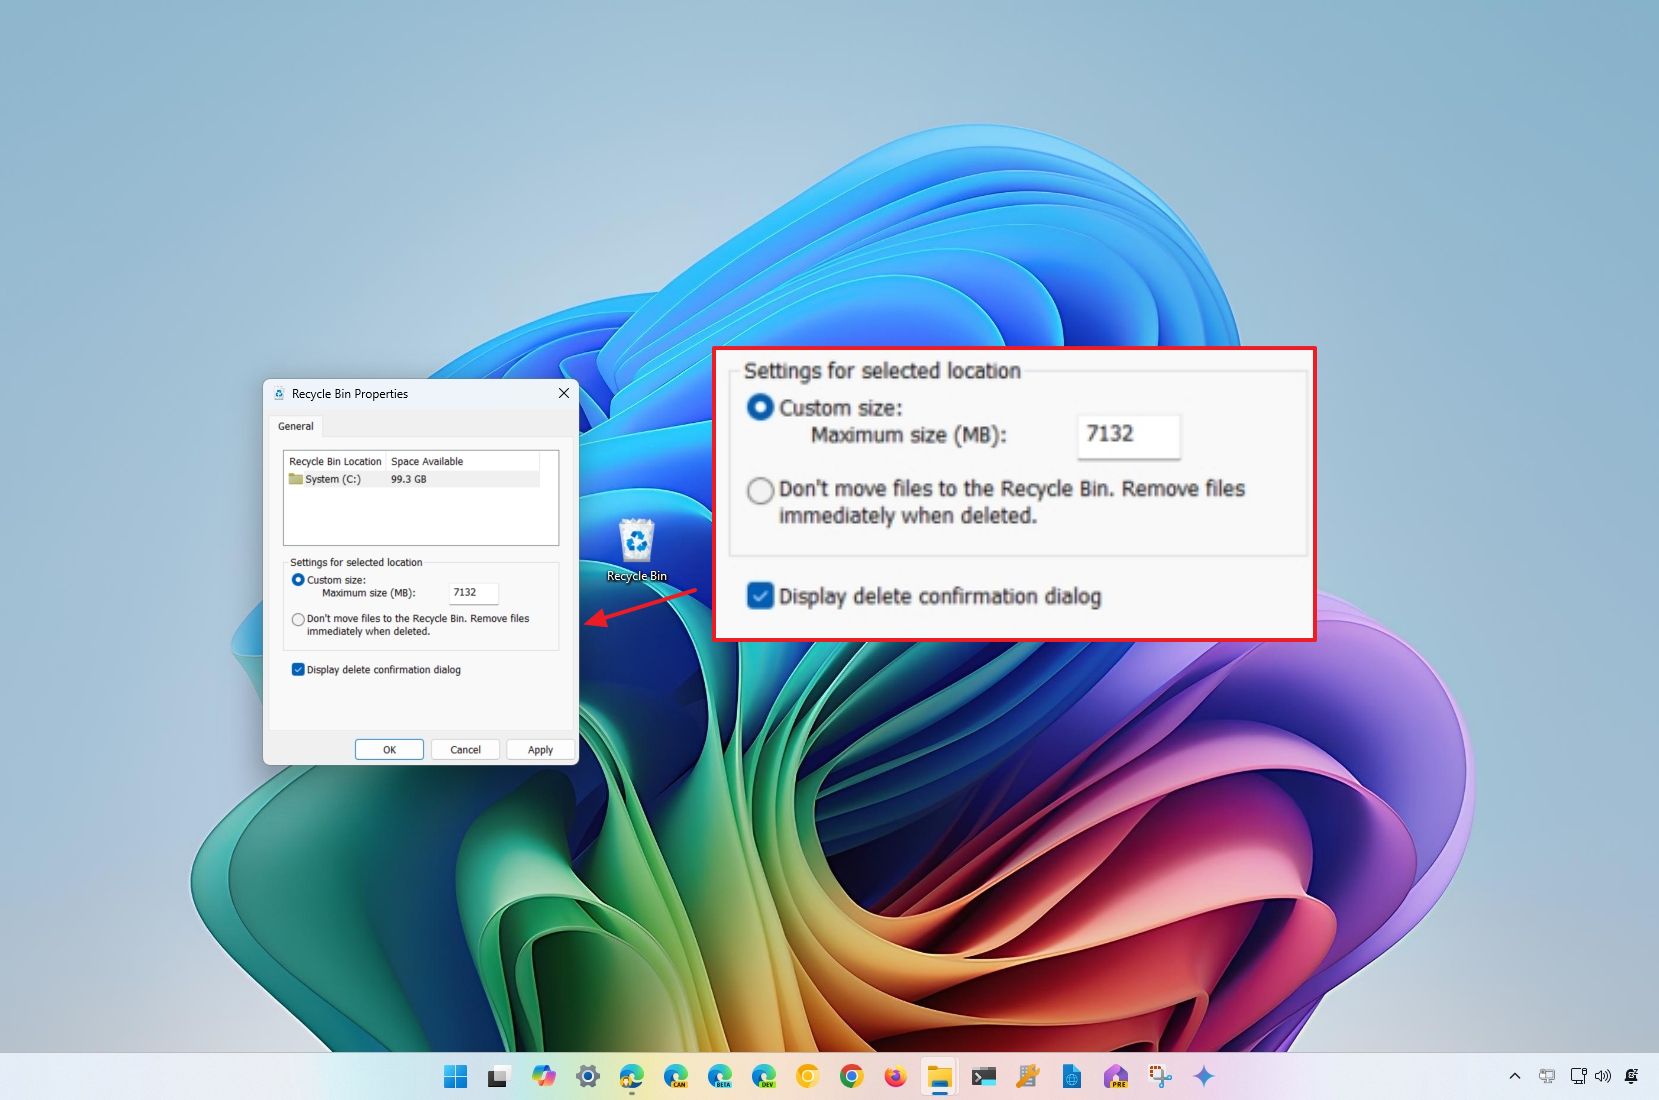
- Right-click the Recycle Bin icon and select the Properties option.
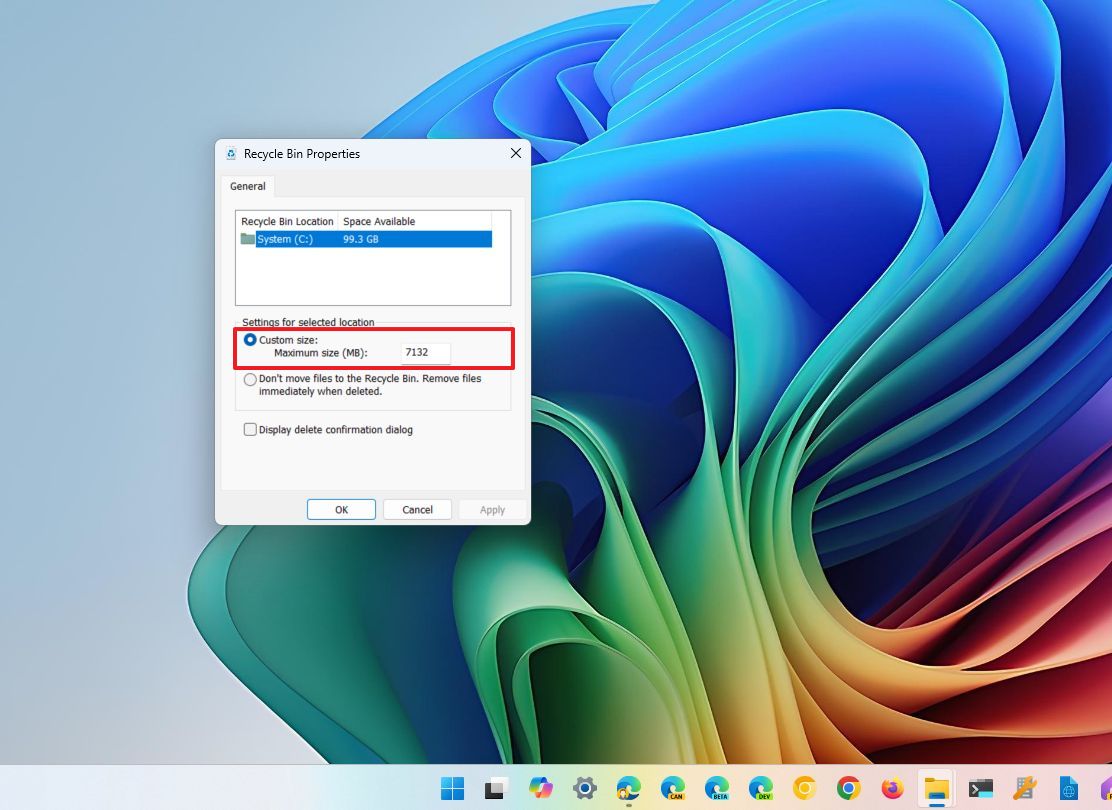
- Select the Local Disk (C:) location.
- Choose the Custom size option.
- Use the Maximum size setting to specify the amount of space the Recycle Bin should use in megabytes.
- Quick note: 1GB is equal to 1,024MB, which means if you want to reserve 50GB, you need to specify 51,200 megabytes.
- Click the Apply button.
- Click the OK button.
Once you complete the steps, the Recycle Bin will store deleted files until they reach the maximum capacity you specify. Then, it will start permanently deleting files from the oldest to the newest.
Although you can configure the Recycle Bin on the main drive and the secondary drive, removable drives do not support this feature.
All the latest news, reviews, and guides for Windows and Xbox diehards.
How to delete files without Recycle Bin on Windows 11
To skip the Recycle Bin to delete files immediately, use these steps:
- Use the Windows key + D keyboard shortcut to see the desktop icons.
- Quick tip: If you don't see any items, right-click the desktop, select "View," and click on "Show desktop icons."
- Right-click the Recycle Bin icon and select the Properties option.
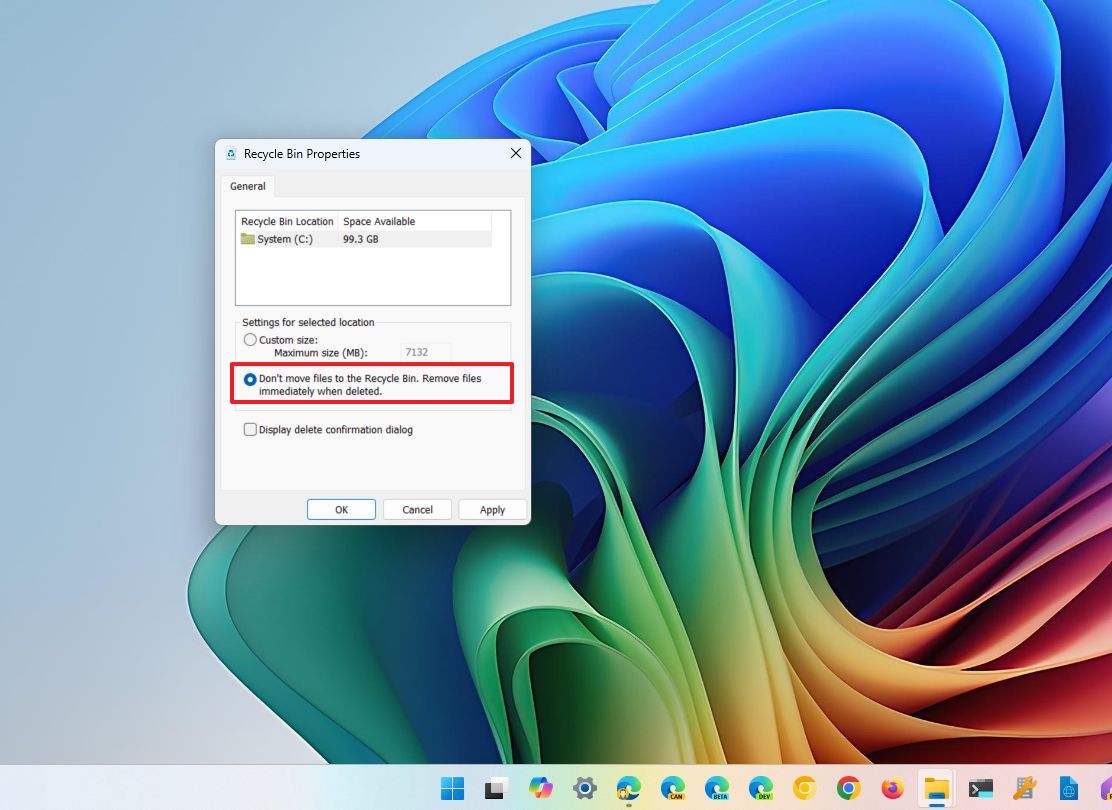
- Select the "Don't move files to the Recycle Bin. Remove files immediately when deleted" option.
- Click the Apply button.
- Click the OK button.
After you complete the steps, files that you delete manually will be removed immediately, skipping the Recycle Bin on Windows 11.
If you don't want to enable this feature, you can press the Shift key while deleting a file to skip the Recycle Bin.
How to display dialog before deleting files on Windows 11
Although you can always restore files from the Recycle Bin, if you usually delete files by accident, you can enable an option to display a confirmation dialog before deletion.
To disable confirmation before deleting files to the Recycle Bin, use these steps:
- Use the Windows key + D keyboard shortcut to see the desktop icons.Quick tip: If you don't see any items, right-click the desktop, select View, and click on Show desktop icons.
- Right-click the Recycle Bin icon and select the Properties option.
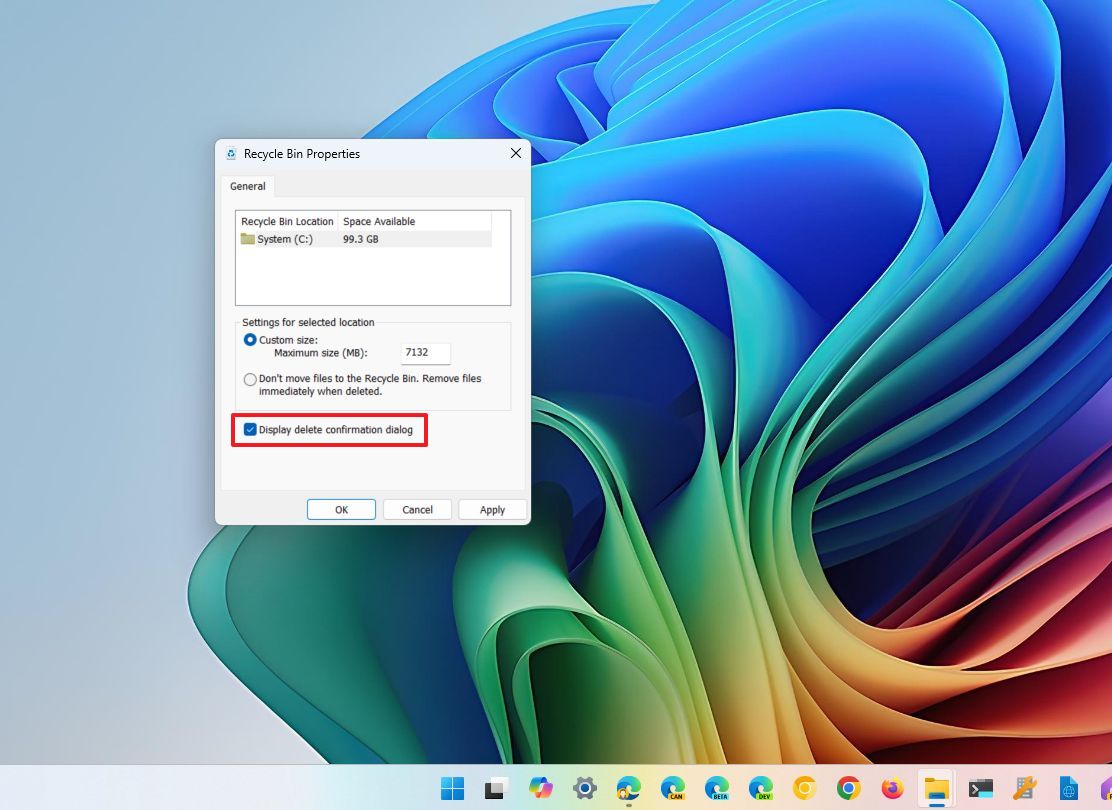
- Select the Display delete confirmation dialog option.
- Click the Apply button.
- Click the OK button.
Once you complete the steps, you'll see a prompt before sending the file to the Recycle Bin when deleting a file.
More resources
For more helpful articles, coverage, and answers to common questions about Windows 10 and Windows 11, visit the following resources:
- Windows 11 on Windows Central — All you need to know
- Windows 10 on Windows Central — All you need to know
How to adjust the maximum storage usage for Recycle Bin
If you want to increase or decrease the amount of storage Recycle Bin can use to keep deleted files, use these steps:
- Use the Windows + D keyboard shortcut to view the desktop.
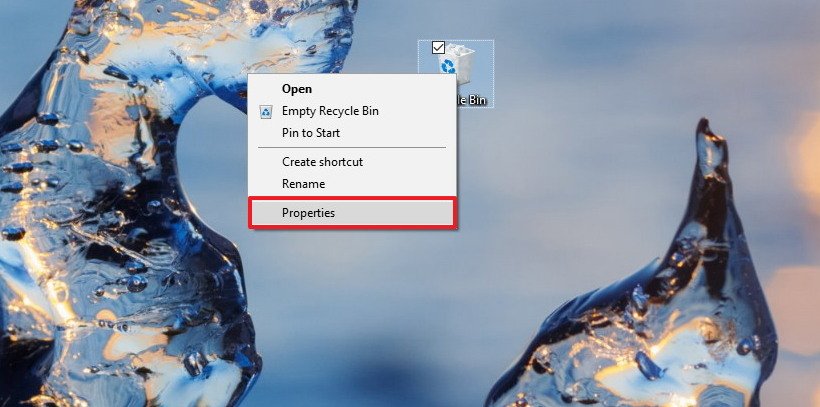
- Right-click the Recycle Bin icon, and select the Properties option. Quick Tip: If you can't find the icon in the desktop, you can control the desktop icons on Settings > Personalization > Themes, and clicking the Desktop icon settings option under the "Related Settings" section.
- If you have multiple partitions you want to configure, select the Recycle Bin location you want to configure. For example, Local Disk (C:), which is the drive where Windows 10 is installed.
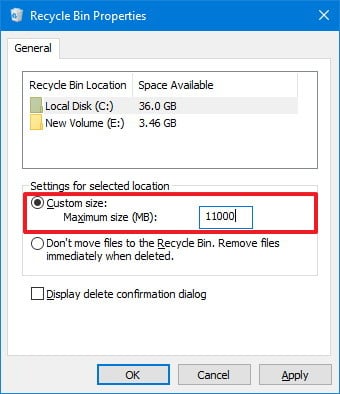
- Under the "Settings for selected location" section, select Custom size option.
- In the "Maximum size (MB)" field, specify the maximum hard drive space in megabytes that Recycle Bin can use on the particular partition. For example, if you have a 500GB drive, and you want Recycle Bin to use 50GB of space, then you need to specify 51200 megabytes (because 1GB is equal to 1,024MB).
- Click the Apply button.
- Click the OK Button.
Once you've completed the steps, the Recycle Bin will be able to keep more or fewer files from a particular location depending on your configuration.
While each partition configured on your device has its own Recycle Bin, removable drives like SD cards and USB flash drives are not supported, which means that as you delete files on those portable devices, they'll be erased permanently.
How to delete files immediately bypassing Recycle Bin
If you work with files that are not important, instead of saving them in the Recycle Bin, you can set an option to remove files immediately using these steps.
- Use the Windows + D keyboard shortcut to view the desktop.
- Right-click the Recycle Bin icon, and select the Properties option.
- If you have multiple hard drives, choose the Recycle Bin location that you want to configure.
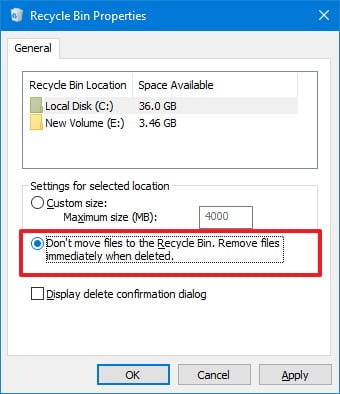
- Under the "Settings for selected location" section, select the Don't move files to the Recycle Bin. Remove files immediately when deleted option.
- Click the Apply button.
- Click the OK Button.
After completing the steps, files you don't need anymore will delete immediately skipping the Recycle Bin.
How to display confirmation before deleting files on Windows 10
If you're one of those users who usually push the delete button on files by accident, even though, you can always restore them from the Recycle Bin. It's possible to display a confirmation dialog before deletion.
To enable a confirmation dialog before moving a file to the Recycle Bin, do the following:
- Use the Windows + D keyboard shortcut to view the desktop.
- Right-click the Recycle Bin icon, and select the Properties option.
- Check the Display delete confirmation dialog option.
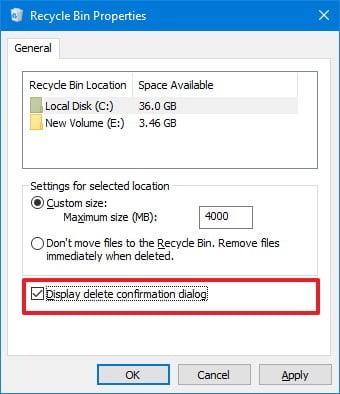
- Click the Apply button.
- Click the OK button.
Once you've completed the steps, every time you try to delete a file, you'll get a confirmation dialog before sending the file to the Recycle Bin.

Mauro Huculak has been a Windows How-To Expert contributor for WindowsCentral.com for nearly a decade and has over 22 years of combined experience in IT and technical writing. He holds various professional certifications from Microsoft, Cisco, VMware, and CompTIA and has been recognized as a Microsoft MVP for many years.
You must confirm your public display name before commenting
Please logout and then login again, you will then be prompted to enter your display name.
